
-
Welcome to Talking Time's third iteration! If you would like to register for an account, or have already registered but have not yet been confirmed, please read the following:
- The CAPTCHA key's answer is "Percy"
- Once you've completed the registration process please email us from the email you used for registration at percyreghelper@gmail.com and include the username you used for registration
Once you have completed these steps, Moderation Staff will be able to get your account approved.
Through the looking glass? Let's Play The Legend of Zelda: A Link to the Past!
Back to Let's Play
< 1 2 3 4 5 6 7 8 9 10 11 12 13 14 15 16 >
< 1 2 3 4 5 6 7 8 9 10 11 12 13 14 15 16 >
|
#31
 05-06-2008, 09:04 PM
|
|||
|
|||
|
Quote:
You die really quickly and it takes charged sword strikes to even damage Ganon. |


|
#33
05-06-2008, 09:06 PM
|
|||
|
|||
|
Did they rob you of Experience too, or was that just other, horrible blights in the series.
|
|
#34
05-06-2008, 09:09 PM
|
|||
|
|||
|
Quote:
|
|
#35
05-06-2008, 09:10 PM
|
|||
|
|||
|
I don't think so. The experience sappers were generally those bouncing/skipping enemies.
I do know the floaty skulls give your 50 exp. a pop if you hit them for a very long time. --- Loving the run through of LTTP! I'm excited for more installments. |
|
#36
05-06-2008, 09:11 PM
|
|||
|
|||
|
As am I, but I think I've spoiled the ending.
SRY GUYS! IT WAS AN ACCIDENT! |
|
#37
05-06-2008, 09:16 PM
|
|||
|
|||
|
Quote:
|
|
#38
05-06-2008, 11:18 PM
|
|||
|
|||
|
Man, those last few posts made me realize how lucky I am that I didn't play the second game. Speaking of which, time for yet another installment.
All righty, let's get back on track. Last time, we took out the Armos Knights and secured the Pendant of Courage, and then learned of the location of the legendary Master Sword from the sage Sahasrahla, as well as the other pendants needed to unlock its power.  The Pegasus Boots Sahasrahla gave me are a huge help - not only do they effectively cut my travelling time in half, but it gives me a means to run through enemies instead of having to walk around them. Handy!  And in no time flat, I find myself at my next destination in the desert. Though I have to wonder about that octopus looking shape in that sand. Is it a warning? A sign? A message?  However, that's not all the desert has in store, as vultures and sand men infest the place like rats at a Pizza Hut. They also hit you pretty hard, so stay on your toes.  Unfortunately, one thing Sahaslrahla neglected to mention was that we need a means to decypher this inscription first. However, since I don't remember where exactly you clue into this information, and since I don't feel like digging it up anyway, I'll just out and say that we need to find the Book of Mudora to translate the thing. And where else do you find a book than the library?  Though maybe it wasn't such a good idea to take a shortcut through the castle...  Yeah, it was definitely a bad idea.  Anyway, here we are at the Kakariko Public Library, the only library in all of Hyrule. Though you have to wonder what kind of state the country's in if the only library lies a bit of a ways out of the village.  One thing I'd like to know is why there aren't any librarians here. Was there some mass firing? Is today a holiday? No one knows. Anyway, it's back to the Desert Palace to decypher some runes. |
|
#39
05-06-2008, 11:20 PM
|
|||
|
|||
|
Man, Link translated that slab in almost no time flat. I wonder if Nich would like to get his hands on a copy of the book? In any case, time to pray so that the God's will get off their asses and move these stones.  Our mothers who art in the Sacred Realm, hallowed be thy names. Thy realm come, thy will be done in Hyrule as it is in the Sacred Realm...  And there we go. One Desert Palace, coming right up.  As it's name suggests, it's a palace in the desert. What it doesn't tell you, however, is that it's booby-trapped to the brim with one of the worst enemies ever: the Beamos statue.  Unlike the Bubbles in the last dungeon, these guys can't be killed. Not by arrows, not by bombs, not by anything. What's worse is that they can shoot you from across the room at any given moment, so if you're picking up pots, tough luck. And they're unblockable, too - even with the highest shield and tunic upgrades, they can still hurt you for one heart and knock you back a bit. They're frustrating to deal with because of this, as you can often find them in rooms with a lot of heavy lifting or trick floors.  Anyway, the first order of business is to pick up this key, which locks the door to the Big Key we so desperately need. Originally it was on top of a torch, but that's nothing a good charge can't solve. Now to find the Big Key.  Be careful though. As I said before, those Beamos statues are assholes.  Anyway, five minutes in, and we already get the Big Key. Pretty easy, huh?  Well, maybe it would be if it weren't for those bloody Beamos statues. Those jerks ruin everything, even screencaps. |
|
#40
05-06-2008, 11:21 PM
|
|||
|
|||
 Gloves > Bracelet. Anyway, now that we've got the treasure, it's time to kill the boss. Time to blow this popsicle stand.  First order of business is to head out the left entrance, as the temple boss isn't in the main building this time around. You know how your professor's office is always in a different building than the lecture? Sort of the same thing, except I guess you don't have to worry about getting mauled on your way there. At least, I hope you don't.  Of course, along the way we run into a heart piece which we can't pick up because of the challenge restrictions. It's tempting, but we have to get back on track unfortunately.  By the way, remember those gloves we got? This is their big power - to pick up rocks 'n' stuff. Not very impressive, but it gets the job done.  However, this time around the temple's playing for keeps, as even the floor is out to get me at this point.  What's worse is that the Beamos statues are out in force as well. If you thought just one of these bastards was bad news, imagine dealing with two or even three.  Well this is embarrassing.  I know I'm probably overstating this, but if back-to-back WarMECHs was FFI's version of the cruelest joke imaginable, this would be LttP's. Honestly, they're throwing three invincible enemies at you that can take off an entire heart in a room where you have to remain stationary to pick up pots in your way at a time when you have at most five or six of them. If that isn't cruel, I don't know what is. |
|
#41
05-06-2008, 11:23 PM
|
|||
|
|||
 In any case, now that that's over with, it's time to take on the boss of this here dungeon. First we grab the key, and then... what the?  That's strange, it's a dead-end. I wonder what those torches are for.  Huh. Fancy that, a trick wall. Anyway, the moment you've all been waiting for:  That's right, it's a boss fight. It's 3 on 1 this time around, and the enemy has no obvious weaknesses. What to do, what to do...  If your timing is good, the bow is a pretty good way to go in this fight. Against the Lanmolas, the bow deals roughly twice as much damage as the sword, and you don't have to worry about the balls of dust they kick up when they surface since you don't have to get in close. It makes what would normally be a brutal fight surprisingly tame and easy. 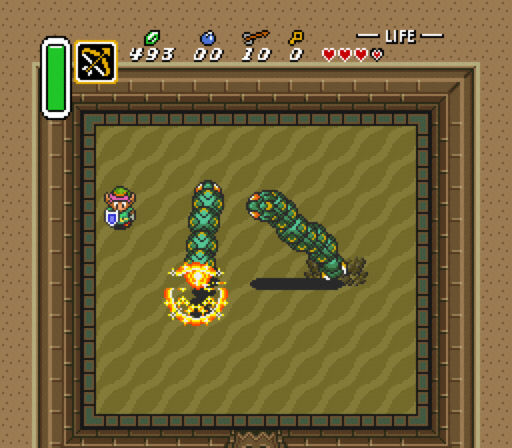 Not too long after the last screencap, the Lanmolas are down for the count, and the Pendant of Power is at last mine.  Two down, one to go. It was a bit short this time, but I'm starting to feel a bit tired so I cut it a bit short in places. Anyway, I guess this would be a good time to call it a night, so see ya next time guys. Next time: The Tower of Hera and the Other World. Be there! |
|
#42
05-07-2008, 12:29 AM
|
|||
|
|||
|
Quote:
|
|
#43
05-07-2008, 12:36 AM
|
|||
|
|||
|
Quote:
|
|
#46
05-07-2008, 10:54 AM
|
|||
|
|||
|
Quote:
>_>  "It's so... bad." |
|
#47
05-07-2008, 01:27 PM
|
|||
|
|||
|
Time for another update. We're almost to the tough parts now.
 Now that we have the second pendant, it's time to track down the third one now. According to the markings Sahasrahla made on our map, it should be located somewhere north of the Sanctuary, on Death Mountain. Sounds ominous, doesn't it? But first, we have to find a way up there. And there's only one place that remotely fits that bill: The Power Glove we picked up earlier comes in handy here, letting us pick up an otherwise unmovable stone. Time to head up the mountain.  Meet the lost old man. He lost his lamp, so he needs me to take him up the mountain. Though one must wonder how long he's been standing in that darkness.  Though you can't really blame him for not moving around much, what with these pits and all. In any case, as we move through the caves he tells us more about Agahnim and how he's been collecting the daughters elderly men such as himself. I wonder...  Despite the crappy screenshot, I now have access to the ever-useful Magic Mirror. It may not be much right now (in fact, I can't even use it yet), but once the game starts to pick up the pace it becomes vital to survival.  By the way, one of the other benefits to helping the old man is that it creates a save point on the mountain for you, so if you ever have to head back up here you can quit and reload. How nice of him.  His household's also a neat little shortcut as well.  Anyway, now that we've reached the top, the rock slide suddenly stops and we're treated to a rather serene environment. I guess it's a nice place when you don't have to worry about being stoned to death. |
|
#48
05-07-2008, 01:28 PM
|
|||
|
|||
 One thing of note is this... thing. What is it? What does it do? There's only one way to find out - step on it. *Woowoowooowaahwaahwoowoowoo*  !!!!!!  Silly rabbit, Moon Pearls are for kids. Wait, Moon Pearls?  Well, according to this comedy duo I've managed to cross over to the dark world, where I'm turned into what reflects my inner being. Perhaps my... persona? Another thing of note is the mention of a Moon Pearl in the tower above us, which protects us against the dark world's effects. Better grab it when we head there later.  In any case, thanks to that mirror the old man lent us, we find a way back to the light world. Not only that, but we've found a way to climb that otherwise impassible ledge earlier. Sweetness! Though we're not picking up that heart piece, unfortunately. Sad, I know.  In any case, we came here to grab a pendant, not reenact an episode from Sliders. Onward ho to the Tower of Hera! |
|
#49
05-07-2008, 01:29 PM
|
|||
|
|||
 Honestly, this looks more complicated than it actually is. It's not like in one of Oracle of Age's dungeons where you have to think twelve steps ahead with these things, so don't fret too much.  See? Already got the first key.  Though I guess you do have to be careful not to lock yourself down there. Oh well, if you ever get really stuck, you can always use the Magic Mirror to warp yourself back to the entrance. Handy, huh?  In any case, using the key brings us down here where we get attacks by yet another set of floor tiles. However, this time around we have to wait it out until the door opens, so we get to see the mark it left behind. Moving on, we find the most important treasure of the dungeon:  The Big Key! And so early, too.  Now that we have the Big Key, it's time to climb our way to the top. However, unlike before, it's pretty much a straight run to the top, so the dungeon goes by pretty quickly.  This room here? This is the entire floor, and the same size as the floor above and beneath it. You don't get to see this level of accuracy in later Zelda games, I tell you what.  But before we can climb to the top, we should make sure to pick up the treasure as well. First we hit the switch...  Then we drop down a floor to get to the chest. And lo and behold, it's the Moon Pearl those two outside mentioned. I'm not sure if we'll be going back to that other world anytime soon, but let's hold onto it just in case.  Now that we've gotten the Moon Pearl, it's time to get what we really came for... |
|
#50
05-07-2008, 01:31 PM
|
|||
|
|||
 To this day, I simply cannot express how much I love how this boss fight starts out, with the brief moment of silence before the explosion of sound when you reach the top. It's very dramatic.  Of note is the fact you can leave any time during the fight. Unlike the last two battles, you aren't locked in with the beast so you can back out at any time, which makes for an interesting psych-out on the players. Should you fight him right now? Are you a bad enough dude to jump down there?  Even if you do jump down, you can still always jump off the side for a tactical retreat if things get too hard for you. Though that's provided you can last that long, since the Moldorm will probably knock you off himself before it even gets to that point.  Regardless, the Moldorm isn't too hard of a battle, as the only real danger is falling to the floors below. He goes down quickly enough, and the final pendant is mine at last! Just one more destination before we can face off Agahnim. That's right, ladies and gents. It's time to get the Master Sword.  However, we have to find a way off the mountain first, and this is the way off it.  Ahh, it feels good to be back on solid ground, doesn't it?  And here we are, the Lost Woods. The Master Sword is within our reach, I can almost taste it. |
|
#51
05-07-2008, 01:33 PM
|
|||
|
|||
 Along the way, there's a Magic Mushroom ripe for the plucking, but like everything else useful we don't necessarily need it. A shame, since the Magic Powder you make from it is hella useful.  ......  First fake Master Swords, now bandits? I hope we get there soon.  There we go. The sacred grove where the sword lives.   This is it. Are you excited? I am. And now for the most significant and memorable scene in the entire series' history:   Booya. Sahasrahla contacts us once we pull the sword from the pedestal, telling us that we should go and kill Agahnim now. But along the way, something dreadful happens...  Next time: Raising the stakes! Link vs. Agahnim! |
|
#52
05-07-2008, 01:49 PM
|
|||
|
|||
|
Already fighting the boss, seems pretty short this game or is there a whole other game to play in the dark world?
|
|
#55
05-07-2008, 01:53 PM
|
|||
|
|||
|
Quote:
 EDIT: Looking around, there are seriously way too many threads going on right now, so I'm going to wait for some of the earlier ones to finish up before I start this one up again. Sorry guys. |
|
#56
05-07-2008, 02:15 PM
|
|||
|
|||
|
Quote:
Get ready for one of the biggest plot points in gaming history. |
|
#57
05-07-2008, 02:31 PM
|
|||
|
|||
|
I like how your avatar lets us know when an update is going to happen.
|
|
#58
05-07-2008, 02:33 PM
|
|||
|
|||
|
Quote:

|
|
#60
05-07-2008, 03:01 PM
|
|||
|
|||
|
This thread is making me pine for this Zelda of yore, stuffed to the brim with no less than thirteen complete dungeons to conquer.
God they spoiled us. They spoiled us so bad. |