
-
Welcome to Talking Time's third iteration! If you would like to register for an account, or have already registered but have not yet been confirmed, please read the following:
- The CAPTCHA key's answer is "Percy"
- Once you've completed the registration process please email us from the email you used for registration at percyreghelper@gmail.com and include the username you used for registration
Once you have completed these steps, Moderation Staff will be able to get your account approved.
Through the looking glass? Let's Play The Legend of Zelda: A Link to the Past!
Back to Let's Play
< 1 2 3 4 5 6 7 8 9 10 11 12 13 14 15 16 >
< 1 2 3 4 5 6 7 8 9 10 11 12 13 14 15 16 >
|
#421
 05-28-2008, 09:38 AM
|
|||
|
|||
|
I loved Twilight Princess, but I would have adored it if the twilit areas encompassed all of Hyrule and you had to flip between light and dark a la LTTP. I loved that the Dark World's version of Kakariko was full of thieves and muggers.
|

|
#422
05-29-2008, 04:11 AM
|
|||
|
|||
|
I really surprised you guys with the Boomerang nugget, didn't I? To be honest, I was actually waiting the entire thread just for that big reveal.
 Anyway, enough talk. Let's Play! 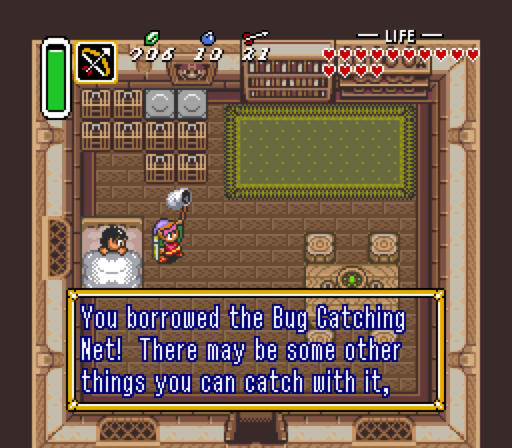 The first item off of today's list is the Bug Catching Net, which we'll be snatching from this poor, sick boy. That's right, not even the sick are exempt from Link's thieving hands, the bastard. In any case, the Bug Catching Net is situationally useful at best - it's the only way you can catch faeries, but otherwise there's not much you can do with it. Stuff it in your back pocket and forget about it.  Speaking of bottles, here's the last one we'll have to find, courtesy of this friendly camper. You have to wonder what the circumstances are that he would be forced to live under a bridge in a tent. Aside from the (not-so-)recent coup d'etat and the subsequent enactment of martial law, that is. Anyway, now that we've got all the bottles and the net, I guess I should explain what the items do, huh?  The most basic item you can get in the game are the three potions. In order from left to right is the Medicine of Life (Red, heals hearts), followed by the Medicine of Magic (green, fills magic meter) and, lastly, the Cure-All Medicine (blue, restores both). Ultimately, it boils down to what you need and when, but the blue potions are by far the most cost-effective of the bunch - for twenty rupees off and only one bottle, it can fulfill the roles of both of the others. Though that's not to say you shouldn't take advantage of the free magic refills from the pond faeries. 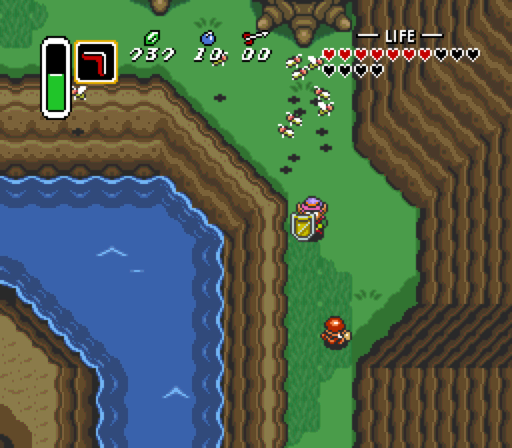 Next on the list are the bees - when caught and released, the bee will seek out all monsters on screen and murder them in cold blood before flying away. Of course, you should be careful when trying to catch bees with your net, as if you look in the wrong place you could find yourself facing a swarm. Of course, if you want you could always pick up the more user-friendly Good Bee, which has the built-in protection of them not stinging you in the face.  And last but not least, there's the time-tested faerie, which restores 7 hearts a pop and can revive you from death at anytime when stored in a bottle. All-around useful and not as clumsy as the Medicine of Life. You can find them at your neighbourhood faerie fountain, usually in groups of two, three or even four. This particular pond, in fact, is just outside of our next stop.  I guess it's time to head back to the Ice Palace to grab the treasure. Honestly, the things I do for you people. |
|
#423
05-29-2008, 04:12 AM
|
|||
|
|||
 Fortunately, this time we're packing heat - literally. With all of the upgrades I've gotten over the past two installments, there's literally nothing that can touch me now. The medallions alone are enough to break the game, which was one of the reasons I held off on collecting them during the original run.  Not too long in, we grab the Blue Mail. What's going to happen, hmm?  Absolutely nothing, that's what. What a waste of time.  Next we're going after the Magic Cape, of which there are two ways to open it up - the first way being to lift those black rocks with the Titan's Mitt, as originally intended. However, due to a possible oversight, you can actually warp to this particular gravestone from the dark world, making it potentially obtainable as early as after the first temple.  And here it is. The Cape grants invulnerability similar to the Cane of Byrna, however instead of killing everything it touches it lets you pass through them instead. Kinda redundant, but still handy nonetheless.  Now it's time to pick up our last sword upgrade. Head back to the faerie in the Pyramid of Power to have her power it up for you. Heh, throbbing.  The Golden Sword is easily one of the strongest weapons you can get, dealing a whopping eight times more damage than the Fighter's Sword we got so long ago. It still doesn't match up to the Silver Arrows, mind you - the number varies from enemy to enemy, but for the most part the Silver Arrows deal roughly six times more damage total compared to the Golden Sword. And that's terrible. |
|
#424
05-29-2008, 04:13 AM
|
|||
|
|||
 Though I forgot to add this to the list two pages ago, here's the Magic Powder for good measure. You have to hand the witch outside that Magic Mushroom we found earlier to unlock it first, though it's worth the effort if only for the abundance of easter eggs that're in the game.  Like this jolly fellow here. Tra la la~  As well as this nutcase. Remember him? Yeah, it's that crazy passive-aggressive bat that makes a return in Link's Awakening. He doubles your magic power under the assumption that it'll make your life harder (false) and then flies off with a back-handed complement. Jerk.  Our last stop for the day is the Wishing Well, located in the beautiful lake Hylia. Every 100 rupees lands us a free quiver / bomb bag upgrade, so you can bet we'll be playing big spender while we're here. Note the random fortune that pops up after every donation - depending on what you get (Great Luck, Good Luck, Little Luck or Big Trouble), the drop rate of items from the monsters you'll fight will either increase or decrease. Needless to say, the greater the luck the better.  As I said before, every 100 rupees summons Venus here to increase our arrow and/or bomb capacity by five (save the last upgrade, which is by 10) to a total of 70/50 overall. Note, however, if you do the math, that comes out to exactly 1,400 rupees in total - far more than we have right now. Guess we'll have to scrounge around for some treasure then.  Though it's technically a secret to everyone, there are a few thieves scattered in caves across Hyrule that are notoriously generous. If you're in need of some scratch, they've got your back.  There's also some loot hidden back in the Hyrule Castle Dungeon, provided you can find the right grave outside the sanctuary that leads to it.  Of course, the process of donating the actual money is kinda tiresome, so be sure to make yourself a lunch or grab a soda while you wait. Once you're done, pat yourself on the back for acquiring a superfluous amount of ammunition and head on to the last series of items we'll need. Next Time: Everything Else Part 4: A Heartful Cry. |
|
#425
05-29-2008, 04:36 AM
|
|||
|
|||
|
Quote:
Quote:
Quote:
|

|
#428
05-29-2008, 10:09 AM
|
|||
|
|||
|
If you ever need more pocket money, and find yourself out of chests to open or thieves to rob, there's always that very special room that you can get to by dashing all over the place.
I have no idea how I managed to find it the first, time, personally. It was pre-Internet, pre-GameFAQs, and looking it up now it seems like a minor miracle that I fell into it (especially since it happened with the hole atop the Golden Pyramid, unlike the examples mentioned in the FAQ.) Once I got the Magic Powder, I'd sprinkle everything and everyone in sight with it. Even the chickens. |
|
#429
05-29-2008, 10:39 AM
|
|||
|
|||
|
Quote:
|
|
#430
05-29-2008, 11:02 AM
|
|||
|
|||
|
Quote:
http://ca.youtube.com/watch?v=jVlCF2Ebo3U |
|
#432
05-29-2008, 11:42 AM
|
|||
|
|||
|
Quote:
|
|
#434
05-29-2008, 02:51 PM
|
|||
|
|||
|
Quote:
|
|
#435
05-29-2008, 05:06 PM
|
|||
|
|||
|
Quote:
|
|
#436
05-29-2008, 05:11 PM
|
|||
|
|||
|
Quote:
|
|
#437
06-02-2008, 07:51 AM
|
|||
|
|||
|
Well, it's been fun everyone, but it's time to put an end to this Let's Play - clinically.
 Location: South of Link's house Earliest Acquired: After Hyrule Castle Items Needed: N/A Method: Open the floodgates in the nearby building to drain the water and reveal the heart piece.  Location: Thieves' Hideout in Lost Woods Earliest Acquired: After Hyrule Castle Items Needed: N/A Method: Jump in the hole behind the Thieves' Hideout's entrance.  Location: Kakariko Village - Blind's Hideout Earliest Acquired: After Hyrule Castle Items Needed: Bombs Method: Bomb open the wall to find it.  Location: South of Kakariko Village Earliest Acquired: After Hyrule Castle Items Needed: Bombs Method: Blow open the wall in the squabbling brothers' house, then make your way through the obstable course in less than 15 seconds.  Location: Kakariko Village - Well in NW corner Earliest Acquired: After Hyrule Castle Items Needed: Bombs Method: Jump into the well in the NW corner then bomb open the wall.  Location: Cave in NE corner of desert Earliest Acquired: After Hyrule Castle Items Needed: Bombs Method: Enter the cave and bomb the wall inside.  Location: Outside Sanctuary Earliest Acquired: After Eastern Palace Items Needed: Pegasus Boots Method: Break open the pile of rocks outside of Sanctuary by ramming them.  Location: Outside Desert Palace Earliest Acquired: During Desert Palace Items Needed: Book of Mudora Method: After you exit the western entrance to the dungeon, make your way south to find it. |
|
#438
06-02-2008, 07:52 AM
|
|||
|
|||
 Location: Zora's Waterfall Earliest Acquired: After acquiring Flippers Items Needed: Flippers Method: After you buy the flippers, make your way south down a waterfall, then head through the forest path.  Location: Death Mountain Cave Earliest Acquired: After Desert Palace Items Needed: N/A Method: Once you reach the top of the staircase on the mountain, head east to find a cave. Instead of going inside it, jump to the cave below it and make your way through it to find the heart piece.  Location: Death Mountain - Spectacle Rock Earliest Acquired: After Desert Palace Items Needed: Magic Mirror Method: Warp onto the rock using the Magic Mirror.  Location: Tree outside Lumberjacks' House Earliest Acquired: After Agahnim's Tower Items Needed: Pegasus Boots Method: After you beat Agahnim, the Lumberjack Bros. should be finished sawing down the tree. Ram the tree they were cutting down to reveal an entrance that leads to the heart piece.  Location: Pyramid of Power Earliest Acquired: After Agahnim's Tower Items Needed: N/A Jump down the far right side of the pyramid and make your way around to it.  Location: Lake Hylia Earliest Acquired: After Agahnim's Tower Items Needed: Flippers, Magic Mirror Method: Head down to the bridge blocked by the stakes and jump into the water. Make your way around to Lake Hylia and warp onto the island shown.  Location: Cave outside Flute Boy's Meadow Earliest Acquired: After Palace of Darkness Items Needed: Magic Mirror Method: In the dark world outside the meadow, there's a circle of bushes in the lower left corner. Cut your way inside and warp to find an otherwise unreachable cave.  Location: Digging Game Earliest Acquired: After Palace of Darkness Items Needed: Shovel Method: Pay 80 rupees to play the game and dig as fast as you can. If you're lucky (or after enough tries) you should be able to unearth it. |
|
#439
06-02-2008, 07:54 AM
|
|||
|
|||
 Location: Kakariko Graveyard Earliest Acquired: After Palace of Darkness Items Needed: Magic Mirror, Bombs Climb the stairs north of the gravestones in the dark world and warp back to find a cave. Head inside to grab the heart piece.  Location: Cave east of Sanctuary - Dark World Earliest Acquired: After Palace of Darkness Items Needed: Magic Cape, Hookshot Method: Head inside and make your way through the cave, using the Hookshot and Magic Cape to make your way around the obstacles.  Location: Chest minigame in Village of Outcasts Earliest Acquired: After Palace of Darkness Items Needed: N/A Method: Pay 30 rupees to begin the game and open two chests. If you're lucky, one of them should have a piece of heart.  Location: Staircase south of Smith's Shop - Dark World Earliest Acquired: After Thieves' Town Items Needed: Magic Hammer, Titan's Mitt Method: Make your way into the area by lifting the dark grey stones blocking the entrance. Next, hammer down all of the stakes in the area to reveal an entrance to a cave.  Location: Misery Mire Earliest Acquired: After acquiring Flute Items Needed: N/A Method: Beside the entrance to the dungeon should be another cave. Head inside and open the chest to grab it.  Location: Misery Mire - NE corner Earliest Acquired: After acquiring Flute Items Needed: Magic Mirror Method: In the NE corner of the swamp should be a small piece of dry land. Warp back to the light world and lift up the large stone there to reveal a cave with the heart piece inside.  Location: Death Mountain Summit - Dark World -> Light World Earliest Acquired: After Opening Gate to Turtle's Rock Items Needed: Magic Mirror, Bombs Method: Head west from Turtle Rock and lift up the large stone to reveal a cave. Head inside and bomb open the crack to the north, followed by another to the west. Head outside and warp to the light world to grab the piece of heart.  Location: Death Mountain Cave Earliest Acquired: During Turtle Rock Items Needed: Magic Mirror, Bow & Arrows, Magic Hammer Method: Outside of the second checkpoint, head as far to the right on the bridge as you can go and warp back to the light world. Head inside the cave and defeat the monsters inside to grab the heart piece. |
|
#440
06-02-2008, 07:55 AM
|
|||
|
|||
 Whew, I think that's all of them. I guess we've gotten everything in the game now, huh? Not like there's anything left in the game to do...  ...not. We've still got one more secret to unveil before we wrap this up. Load up a game in the Sanctuary and run like the dickens out of there.  Dash your way down here. Do not let up the pace even a little or else you'll have to start all over.  Weave your way through the trees here, then resume dashing east. Be careful you don't get picked off by those guards.  Make a beeline for the secret entrace, not letting up the pace one bit. Finally, dash into the entrance and...  Voila! Quite possibly Nintendo's best-kept secret in this game - a room so hard to find that it's knowledge was steeped in mystery for years. But what is the deal with said room?  Named after a winner of a Nintendo power contest back in the early 90s, the Chris Houlihan room is found when an error condition occurs while loading the next screen. I'm not sure of the specifics of how this occurs or why, but it's there and you get 225 rupees for finding so I'm not complaining.  Exiting the room brings us back outside of Link's house, regardless of whether he entered the Houlihan room in the light or dark worlds. And it's here that Link will be spending his well-earned retirement.  With all the equipment found and Ganon vanquished, there's not much left for him to do except kick back and enjoy life. However, will Hyrule truly be safe from a future evil?  But even if the world is plunged into darkness once more, a hero will rise up to defend Hyrule against it. For even when it is cast in its darkest hour, there shall always be a Link to defend it, as it is fortold in the Legend of Zelda. ~Fin~ |
|
#441
06-02-2008, 08:03 AM
|
|||
|
|||
|
Bravo on getting all the Heart Pieces, especially the digging game one. That one has vexed me for YEARS. Also I've never found the Houlihan room, hell I've never even heard about it until a couple of years ago. That's how big of a secret it was.
What no mention of how you can pick up one of the fish from the swamp ruins pond and carry it to the Merchant in town to sell? |
|
#442
06-02-2008, 08:10 AM
|
|||
|
|||
|
If the complex character interactions in Majora's Mask didn't already make up for its dearth of dungeons, then it would still have been redeemed by the fact that a lack of dungeon bosses to dispense full Heart Containers meant a ton more Heart Pieces to collect--and therefore a ton more odd tasks to perform and remote passages to explore to earn them. Compare fifty-two Pieces to ALttP's paltry twenty-four. (Twilight Princess compromised by having plenty of dungeons but also requiring five Pieces to a Container instead of four, which is okay, I guess.)
Anyway, thanks for the great LP, PR. You never let up with the quality commentary, and I had a lot of fun reading along. |
|
#443
06-02-2008, 08:35 AM
|
|||
|
|||
|
Quote:
|
|
#444
06-02-2008, 08:53 AM
|
|||
|
|||
|
Top-notch Let's Play, PapillonReel! It was very entertaining, and I even learned something new about this game, which is something I thought would never happen again.
|
|
#445
06-02-2008, 08:57 AM
|
|||
|
|||
|
I bow to your superior Zelda playing skills Senor Reel.
I admit that you are my better. |
|
#447
06-02-2008, 11:00 AM
|
|||
|
|||
|
A job well done!
I'm tempted now to play this game for the first time. |
|
#448
06-02-2008, 11:23 AM
|
|||
|
|||
|
It's been a great ride, PR. Thanks.
|