
Post #13 – The Final Climb
.png)
Okay, so, final climb up Remorse Tower.
.png)
.png)
Very first battle, two Medusas spam me with Attribute 9 All (Scorching Tornado), knock out Teefa, and give me a Game Over. Let’s try that again!
.png)
Second try, I get to this treasure chest and realize I’m still sitting on a hoard of Return Rings. I dump a couple and feed the honey to Rooks.
.png)
Then I win that battle, Rooks gains a level, and Marid picks up a new spell.
.png)
Killer Bees don’t sounds as badass as Vampire Bees, but they cast Sleep All, which can be a big problem.
.png)
.png)
Levels for Teefa and Darwin. I don’t know if I really was supposed to have grinded more last chapter, or if the level curve was messed with as part of the hack.
.png)
.png)
Then some honey I immediately feed to Rooks.
.png)
The floors in this version of the tower are much shorter.
.png)
.png)
I think the theme here is “Stay or Go?”
.png)
I didn’t even get into a fight on the 2nd floor.
.png)
New to this floor are Beezlebubs, which have 200+ HP and cast Lightning 3.
.png)
.png)
.png)
More honey for Rooks. The Spirit Gauntlet is a minor upgrade for Teefa.
.png)
And that’s the 3rd floor. See what I mean about short?
.png)
.png)
An armor upgrade for Rooks. (At this point, I don’t care if Darwin can use it. Rooks matters more.)
.png)
And again, more honey.
.png)
.png)
At the 5th floor, the textures change. But we’re still fighting lots of Minotaurs.
.png)
.png)
More treasure that will be useful eventually. I try to knock out Medusas quickly after that first wipe.
.png)
.png)
.png)
Rooks gains a level on the 6th floor, and Sylph learns her ultimate spell, which is an instant-kill if it hits. I never actually cast it.
There was a Tent on the 7th floor, but I missed the screenshot.
.png)
And this is why we need to keep the party healed up.
.png)
.png)
More levels.
.png)
The maps here are just these zig-zaggy straight lines with short side paths for treasure. It’s like Final Fantasy 13 here in Remorse Tower.
.png)
On the 9th Floor, we change textures again.
.png)
.png)
Looks like we’ve got trouble, in the form of recycled bosses. Everybody loves a good boss rush, right?
.png)
.png)
.png)
.png)
Except no, it’s Sarah and Axs to the rescue! (And hey, Axs was alive after all! …How the hell did he survive?) There’s no battle, we automatically rush past.
.png)
.png)
So we’ll fight this boss instead!
.png)
.png)
.png)
.png)
.png)
.png)
But rather than letting me fight the awesome dragon goddess, Darwin and Teefa split off as well.
.png)
.png)
This is actually fairly logical: Time is of the essence, and Rooks is the one who needs to reach the end and use his card-powers to seal Rimsala. Everything else is a distraction and everyone else is expendable.
.png)
Up on the final floor, Rooks faces his last challenge.
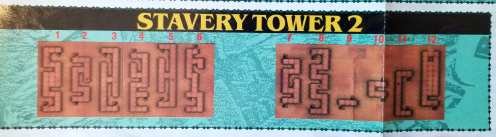
And here’s Nintendo Power’s final map, of the revised/revisited “Stavery Tower.”
.png)
.png)
.png)
.png)
Rimsala tries to use her mental powers to get Rooks to revive her, which adds a new layer to Galneon and Alan’s actions. How much of their plans were even their own ideas to begin with?
.png)
.png)
Rooks is made of sterner stuff, so sealed Rimsala decides to get rid of him.
.png)
.png)
Rimsala, still partially sealed, isn’t so bad. I rotate through spirits to buff Rooks, and I have him toss Attack Impair and Defense Impair before I lay into her.
.png)
.png)
.png)
But then…we’re too late!
.png)
And Rimsala is fully revived.
.png)
.png)
.png)
.png)
And promptly slaughters Rooks.
.png)
.png)
.png)
.png)
Rooks’ ancestor to the rescue! The two swords and the jewel combine into one sword! (Which nothing ever indicated they could do.)
.png)
.png)
We’re restored and thrust back into battle. The weapon is automatically equipped, it’s called the Armageddon II, and it’s the best weapon in the game.
.png)
.png)
Rimsala Unsealed will wreck your shit with Avatar Storm (Attribute 11 All). I do the same round-robin of spirits casting buff spells, because they can’t really heal enough to keep up with the damage and they can’t do real damage to Rimsala. (Rooks can do around 180 per hit with Defense Impair and Stomp All both active). Then I just need to time my applications of Heal 3 with the occasional Gold Flask.
The spirits’ role in this battle ended up being pleasantly thematic: They were there to support Rooks (with buff spells and healing magic) and act as meat shields for him.
.png)
.png)
.png)
.png)
.png)
Rooks casts the sealing spell again, and this time it works. (I successfully captured the lightning in the Rimsalas shots, but not around the Tower…again.)
.png)
.png)
.png)
.png)
.png)
.png)
.png)
.png)
.png)
We’re treated to a text-only epilogue that nonetheless leaves questions. Did all of the companions survive? Do Sarah and Teefa share the throne? What about the skirmishes with the other five countries?
But at least for now, the land is safe.
Okay, so, final climb up Remorse Tower.
Very first battle, two Medusas spam me with Attribute 9 All (Scorching Tornado), knock out Teefa, and give me a Game Over. Let’s try that again!
Second try, I get to this treasure chest and realize I’m still sitting on a hoard of Return Rings. I dump a couple and feed the honey to Rooks.
Then I win that battle, Rooks gains a level, and Marid picks up a new spell.
Killer Bees don’t sounds as badass as Vampire Bees, but they cast Sleep All, which can be a big problem.
Levels for Teefa and Darwin. I don’t know if I really was supposed to have grinded more last chapter, or if the level curve was messed with as part of the hack.
Then some honey I immediately feed to Rooks.
The floors in this version of the tower are much shorter.
I think the theme here is “Stay or Go?”
I didn’t even get into a fight on the 2nd floor.
New to this floor are Beezlebubs, which have 200+ HP and cast Lightning 3.
More honey for Rooks. The Spirit Gauntlet is a minor upgrade for Teefa.
And that’s the 3rd floor. See what I mean about short?
An armor upgrade for Rooks. (At this point, I don’t care if Darwin can use it. Rooks matters more.)
And again, more honey.
At the 5th floor, the textures change. But we’re still fighting lots of Minotaurs.
More treasure that will be useful eventually. I try to knock out Medusas quickly after that first wipe.
Rooks gains a level on the 6th floor, and Sylph learns her ultimate spell, which is an instant-kill if it hits. I never actually cast it.
There was a Tent on the 7th floor, but I missed the screenshot.
And this is why we need to keep the party healed up.
More levels.
The maps here are just these zig-zaggy straight lines with short side paths for treasure. It’s like Final Fantasy 13 here in Remorse Tower.
On the 9th Floor, we change textures again.
Looks like we’ve got trouble, in the form of recycled bosses. Everybody loves a good boss rush, right?
Except no, it’s Sarah and Axs to the rescue! (And hey, Axs was alive after all! …How the hell did he survive?) There’s no battle, we automatically rush past.
So we’ll fight this boss instead!
But rather than letting me fight the awesome dragon goddess, Darwin and Teefa split off as well.
This is actually fairly logical: Time is of the essence, and Rooks is the one who needs to reach the end and use his card-powers to seal Rimsala. Everything else is a distraction and everyone else is expendable.
Up on the final floor, Rooks faces his last challenge.
And here’s Nintendo Power’s final map, of the revised/revisited “Stavery Tower.”
Rimsala tries to use her mental powers to get Rooks to revive her, which adds a new layer to Galneon and Alan’s actions. How much of their plans were even their own ideas to begin with?
Rooks is made of sterner stuff, so sealed Rimsala decides to get rid of him.
Rimsala, still partially sealed, isn’t so bad. I rotate through spirits to buff Rooks, and I have him toss Attack Impair and Defense Impair before I lay into her.
But then…we’re too late!
And Rimsala is fully revived.
And promptly slaughters Rooks.
Rooks’ ancestor to the rescue! The two swords and the jewel combine into one sword! (Which nothing ever indicated they could do.)
We’re restored and thrust back into battle. The weapon is automatically equipped, it’s called the Armageddon II, and it’s the best weapon in the game.
Rimsala Unsealed will wreck your shit with Avatar Storm (Attribute 11 All). I do the same round-robin of spirits casting buff spells, because they can’t really heal enough to keep up with the damage and they can’t do real damage to Rimsala. (Rooks can do around 180 per hit with Defense Impair and Stomp All both active). Then I just need to time my applications of Heal 3 with the occasional Gold Flask.
The spirits’ role in this battle ended up being pleasantly thematic: They were there to support Rooks (with buff spells and healing magic) and act as meat shields for him.
Rooks casts the sealing spell again, and this time it works. (I successfully captured the lightning in the Rimsalas shots, but not around the Tower…again.)
We’re treated to a text-only epilogue that nonetheless leaves questions. Did all of the companions survive? Do Sarah and Teefa share the throne? What about the skirmishes with the other five countries?
But at least for now, the land is safe.
.png)
.png)
.png)
.png)
.png)
.png)
.png)
.png)
.png)
.png)
.png)
.png)
.png)
.png)