
-
Welcome to Talking Time's third iteration! If you would like to register for an account, or have already registered but have not yet been confirmed, please read the following:
- The CAPTCHA key's answer is "Percy"
- Once you've completed the registration process please email us from the email you used for registration at percyreghelper@gmail.com and include the username you used for registration
Once you have completed these steps, Moderation Staff will be able to get your account approved.
4x4 = -wait, what's the title? Let's Play Ganbare Goemon 3!
Back to Let's Play
< 1 2 3 4 5 >
< 1 2 3 4 5 >
|
#31
 04-27-2015, 12:46 PM
|
|||
|
|||
|
Quote:
|


|
#32
04-27-2015, 06:17 PM
|
|||
|
|||
|
Quote:
|
|
#33
05-02-2015, 07:55 AM
|
|||
|
|||
|
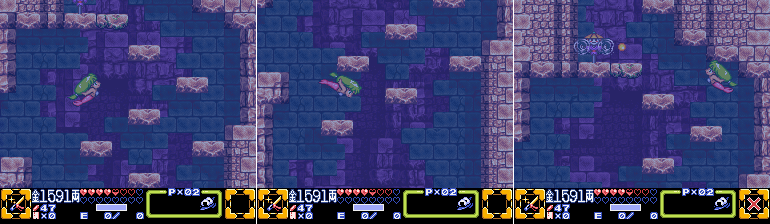
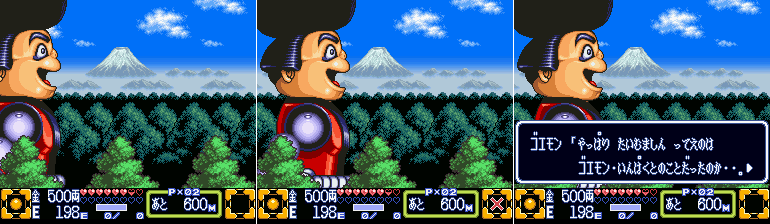
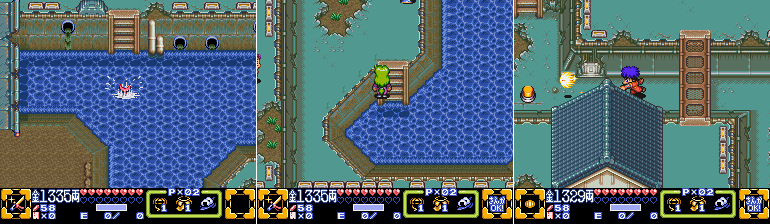
Welcome back to Ganbare Goemon 3! Last time we went through my personal least favorite area of the game, and now we’re going to move well past that.
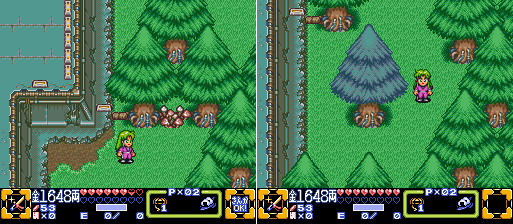
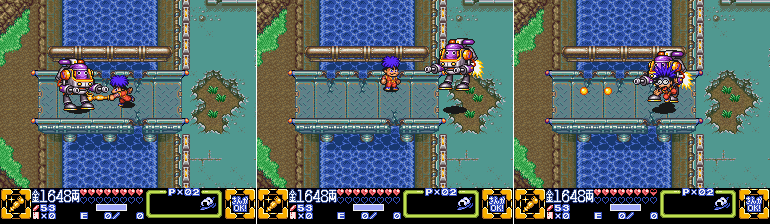
But move on where, you might wonder? We’re at an effective dead end and I guess our only choice is to search every shrine in all of Edo to find where the Wise Ol’ Man hid the Triton Shell. Y’know, unless someone just hops out of the trees to point us in the right direction…  Afterwards... Oh hey, it’s Yae! Last we saw her in Goemon 2 she gave us some quick info in a between-world cutscene, and then she accidentally blew up the ground under Ebisumaru with a hidden landmine. This time around, though? She’s ready to join up! Yae: I finally found you! Sasuke: Yae! This is perfect timing! We found a note about the shrine here, and we were just on our way to Hagure Town so we could get to a secret spot in Ninnin Village... Yae: Do you suppose the Triton Shell is in THAT cave? But nobody could get into that place without traveling underwater. Sasuke: Well if the Wise Ol' Man borrowed Yae's body maybe he could enter... Goemon: Yae's Body?! Come on, you can't do that.... gah! Nosebleed! Ebisumaru: What are you thinking, Goemon?! By the way, Yae, why were you looking for us? Yae: Ummm, yes, actually while I was out patrolling the Ninja Cat Kurobei told me what happened with the Wise Ol' Man and I thought I could help. Goemon: I didn't know Kurobei even knew about that... Sorry to drag you into this Yae! Yae: Well we're friends. Why would you apologize now, I'm already a part of it! Let's go! Perverted nosebleed jokes aside, Yae points us to where we need to go: The Shrine in Ninnin village. Last time we went that way the bridge guard wouldn’t let us by, but now that Yae is hanging around we can cross no trouble! It's kind of weird how they know to go to Ninnin Village since nothing the game has told us thus far gave us that info, though it is possible that idle NPC chatter mentioned a mysterious cavern under a shrine in Ninnin village. This is why I'd love to see a real fan translation of the game someday, I can only imagine the little incidental details that I miss since all I have is a translation of the game's primary story events.  Anyway, Yae is equipped with a katana as her main weapon, and a bazooka as her subweapon. She had to earn this in Mystical Ninja Starring Goemon and you might think there had to be some story behind why a kickass ninja girl from comical feudal Japan would have something like a bazooka at all, but no. She just straight up starts with one with no fanfare. It doesn’t fire explosives so much as bursts of air, but it’s as damaging as any ranged attack. 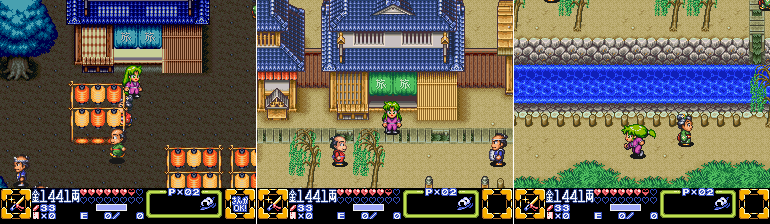 Village Anyway, our goal requires us to head back to Hagure Town, so we take the travel center. See? It’s already an improvement over the travel centers in Goemon 2 which were utterly unnecessary thanks to the world map system. As an aside, all the characters have really nice animation, but Yae’s running animation is especially cool. Wavey thick hair aside, she runs with such goshdarned determination.  So Determined... 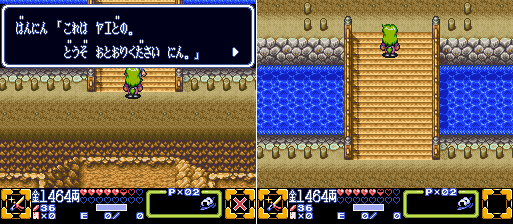 Anyway, with Yae in the party Dr. McNinja finally lets us cross (Nin). 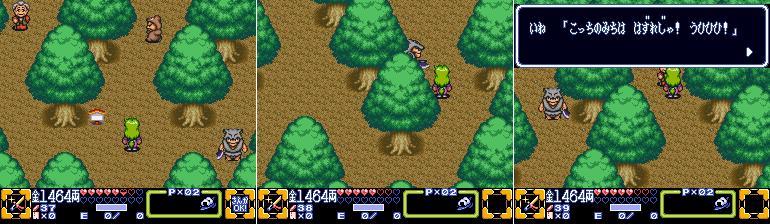 Just north of the bridge is a forested area very similar to the forest just west of Festival Town. The exit to Ninnin Village is in the northwest, and the rest of the forest is all dead ends filled with baddies. And, mysteriously, a few old ladies. I can’t decipher what they say and none of em are important to the story so the old script I have doesn’t cover them. One of the ladies, though, is another NPC Fortune Teller.  We leave the forest and reach Ninnin Village, as the guy standing just at the entrance lets us know. Incidentally, I just love that super secret Ninja town is straight up called Ninnin Village. Nice job there oh masters of subtlety. 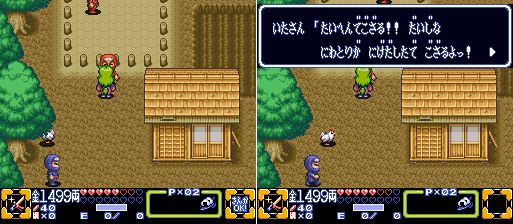 Just north of the town entrance is a frantic ninja in front of a chicken pen who is worried about all of his chickens, as they have flown the coop, as it were.  Fortunately we have a thing and he offers to give us a deed to some land in exchange for our Enigmatic Bean, and just like that the chickens immediately return to the pen. Cook: Something terrible happened! All the best chickens ran away! If we had their favorite food we could catch them immediately. ..Ooh! Is that an Enigmatic Bean? Please, I beg you, give it to me! >Give Cook: Thank you so much! With this I can bring them back! With the power of this bean, and BIRD GATHERING JUTSU! (Screen Flashes) Cook: Oh how they assemble, thank you for your help. As thanks I will give you one of our fields. Narrator: Goemon and his allies obtained a field, so they are proud land owners now?!  As you can see in our inventory, we now have a sign with ‘Go’ on it, which seems to indicate that Goemon and friends now own this plot of land in Ninnin Village! Which…. gives us nothing besides putting that sign there. Seriously, that’s it. This entire fetch chain from saving the girl in the mountains to handing over the sandal strap in Festival Town to herding the chickens functionally awards us with nothing. It’s not even required to technically 100% the game, it’s all just a joke. Possibly at the expense of absurd fetch quests. Honestly, I can’t hate it. 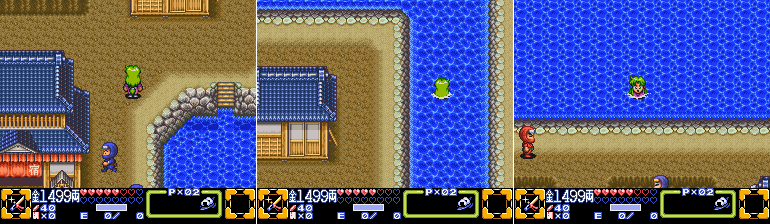 Anyway, our goal is just north of Ninnin Village so we have to enter the waterway on the east side of town and swim up just north of our new plot of land, not that there’s anywhere else to go, but when we get there… Last edited by SpoonyBardOL; 12-03-2017 at 02:34 PM. |

|
#34
05-02-2015, 07:59 AM
|
|||
|
|||
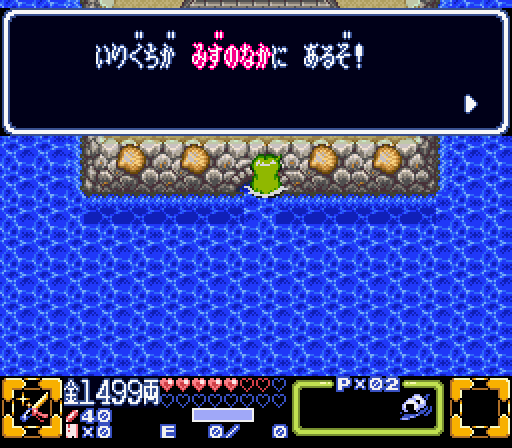 We can’t get inside due to needing to dive to enter the shrine. I guess Goemon and pals aren’t super great swimmers. I mean, they need a floatation device to even get around in water. What now? 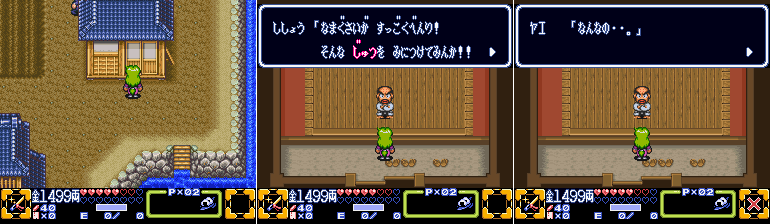 A Challenge for Power Fortunately there’s a guy in Ninnin Village who is able to teach Yae a special Ninjitsu transformation magic. This must be what Sasuke meant earlier about the Wise Ol’ Man needing to borrow Yae’s body, but how he knew that in advance before even Yae learned about it is a mystery. Also, this piece of music might be familiar to anyone who played Mystical Ninja Starring Goemon. It was used in much the same way there too. 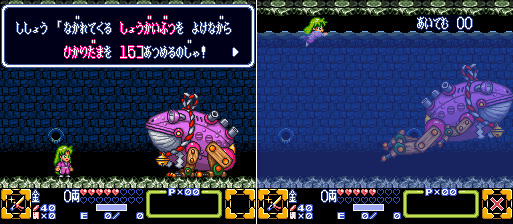 Fortunately, the minigame required to gain Yae’s Mermaid Transformation in THIS game is nowhere near the exercise in frustration as the Waterfall of Pain and Misery was in the N64 title. Here we just need to swim around and collect 15 glowing doodads before time runs out or we take too much damage. The pink recolor of the game’s first boss will hop along in front of us sending tadpole bombs out, while glowy doodads and spiked obstacles move in from the right.  Pressing A activates a character’s special skill, and in Yae’s case she transforms into a Mermaid. Pressing it again changes her back, but only on the surface of water, you can’t change back while under the surface. Pressing Y will also execute her underwater attack: a quick dash forward. She can’t destroy the spiked obstacles with it, but the tadpole bombs can’t hope to survive. 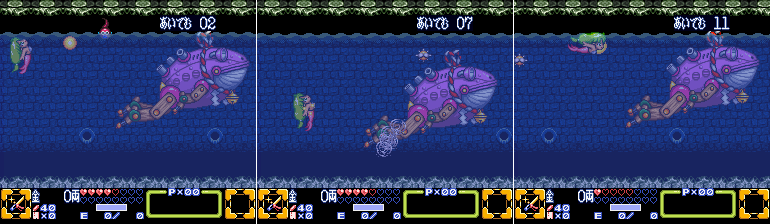 The minigame is fairly easy as long as you don’t go too nuts with dashing around and run headlong into damage. It’s also important to note that you can’t change direction nor stop once you start dashing, so if you’re not careful it’s possible to let the glowy doodads pass right by you. 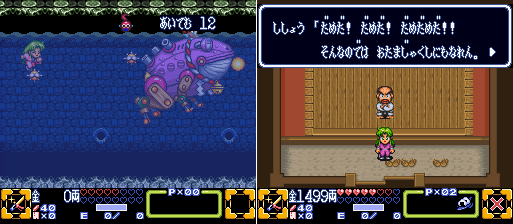 If you take too long or take too many hits you get ejected from the game and the instructor yells at you for being a big ol’ loser. Fortunately you can try again until you get it.  Succeed and Yae earns the ability to transform into a mermaid whenever! Under da’ sea, baby! 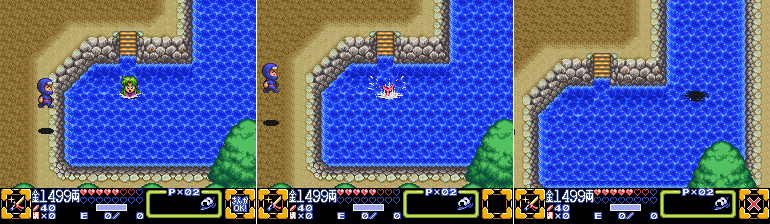 Village Yae hops outside and takes a dive! In overworld sections the mermaid power simply lets you pass under things that may be obstructing your way, such as low hanging bridges or…  ...Submerged entrances to caverns!  Stage 3: Ninnin Village Shrine Well, more like the cavern UNDER the shrine, but w/e. Welcome to Stage 3, and right off the bat it tells you that it’s pretty much a Yae-dungeon, much like how Stage 2 was primarily a Sasuke dungeon. We’ll continue to use Yae for pretty much the whole thing. Last edited by SpoonyBardOL; 12-03-2017 at 02:36 PM. |
|
#35
05-02-2015, 08:02 AM
|
|||
|
|||
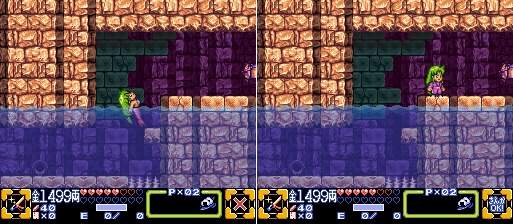 As I mentioned earlier, Yae can only change back to normal on the surface of the water. Pressing A while under the surface, even a little bit, just does nothing. 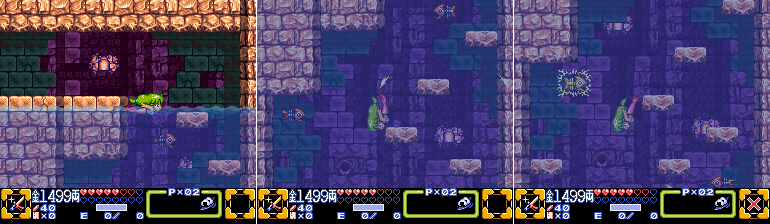 Just right of the entrance is a submerged tunnel heading down with a bunch of stone platforms that Mermaid Yae has to swim around, and the new enemies here aren't making it the slightest bit easier.  Name: Electric Fishbone Of course the Wise Ol' Man invented a robotic fish skeleton, why wouldn't he? It swims back and forth, periodically firing off electric charges in a diagonal spread. It needs to be submerged in water to do much of anything. 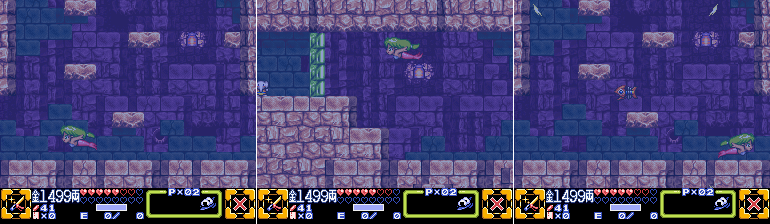 Once we reach the bottom we have a choice of going right or left, but the choice is an illusion. If we head left our path is blocked by green crystals which Sasuke needs to blow up, but there's no changing to Sasuke unless we get rid of the water, so we head right. 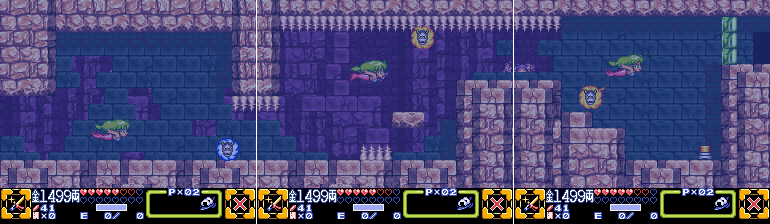 The right path leads to a spike-lined hallway with a bunch of Mr. Onizoomas. The spikes are easy enough to dodge while swimming, just don't go dashing around recklessly. At the end of the room are some more green crystals, and a switch.  Just trying to swim onto the switch does nothing, you have to go above it and then dash downward and collide with it to activate it. Once you do, the water starts to drain out. You might be thinking "Oh god it's the Water Temple isn't it?", but don't worry, the game has nothing quite so complicated. Yet.  With the water safely drained away we can head back to the left and remove those green crystals. We can't do a thing about the crystals in THIS room, though, they're too high. Also I just realized I forgot to show what happens when you try to use Yae's Mermaid Transformation on dry land. So, uh, THAT happens. She just becomes comically immobile until you deactivate the power.  Anyway, back to the left we clear the path forward AND find the Elephant Map! Score!  And here's our map for Stage 3. WAY less convoluted than Stage 2. Hell the back layer's barely used. If you guessed we're eventually going to be coming up the back layer and exiting from that room we were just in, well you might just be right!  You can see an Electric Fishbone in the first screenshot there flopping around helplessly. That's what happens to them when the water drains out. They're CLEARLY robotic so you'd think they'd have some sort of alternate fish-out-of-water mode, oh well! I should also point out that Yae can cut enemies in half with her weapon just like Sasuke can. Her Katana has a touch more reach than Sasuke's Kunai as well. I've also neglected to mention until now the difference in running speed between the characters. Both Goemon and Ebisumaru run along at an average pace, but Sasuke and Yae run a lot faster, and as a result they can naturally jump farther. On the other hand, Goemon and Ebisumaru can hold the attack button to start sprinting, and once they do they basically reach Sasuke and Yae's speed, while trying to dash with them seems to do nothing. I haven't measured it out, but if they do go faster by holding the button down the difference to their normal speed is negligible. You might think that there are occasions where you'd WANT to use Goemon or Ebisumaru's slower walking speed for precision, but it honestly never really comes up. For the most part I stick with Sasuke or Yae when playing normally, switching only to Goemon and Ebisumaru when I need to. But for the purposes of this LP I'll try and mix them up more than I normally would as the game progresses. Or maybe I won't and I'll just switch to Goemon and Ebisumaru for photo-ops. Not like you guys can tell! Last edited by SpoonyBardOL; 12-03-2017 at 02:37 PM. |
|
#36
05-02-2015, 08:05 AM
|
|||
|
|||
 Back to the stage, we have another tunnel downward, and another choice. Also, much like Ebisumaru's idle animation where he rubs his face with a cloth, Yae has an idle animation where she casually flips her hair back, and again like Ebisumaru's idle animation it seems to start almost immediately after stopping, which means I wound up getting a lot of shots of it. Let's start a counter! Hair Flip Count: 1 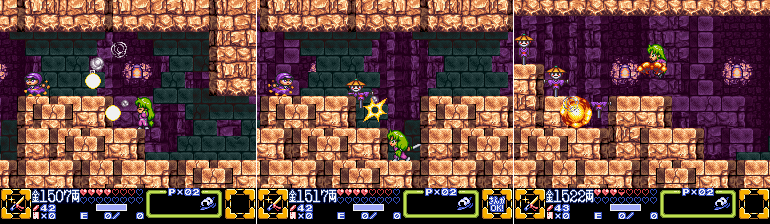 The left passage leads to a hall with uneven footing, and a bunch of mooks. Hair Flip Count: 2 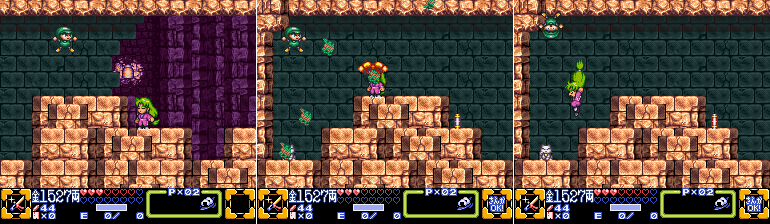 At the end of the hall we see some Kite-Ridin' Jimmies. ...or, Wall-Crawlin' Jimmies? They're not really new enemies since they look and behave just like their mobile brethren, it's just that they're totally stationary. Oh, and they're guarding the stage's first Fortune Cat! Score! Hair Flip Count: 3  We head back to the fork in the path and go right. More Kite-less Jimmies!  Yae shows off her Bazooka, even though she's more than capable of jumping and hitting the Jimmy with her Katana and using the Bazooka puts her in their line of fire. It's just, why use a sword when you have a Bazooka on hand, y'know? We also come across a Sparkling Dango! Much appreciated, even at this early point. Hair Flip Count: 4  At the end of the room we come across another tunnel leading downward, and still no water in sight! 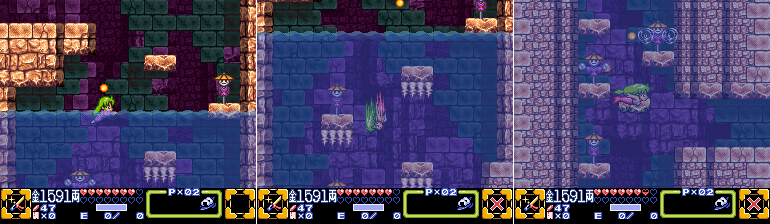 Whoops, spoke too soon. It was about time we had to go swimming again. Diving downward, we come across a moving platform, you can see it in the last screen, Yae's on top of it and it has a slightly different coloration compared to the others. Unlike the other stone platforms this is a sprite, not a tile. This means Yae actually has a rather frustrating interaction with it in Mermaid form. With the stone tiles she can swim up against them or around them without stopping. But when she collides with the moving stone platform sprite her momentum is actually stopped. It's really easy to get hung up on it when you're just trying to get around it. It might be the most frustrating obstacle in this stage, and it's probably not even meant to be an obstacle!  Breaking free of the moving stone's apparent magnetic pull, we have a choice of heading right, or continuing down. Now, you might be tempted to go right first, but trust me, you want to go down and take the first door on the left. 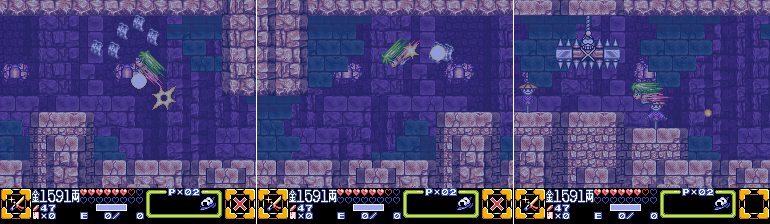 This passage has more foes, Electric Fishbones and Jimmies alike. Even Stompy works under water! This is also a good time to mention that you can dash diagonally, AND that while you're dashing you're immune to harm from enemies. You'll still take damage if you swim straight into a damaging obstacle, but NPCs won't hurt you while you're in your dashing frames. This includes Stompy! He might as well not even be here. Poor Stompy.  Anyway, the reason you want to come here first is that this passageway has the second Fortune Cat at the end of it, and that narrow spike-lined tunnel means you pretty much need to come here while it's still flooded. You CAN just soak the hits on foot, if you have to, but that's bad and dumb. Last edited by SpoonyBardOL; 12-03-2017 at 02:38 PM. |
|
#37
05-02-2015, 08:08 AM
|
|||
|
|||
 Heading back out to the vertical shaft, we need to go back up and take that right branch. Getting back up is a little tricky since Mermaid Yae's hitbox is a little weird. She's kind of like a big rectangle, and cannot fit through the 1-tile wide gaps between most of these platforms while swimming up. Though coming down I WAS able to squeeze through them, it's weird. Maybe I could have found a way through while heading upward if I kept at it long enough, but it just became easier to swim down and around them. 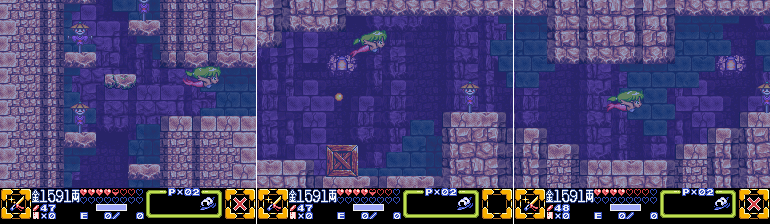 The next chamber has a box we cannot interact with, plus a few Strawhatted Shooters we effortlessly swim by. 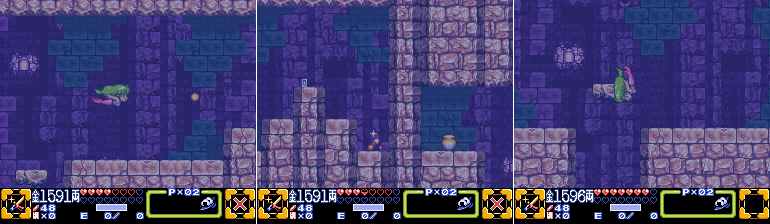 Yae passes a path going down, because there's another Sparkling Dango in the dead-end just past it. I took a hit right before getting it so she's in her flashing invincibility frames. Finally, yes, that platform in the middle of the opening is another moving sprite that goes up and down and, yes, Yae gets caught on it while I try to swim around it. The ability of these things to just say right in your way is uncanny. 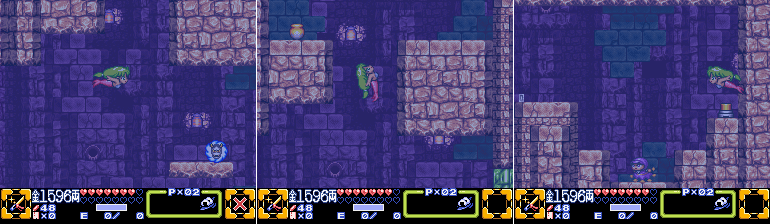 Finally Yae breaks free of it and swims downward. Just to the right, and up into another chamber, is a button. Now, I'm going to say this clearly just so there's no misunderstanding. Are you going for a 100% run? DO NOT HIT THIS BUTTON RIGHT AWAY. DO NOOOOOOOOOOOOT. This button is a middle finger in disguise to the completionist. Here's why.  Leave the chamber and swim to the left instead, and you see it. Just under the entrance to this entire area is a Fortune Cat. And it's isolated up in its little nook. You can reach this easily by swimming. So guess what hitting that button does? Go on, guess? If you guessed 'Lowers the water', you'd be right. Hit that switch first without going to the left and you'll never be able to reach this Fortune Doll. It's POSSIBLE that if you play two-player you can abuse the way Player 1 and Player 2 interact to gain some extra height and reach it, but I'm not 100% certain that's possible and I have no way to test. Either way, for the solo player this one Fortune Cat doll may be responsible for most players missing out on a 100% run. It's SUCH a dick move.  So grab the doll and THEN swim back to the right and hit the switch.  The water drains away and we're free to jump back down. A bit further to the right of here are some more green crystals.  Sasuke clears them away, and in the room beyond is the fourth Fortune Cat doll for the stage! Yeah, that's right, the final two Fortune Cats are in the same room. Feels a bit odd, I agree, especially with how the other one can be missed entirely due to a small bit of carelessness.  Oh right, I forgot to highlight this last time, but Sasuke has special animations for his upward and ducking attacks. Much like Goemon 2 he fires his hair upward and outward whenever you try to attack straight up, or from a ducking position. It's so goddamn adorable.  With no water around these moving platforms FINALLY function as a means for the player to move forward rather than an exercise in frustration getting in your way. Last edited by SpoonyBardOL; 12-03-2017 at 02:39 PM. |
|
#38
05-02-2015, 08:10 AM
|
|||
|
|||
 We head back out, passing the box again along the way. Oh man, that box. It's such a tease. You can see why it's there, it's for players who need to return to the rest of the room after the water drains away. But the only reason you'd want to return is to get the Fortune Cats, however one of the two cats is unobtainable if you didn't get it prior to draining the water, so the only reason this box exists would be if you missed the Cat hidden behind the green crystals! It does you no good whatsoever to get the other one, and if you got THAT Fortune Cat there's no way you'd miss the other. I mean, sure, it's possible a player would get the first one and miss the second one and not get it until they remembered to come back and look for it. But that's kind of a stretch, and if they added a way to return and get one of them, couldn't they have added a way to get the other one with the water drained out too? That is the most aggravating box!  Anyway I failed to get a shot of it, but as we swim down the main shaft we come across a path branching to the left. We enter this larger chamber, and at the end of it is another water-lowering button. It's on the ceiling this time, but our method of dealing with it is the same.  Fortunately there's plenty of stone platforms to help us climb back up out of the drained chamber.  Back in the main shaft, we head further down and come across a path to the right. Hair Flip Count: 6  In this room, though, we hit a dead end since we cannot reach that door.  Finally we head back down to the very bottom and enter a new chamber, it even has a snazzy new palette!  There's a brief sequence with collapsing platforms over a spike-lined tunnel. No need to sweat it here, though, the platforms don't fall off the screen, they land safely on top of the spikes, so even though your first video game platformer instinct might be to jump off of a falling platform, you can safely say on them. Makes the jumps here a lot easier.  Fanfare After blasting away some more green crystals we finally come across the end of the cavern, and we've FINALLY tracked down the Triton Shell! No more red herrings! Hair Flip Count: 7  It's Starting to Collapse! Buuuuuuuuut that was a load-bearing MacGuffin. Time to go! Spikes start falling from the ceiling as we head out. Thankfully they're a different color from the spike tiles and are telegraphed well in advance.  The water starts filling up again as we head out into the main shaft. It stops at the previous branch, though, and unfortunately there's no way to go back up without water, so we have no choice but to go to the right. Last edited by SpoonyBardOL; 12-03-2017 at 02:40 PM. |
|
#39
05-02-2015, 08:13 AM
|
|||
|
|||
 But now that this room is partially flooded we can reach that door easily. We go into the back layer for the first and only time in the whole stage!  The entire back layer is a slow elevator heading up, while foes constantly attack us from all sides. Hair Flip Count: 8 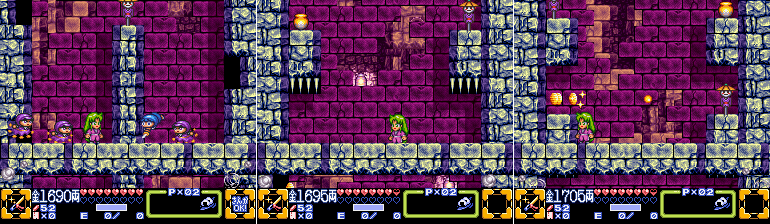 This section isn't terribly difficult. Some of the Dive-Bombin' Jimmies can get the drop on you since their aggressive jumping tactics are still in play. But just play this section carefully and you'll be fine.  There are some Ryo Pots on the way up, by all means grab the free cash if you have a spare moment. Hair Flip Count: 10 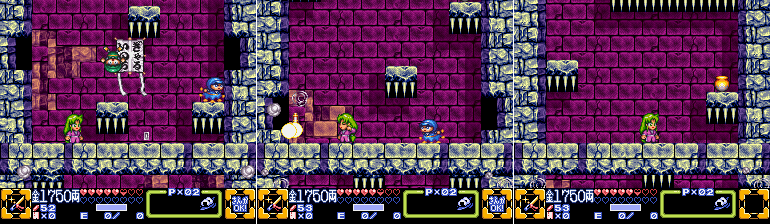 Eventually Kite-Ridin' Jimmies enter the mix, with actual kites! Shame they're as easily dispatched as always. Hair Flip Count: 11 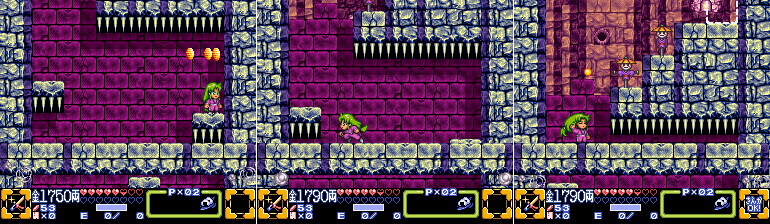 The very end of the section almost looks like a trap, with a Ryo pot precariously placed on the right side of the screen and the only safe way upward being on the left, but you have PLENTY of time to grab the cash and make it through safely. It's no thang. Hair Flip Count: 12 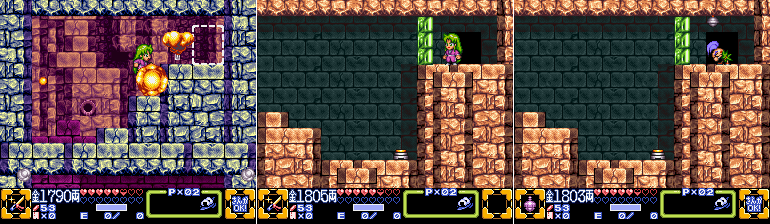 Finally the elevator stops and we get to leave the back layer, coming out right behind that wall of green crystals we couldn't access earlier.  And we're basically back at the start, it's just a quick climb upward to the exit. Though we've long since passed a dangerous area, the 'It's Starting to Collapse!' theme keeps playing on our way out. Heck, if you were so inclined you could go to the left instead of up and go back through the entire damn stage and nothing would stop you, though doing so would be pointless and only someone who wanted to make sure there was nothing hidden away on a second look would bother wasting time doing something like that. Ha ha ha.. ...hah....  My health was always at 3 hearts what are you talking about.  There's basically no obstacles between here and the exit. It's an easy walk outside.  Village And as soon as we exit the entrance collapses behind us and we're forever barred from re-entering Stage 3, much like Stage 1. So yeah, even IF the entire dungeon reset upon exiting, there's STILL no way to get that one Fortune Cat if you missed it. I really love this game, but even I have to admit that is some buuuuuuuulllllllllllcrap. Anyway, as we swim back down to get on dry land we see a red-clad Ninja hopping up and down frantically, as if he were trying to get our attention. Something urgent must have happened. Oh well, we'll find out next time. And get ready, because next time? Hoooo boy... We're gonna need some BIG help. Last edited by SpoonyBardOL; 12-03-2017 at 02:41 PM. |
|
#41
05-04-2015, 01:01 AM
|
|||
|
|||
|
Quote:
|

|
#42
05-09-2015, 01:07 PM
|
|||
|
|||
|
Howdy and welcome back to the Ganbare Goemon 3 LP! I got a bit sidetracked this week and nearly got super delayed working on the update, but here we are and not too much later than usual.
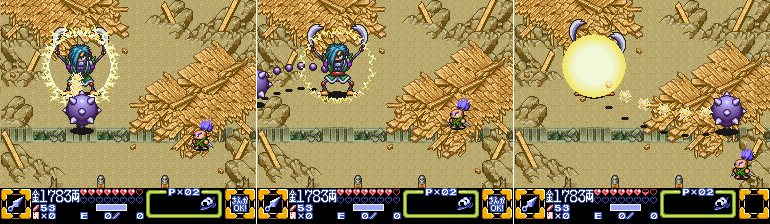
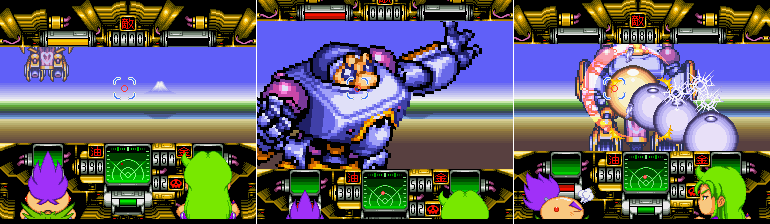
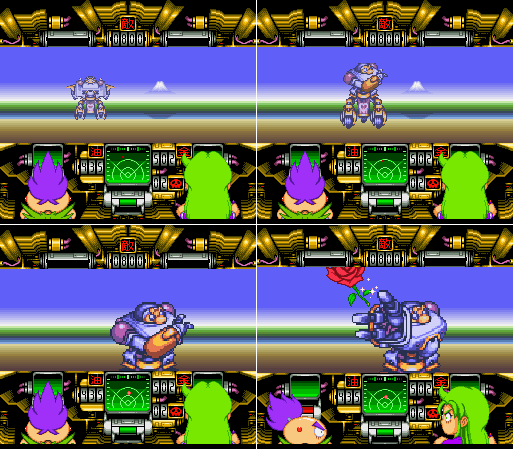
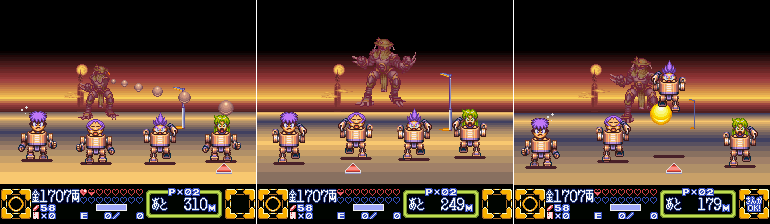
 Village When we left our heroes last time they had just cleared the cavern under the Ninnin Village Shrine, and escaped as the cavern allegedly started to collapse despite the fact that we really didn't see any sign of that actually happening until we left and saw the entrance caved in. Oh well! Before we can exit the waterway a red-clad Ninja (who is obscured by the text boxes in the image there) frantically warns us that something terrible happened at Hagure Town and we had best get our butts over there real quick! 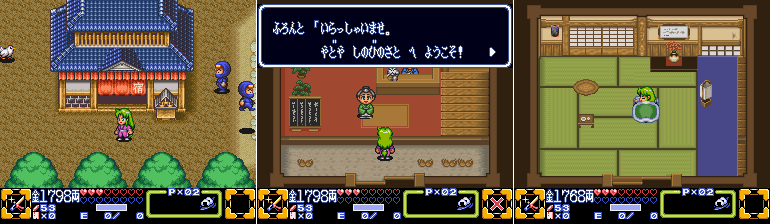 But before we do that I stay at the Inn real quick to recover them hearts. 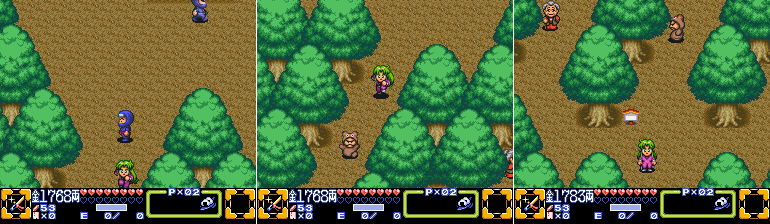 No time to stop and spar with the local ruffians, if an NPC tells us something is an emergency then it damn well probably is. Especially if they're dressed in bright red pajamas.  Hagure Town Destroyed.... And... Oh. The music suddenly turns from a cheery happy town theme to something kind of ominous. We see the residents of Hagure Town now hanging around the hills for some reason. Well I'm not going to sugar coat it, the name of the BGM track kinda gives it away.  I switch to Sasuke because of a reason and cross the bridge up into the town itself and see lots of flattened houses, and a certain someone standing in the middle of the rubble. 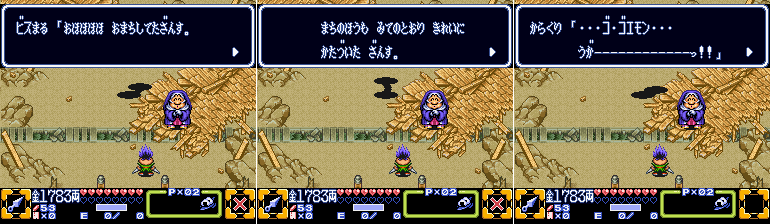 Bismaru's Theme Bismaru: Oh ho ho ho ho! I've been waiting for you! Take a look at this town. Now it's so lovely and cleared away! Now it's your turn! I present the Mechanical Bodyguard! Robot: G-GOEMON!! Ugaaaaaaaaaaaah! 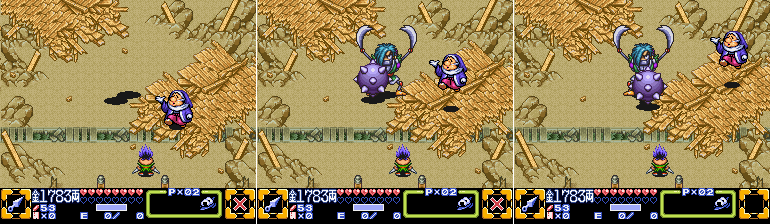 And Bismaru straight up hops off screen, with one whole frame of animation and everything. It's honestly a little comical. However! It's time for a boss battle! Yes, an actual boss battle! We haven't seen one since the first stage...  Mechanical Bodyguard: With how he furiously roared out Goemon's name you'd think he had some hidden backstory connecting the two of them, but no. He's just one of Juurokubei's robot thugs. He likes to attack by spinning his electrically-charged mace around, while also whirling around the room like the Tazmanian Devil.  Boss Battle Oh man, it's been awhile since we heard that boss theme. I don't think I really talked about it the first time around. It's not nearly as, um, whimsical as Goemon 2's boss theme but it's still pretty silly. It grows on you though. Anyway, the boss fight. The Mechanical Bodyguard is, I believe, the only boss encounter in the game on this perspective. All the others are in 2D stages. There might be a few mini-boss encounters on the 'overworld' like this, but none of em but this one start up the boss theme. If you leave him alone he'll either start swinging his mace around or, in this case, start spinning around the arena. He'll fire off in one direction and ricochet off the... walls? The sides of the screen, at any rate.  Here he is swinging his mace. You'll want to move as far away from him as possible to dodge this. Or if you get an opening you can rush in to hit him. Unfortunately you cannot just play jump-rope over the mace's chain, which is too bad because that could have made the fight a bit more interesting. Last edited by SpoonyBardOL; 12-03-2017 at 02:46 PM. |
|
#43
05-09-2015, 01:10 PM
|
|||
|
|||
 Sometimes when he swings his mace he does so powered by an electrical charge. Only thing this changes is that it makes him invulnerable, so you can't just hit him to break him out of the attack. 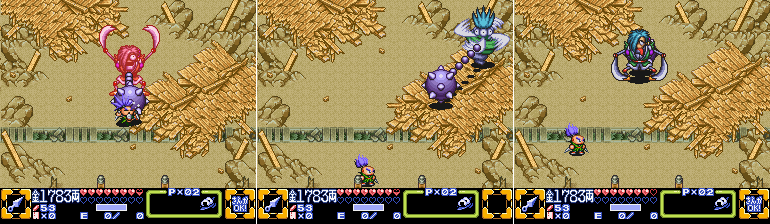 He's kind of a 'trading blows' sort of boss, though, since unless you use ranged attacks it's pretty easy to take a hit when you go to hit him. I could always always use Goemon, as he has more reach with his primary attack, but I'm not. I'm using Sasuke. Because of a reason. Love the Bodyguard's expression upon being hit though. He'll also occasionally get tuckered out if he spins around the room for too long, it's basically a free hit on him whenever this happens. 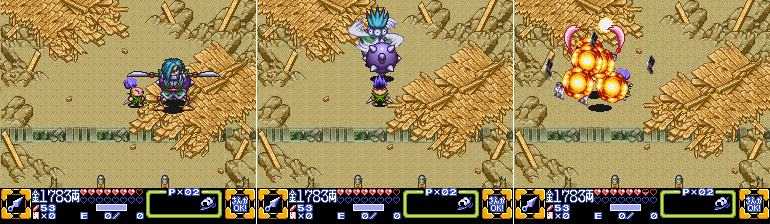 And that's basically the fight. Eventually the Mechanical Bodyguard abruptly explodes, and his remains get crushed by his own mace. Yeouch.  Kidnapped! Bismaru hops back down on-screen carrying Omitsu, and isn't very pleased. Bismaru: Shameless! What a piece of junk! I'll just take this girl and smash you all with my giant robot! Farewell! Omitsu: Kyaah! Help me Mr. Goemon! Oh, Omitsu has been kidnapped by the villain. What an exciting new direction for the series. 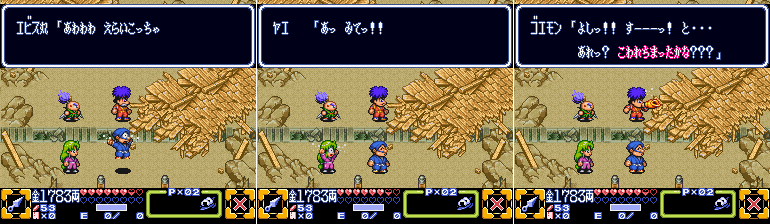  Goemon: Damn it! Omitsu's in danger again! Ebisumaru: Waaaah! We're in trouble! What do we do?! Yae: Look! That ugly robot is running away! Sasuke: Goemon! Call Impact with the Triton Shell! Goemon: Okay! (puff puff) Huh? Is this thing broken or something? Sasuke: You have to take a bigger breath! (laugh track) Goemon: Oh fine! I'll do it your way! I'll overcome it. Let's go! Oh man, he blew into the Triton Shell! You guys know what THAT means!  Impact's Theme    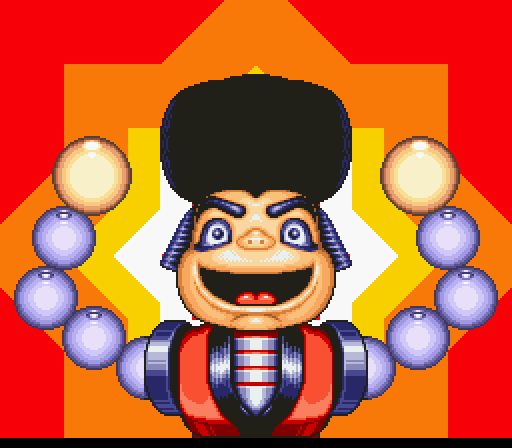 (laugh track) lol Ebisumaru fell upside down. Fans of the N64 games might get a twinge of nostalgia when Impact's theme first starts up, though only the first few notes are reminiscent of 'I Am Impact!', though it's probably safe to say this ditty was part of the inspiration to the iconic N64 song. Last edited by SpoonyBardOL; 12-03-2017 at 02:48 PM. |
|
#44
05-09-2015, 01:14 PM
|
|||
|
|||
 Starting Up... Yeah this is only barely a BGM track, but it plays at the start of every Impact Destruction Sequence as Impact stomps in from the left. Goemon: ...Impact is a Time Machine??? ...well, at any rate, that pest is escaping really fast! Sasuke: Yae, pull that new switch there. Yae: Okay! This yellow one right? Ebisumaru: We're not going nearly fast enough! Is something broken in here? Sasuke: What do you mean by that? Goemon: Hey, stop arguing! We gotta chase that thing! Ebisumaru: At this rate it will be night time by the time we catch up... Well that was kind of a disjointed conversation. Goemon just drops the info that Impact is a Time Machine with no fanfare or warning, maybe he learned off-screen during Impact's summoning animation. It's not the first time in the game new knowledge was just kind of blurted out, I'd REALLY love to see a proper script translation someday... There was one important bit of info in there, though. Impact DOES move a lot slower in the destruction sequences of THIS game compared to Goemon 2 or Mystical Ninja Starring Goemon. Where they were frantic 'destroy all the things for points' little mini-games, in Goemon 3 you're more defending against a steady stream of enemies while moving forward at a deliberate pace. So let's get to it!  Impact Goes To Battle! Even the music is slower and has more weight to it. Anyway, Impact gradually moves forward in these sequences, you can see the little meters counter on the bottom right of the screen which lets you know how much further you have to go till the goal. You can control Impact's relative position on screen by moving him backwards and forwards, as well as up and down to a point, but you can't make him actually progress any faster. Hitting B or Y will cause Impact to punch forward, and hitting A causes him to fire some Nasal Medals at face-level. You can also turn his head back and forth with the D-pad, which can alter the trajectory of his Nasal Medals, which is the only way to hit some enemies that are too low to be hit with his punches. You can also cause Impact to jump by pressing X, but it's not super advantageous to do so. Fun though.  You lose some energy if an enemy hits you, but it's not super difficult to actually make it to the end of these destruction sequences. Hell, I've never actually lost in one (I should remember to lose intentionally next time to get some shots of what actually happens). No, the big danger here is that if your performance is too crummy you'll enter the boss fight with a poor load-out of energy and ammo. The more foes you destroy, and the more damage you avoid, the better equipped you are for when it matters.  Here is Impact looking at the screen, which happens when you hold the D-pad to the left. I couldn't get the timing right to get a shot of his head mid-turn no matter how many times I attempted it. If you fire Nasal Medals while he's looking at the screen they'll go straight down, though this isn't at all useful since if an enemy lasted that long to be in a position to be hit there they'd just be destroyed by Impact's body anyway. But if you fire them while his head is in the middle of turning they'll fire downward at a 45 degree angle, which is perfect to hit these jerks hiding in trees chucking bombs at you. The timing is tricky though since Impact's head rotates back to its original position as soon as you let go of the D-pad. 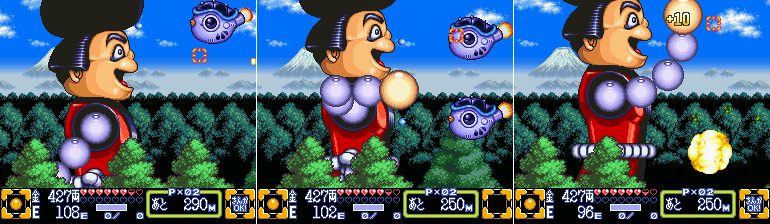 If you don't want to waste the Nasal Medals on the flying enemies you can also have Impact do an uppercut by holding up when you hit B or Y. It has a delay before you can do it again, though, so it's not as helpful against a large number of higher enemies. 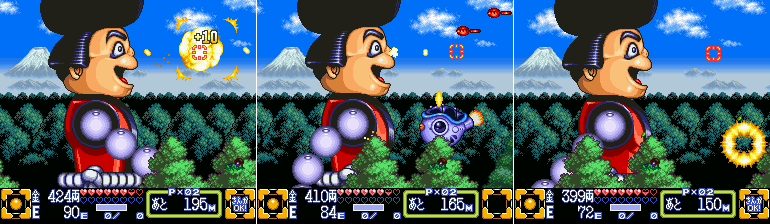 The closer you get to the end the more dense the enemies become, but it's still pretty manageable for this first destruction sequence. I never bothered doing a roster of the new enemies in the destruction sequences since, I dunno, they just don't feel like enemies, y'know?  Once you reach the end you get a tally of what you'll be getting going into the boss fight. I get an extra 375 energy, 128 Ryo, and 2 Pipe Bombs. 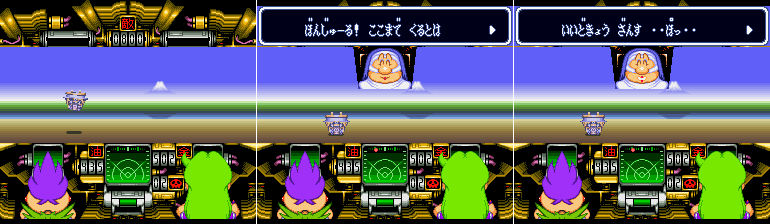 Impact Boss The perspective changes to inside Impact's cockpit, with Sasuke and Yae at the controls. The characters at the controls depends on who was your last-used character before Impact was summoned. If it was Goemon you'll have Goemon and Ebisumaru at the controls, Ebisumaru gives you Ebisumaru and Sasuke, Sasuke gives you Sasuke and Yae, and Yae gives you Yae and Goemon. Huh? Oh right, Bismaru is saying things. Bismaru: Bonjour! You have some nerve coming here, it is quite dangerous for you! It must have been love at first sight that brought you after me. Unfortunately for you all, however, this is goodbye! Bismaru Elegant, transform!  The weird bucket-shaped mech suddenly transforms into something that resembles its owner, tossing a rose at us right before the fight starts. Incidentally, Bismaru's portrait in the cockpit is flashing, and it was hella difficult to capture it. I must have taken something like a dozen attempts to get it on a frame while it was on screen. Same for the rose. 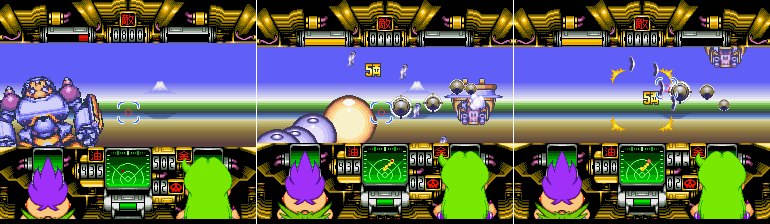 And the fight begins! Impact's controls here are much like they are in Goemon 2. Y is your quick, weak punch. B is the strong punch. A fires Nasal Medals, X shoots out a Pipe Bomb. And L&R block on either side. Things are mixed up a bit this time around, though, with a Strong Punch meter. It's in the top-left of the screen, just to the left of the boss's HP indicator. It gradually fills up and depletes whenever you use a strong punch. You're not prevented from using a strong punch if it's not full, but if it IS then the punch will be much more powerful. You don't get any extra benefit from it unless it's fully-charged, though, and punching before it's full causes it to deplete again anyway. The times when you want to use a strong punch come infrequently enough that you don't really need to worry about it though. The Bismaru Elegant has a number of attacks. First off it has a staple of almost all Impact Boss encounters, a projectile. Destroying the projectile, either with your weak punch or some Nasal Medals, awards Ryo which you use as ammo for more medals. Last edited by SpoonyBardOL; 12-03-2017 at 02:51 PM. |
|
#45
05-09-2015, 01:18 PM
|
|||
|
|||
 The Bismaru Elegant also likes to charge at you to either hit you with a flurry of strikes or a flurry of, uh, kisses. They all do damage either way, and the boss can be knocked away from this attack with a strong punch. But I'd advise not hitting it with a strong punch right away... 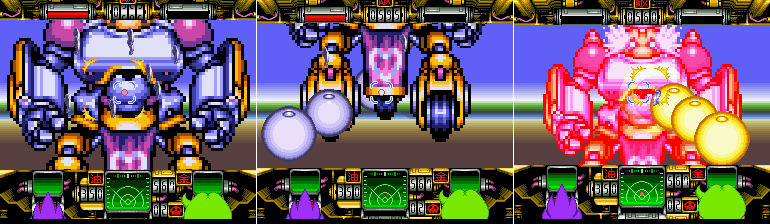 Instead what you WANT to do whenever it comes up close is to mash Y to hit it with a flurry of weak punches. After a quick combo the Bismaru Elegant will fly upwards for a moment, and once it lands you can hit it with a second flurry of weak punches. If you try to punch it again after the second combo you'll knock it out of range of your fists, so this is when you want to hit it with a strong punch. Two weak punch combos followed by a strong punch does CRAZY damage, and nearly every boss in the game leaves itself wide-open to this attack. For this reason alone all of the Impact boss battles in Goemon 3 are, on the whole, far easier than they were in Goemon 2. 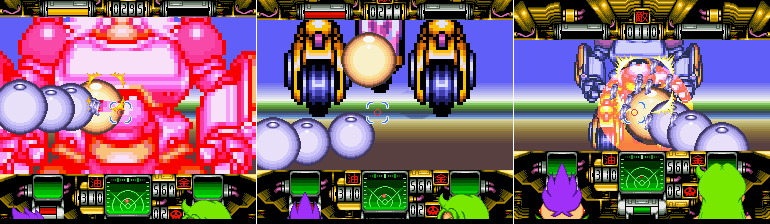 Here's a shot of another combo to better illustrate. I ran through the fight twice to make sure I had enough screenshots, so that's why the totals of HPs and ammo and stuff is a bit inconsistent throughout my images here, but the first and third of the images above show about how much damage this combo does to a boss on average. That's roughly 185 damage for a counter-attack, and bosses LOVE to get up close to try and hit you which means you have plenty of chances to use it. Mash Y, mash Y again, hit B. You don't even really need the pipe bombs anymore.  Of course they're still there if you want to use them. Much like Goemon 2 you become invincible once the bomb is launched so it's good to use defensively as well as offensively.  Bismaru's other attack is to transform briefly back into its, uh, bucket form and ram you at full speed. The only way to avoid damage here is to hit it with a strong punch. 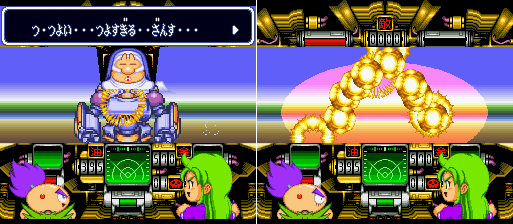 Compared to the Sumo Robot from Goemon 2, the Bismaru Elegant is kind of a pushover. Bismaru: Strong... they're too strong. Boom! The Bismaru Elegant explodes. I guess that's the end of her, huh? 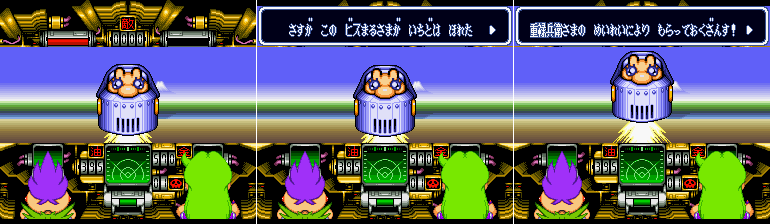 Bismaru's Theme Pfft. Right. Bismaru: So the great and clever Bismaru was charmed by someone else for a change. But I guess you can't blame me. I still have to take Omitsu away, though, on Lord Juurokubei's orders. Bismaru Pod, Time Warp! Until we meet again, farewell! 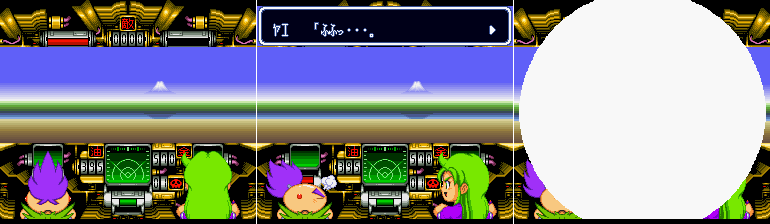 Sasuke: Oooh! They made a time warp! Yae: Fufu, what nerve, running away! Sasuke: Impact! Time warp! (Incidentally, this is why I swapped to Sasuke earlier, the script I'm following has certain characters in all the Impact scenes so I'm making sure to use the characters it did on those occasions for convenience) 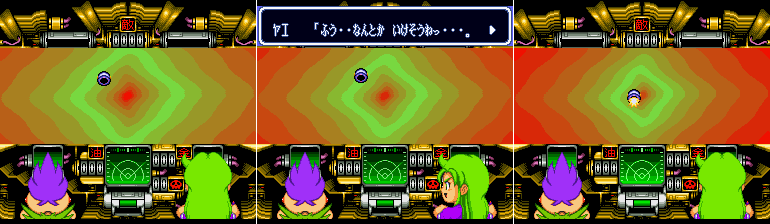 Yae: Phew. Looks like we're OK. (rumble) Eh? Something's behind us! Sasuke: Oh no, I can't get away!  And just like that the screen goes white! Looks like Bismaru managed to escape with Omitsu. As for Goemon and the others, well.... you'll just have to wait until next time to find out what happened to them! See you next--- "But Spoony!" Hypothetical viewer who is familiar with the game might say "You missed a thing in Hagure Town!" You're right! I did!  Village Rewinding back to right after I got the Mermaid Transformation power, but BEFORE beating Stage 3. I dive into the canals around town... 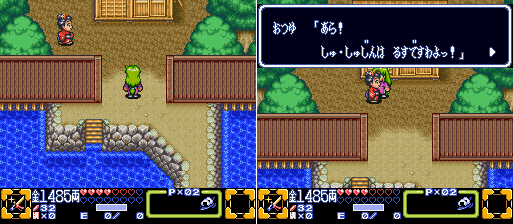 And head to the northeast, which has a house on a bit of land that is otherwise unreachable since you have to dive under bridges to get there.  And inside is a dude who gives you 200 Ryo just for finding him. That's it. Kind of a weak reward for finding what is probably the most easily-missed NPC in the game. Oh well! And that's it, for really real! But before I go, here's a recording of the entire first Impact sequence and boss battle. I used the same recording method I did for my Goemon 2 LP, which is to record it on ZSNES with a ZST, then export the ZST to a video file, but unfortunately I dunno if I can do this every time as I'm hitting the same de-syncing issues that I did with Goemon 2. I still manage to beat the boss, but you'll see me take a few hits I shouldn't have because the boss moves in a way it didn't when I was fighting it. Last edited by SpoonyBardOL; 12-03-2017 at 02:52 PM. |
|
#48
05-10-2015, 12:40 PM
|
|||
|
|||
|
Quote:
|
|
#49
05-11-2015, 05:06 AM
|
|||
|
|||
|
Quote:
 Also, if you have some dialogue you don't understand, I can translate it if you upload all of the dialogue's screenshots. 
|
|
#50
05-16-2015, 10:40 AM
|
|||
|
|||
|
Hey it's time for that Ganbare Goemon 3 thing what I'm doing!
When we last left our heroes they had just stood victorious after the first Goemon Impact boss fight, but then after chasing Bismaru through the time warp, uh, shenanigans happened? 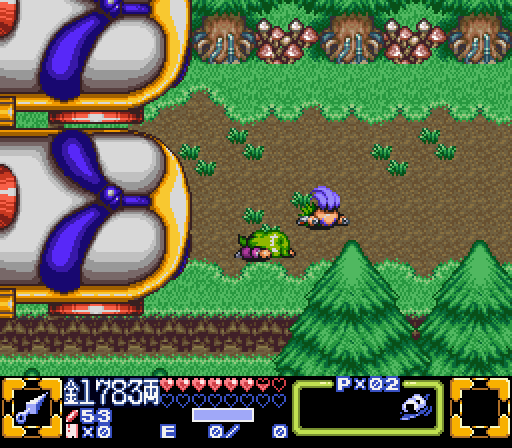 Whoops! After it's all over, Sasuke and Yae find themselves face-down in an unfamiliar field. Goemon and Ebisumaru are nowhere to be found.  Sasuke: What is this place? Is this the future of Edo? ...Ah! Yae! Are you alright? Yae: Ugh... I'm okay. Sasuke, where are we? Sasuke: I think we arrived in the future somehow or another. Yae: Where are Goemon and Ebisumaru? Sasuke: Perhaps the shock of coming out of the time warp sent them elsewhere? That's a possibility anyway... Yae: Seems that way. Sasuke: There's no sense in us staying here. We should head towards the town! (note, this has nothing to do with who you were using in the Impact sequence, even if I had a pair of characters other than Sasuke and Yae piloting Impact it still would be Sasuke and Yae waking up in this scene)  Future Overworld And here we are, in THE FUTURE! Get used to that new BGM, it will be with us for much of the rest of the game. Speaking of the rest of the game, this is pretty much where the game starts for real. Well, sorta. I mentioned a few updates ago that Goemon 3 had a weird structure. We're about 25-30% of the way through the whole game, but we're going to be spending the rest of it in the future, there's no going back to the past (hopefully you got all 12 Fortune Cats in the first three dungeons!). The world is now much larger than the tiny area we were confined to in the past, which we'll gradually see as time goes on. Even the stages of the future feel different from the ones in the past, but I'm getting ahead of myself. For now, we got some exploring to do, due east! 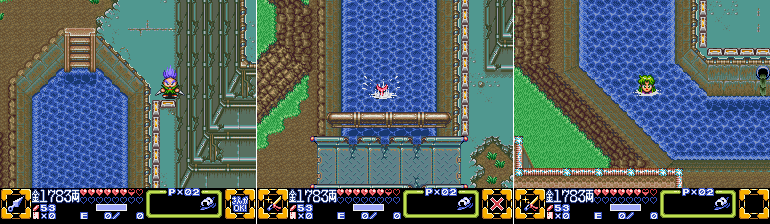 We have to dive under a bridge to get anywhere, and we pass by a suspicious-looking electrical barricade on the way. 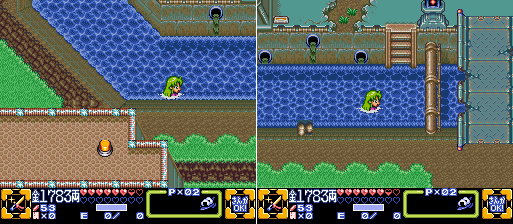 And a switch! This may be a place we'll be visiting later. For now, though, we transition screens and enter Neo Hagure Town.  Rather than exit the waterway at the first opportunity, I instead see how far I can go via swimming.  The waterway eventually takes me to the only other exit far to the south.  Way back at the north entrance I go east instead, but come up on a dead end after transitioning to a new screen. I'll do a roster of those enemies as I encounter them for real.  Futuristic Store Alright, let's actually look around town. I exit the water from one of the north exits and enter the first building I see, a future shop! And it's the first store that sells armor items! Much like other games in the series you can buy armor to absorb damage from enemies. The Straw Cape and Straw Hat, lowest tiers of armor that they are, absorb one hit each, and we can only carry one of each. But hey, they functionally add an extra heart for us between the two of them. I pick up one of each, I already have a Rice Ball.  Future Overworld Oh and there are a lot more NPCs just walking around we can talk to. I bet their advice is super useful and they might even be filling in the blanks of the story with incidental details. But again, there's no full translation of the game. For what it's worth, I think Takeshi there is telling us something or other about Neo Hagure Town. Just north of here is another exit west, taking us close to where we started, over that bridged we first dove under. Last edited by SpoonyBardOL; 12-03-2017 at 06:37 PM. |
|
#51
05-16-2015, 10:44 AM
|
|||
|
|||
 It just takes us to a straight-up dead end though Phooey. Heading back into the town, I peek inside the inn. I dunno what it is, but the 'Neo Hilton' sign just makes me chuckle.  Futuristic Travel Center A little further north there is a building with a green curtain, and just to the left of that (sorry, I thought I had a better screenshot of it, but it looks like I didn’t) is an exit to town that’s currently blocked off by some metal boxes. Inside the building with the green curtain is the Travel Center OF THE FUTURE. Unlike in the past where the travel centers just functioned as a direct link between Hagure Town and Festival Town, in the Future the Travel Centers are much more useful since there’s more than two locations. However at the moment we only have access to New Neo Hagure Town so we can’t get much use out of the Travel Center yet. Oh, and the weird little Elephant-thing holding a Dango and riding a floating ball? You’ll see them around the Future Overworld here and there, they’re basically portable Fortune Tellers.  Future Overworld I hop down and enter this hut, and a little girl mentions something about the ‘Karakuri Touzokudan’, or, as I’ll be calling them, the Band of Mechanical Thieves. These thieves also, apparently, have mecha. (And don’t worry, I won’t be flooding the LP with images of every single line of NPC dialogue like the last game)  A little east of here is another exit to town blocked off by another metal box. Little Metal Box, you are the worst.  Yae tries to take out her frustration on it, but the Little Metal Boxes will not budge, no matter what you throw at them. Just a bit north of there, the stairs are slightly obscured by the highway rubble, is a building with another trainer. This one, though, will have nothing to do with green-haired ladies or little mechanical ninjas.  And in another house towards the middle of the upper area is… Oh. It’s Kensuke. Hi Kensuke.  Well that’s all we can do in the upper area of New Future Neo Hagure Town, let’s check out what’s available to us from the southern waterway exit. Hey check it out, an exit to town that isn’t blocked off by a frustrating box! 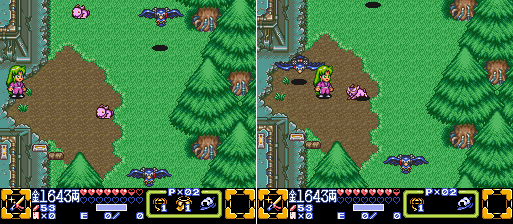 It’s another forested area, with some diving birds and seriously cheesed-off rabbits!  Rabbitman Dynamite: Oh they look cute and cuddly at first, but as soon as you get close to them these fuzzy critters start looking for blood. And their eyes… they’re just…. evil. There’s no way mother nature could produce such a monstrosity… and it didn’t! Rabbitman Dynamite is a robotic minion of the Band of Mechanical Thieves, and clearly the product of some twisted mind.  Bloo J. Byrd: Another robotic animal minion of the Band of Mechanical Thieves, Bloo J. Byrd loves to fly just out of reach of most melee attacks, and then swoop at its prey. Fortunately they’re vulnerable to being hit while mid-swoop, or the impatient hero can just jump and hit them as well. Last edited by SpoonyBardOL; 12-03-2017 at 06:38 PM. |
|
#52
05-16-2015, 10:46 AM
|
|||
|
|||
 Anyway, my joy at finding a new area is short lived since both north and south exits from the first screen lead straight to dead ends. And not even dead ends that can be opened up later by finding a Little Metal Box Eraser. Though that one mis-colored tree in the southern path looks a tad suspicious. May need to make a mental note of that. 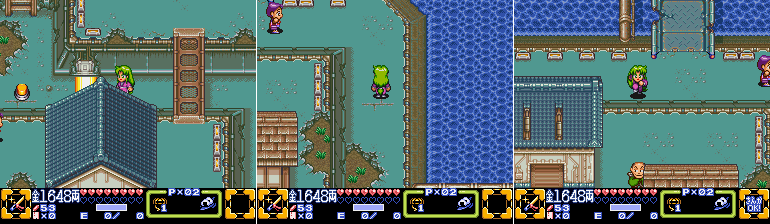 So with no other paths open to us we head back into town, and find an energy barrier we can’t pass through. If we had Goemon we could just throw a charged Ryo at the switch, but we don’t and neither Sasuke’s Firecracker Bomb nor Yae’s Bazooka will do the trick. As we go north around the raised area a shifty-looking guy walks out from behind a house and slinks away. We can’t do a thing with him yet, but if he happens to spot us there’s a rather obvious audio cue as he gets a shocked expression and then runs away. Hmmm…  The path to this little area is partially obscured behind some houses. 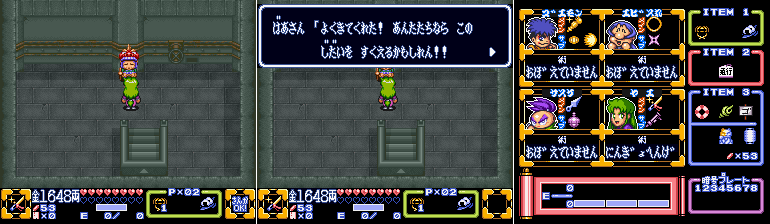 Underground Inside is an old lady with an odd headdress, and she just straight-up hands over a Fortune Cat. You can see in our inventory that 1/4th of the Fortune Cat icon is colored in. Also Goemon and Ebisumaru are still present as if they were available, though they aren’t. 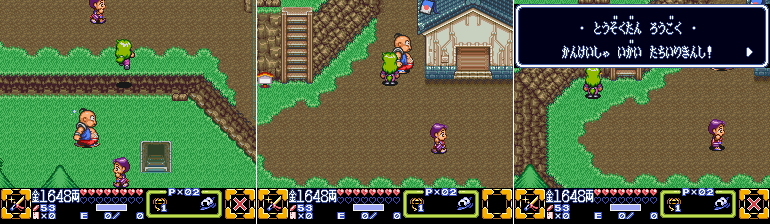 Future Overworld From there I jump down to the north to the last area of Neo Futureland Hagure Town we have yet to visit that’s available to us. There’s a big guy ramming a house, and a sign near an exit leading to the west. The sign mentions something about the Band of Mechanical Thieves’ Prison. Ah, this must be where those dastardly rogues have been kept! We should pay them a visit and laugh at them behind bars! Or… forcefields? I dunno, what do future prisons use? Also, there is a path directly here from the north side of town, but I took the long way around just to get the Fortune Cat, if you just wanted to go straight to the path to the prison just head south down the first bridge you see in this area. 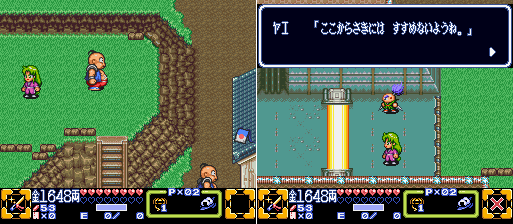 We head into the Prison, but find our way blocked by an energy barrier. Oh well, I guess visiting hours are over? Yae: Looks like we can't continue from here... Sasuke: Should we go back? 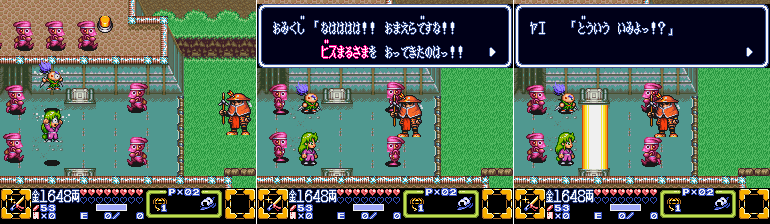 Gotcha! Suddenly Sasuke and Yae find themselves thrown over the barrier by some masked thugs! Another thug, with what looks like an arrow embedded in his helmet, bounces onto the screen from the right with all of one frame of animation. Omikuji: Nahahahaha! You! You're the guys chasing the great Bismaru! But doing that is like trying to throw a dried plum at a shop curtain! Yae: What's that suppose to mean? Omikuji: There's an old Japanese proverb that says if you throw a dried plum at a curtain nothing happens, it just drops to the floor. In other words, it's pointless to even try! Don't you think you're getting wiser here? Yae: I can't believe I have to talk to this idiot... What a ridiculous way to get arrested... (groan) Sasuke: Well, what are you going to do? Omikuji: Hey! It's very rude to call me an idiot! Quickly! Throw them in jail! Huh, I guess it wasn't the prison where the Band of Mechanical Thieves was being held, but rather a prison belonging to them. Whoops. Looks like Sasuke and Yae have been captured by this Omikuji guy. What ever will happen to them? 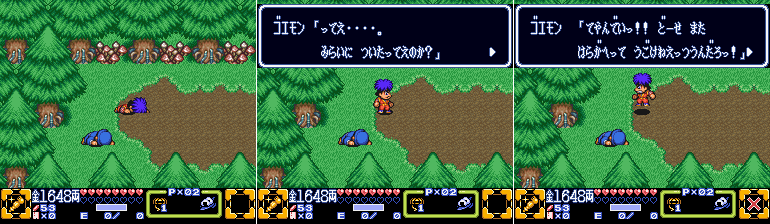 Whoops! Predictably, the screen fades and we swap over to Goemon and Ebisumaru, who landed a short distance away from where Sasuke and Yae did. Goemon: Oww... did we make it to the future? Ebisumaru: Goemon... I'm so useless. I can't move another inch. Goemon: What the hell are you going on about? You're absolutely fine! You're probably just hungry! Ebisumaru: That's not true! I've been eating a lot of this grass and I think it made me sick! ...I've been throwing up. Goemon: Ebisumaru.... even in the future you're eating grass? Ebisumaru: B-but.... Goemon, I'm starving! Goemon: Oh, shut up! Come on, we have to look for Sasuke and Yae! Oh Ebisumaru, you goofball. ....I guess eating grass is a common thing for him? 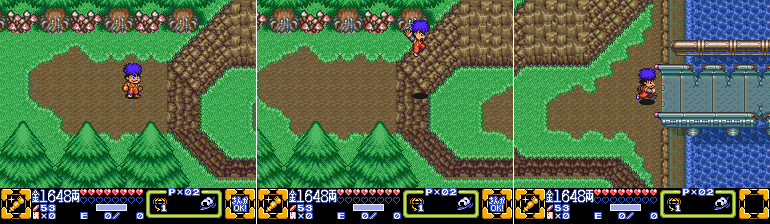 Future Overworld We head just a bit east of here, and we hop down at the dead end Yae and Sasuke ran into earlier. Geez, to think Goemon and Ebisumaru were just a stone’s throw away, who knew? Also, I haven’t mentioned it yet, but did anyone notice that the trees have what looks like pipes coming out of them? Wow, even the plantlife is futuristic!  Police Robot Before we can get any further, though, we encounter a thug in a mecha who bars our path. He quickly realizes we're friends of the pair they just captured, and attacks! Last edited by SpoonyBardOL; 12-03-2017 at 06:41 PM. |
|
#53
05-16-2015, 10:50 AM
|
|||
|
|||
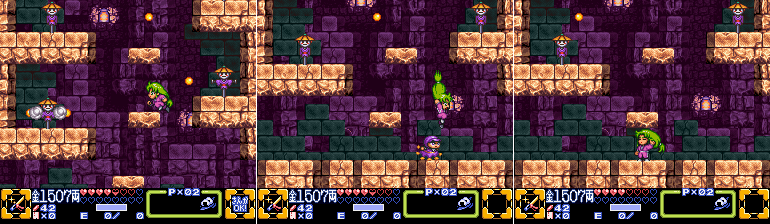
 The mecha isn't too tough, it fires a stream of Yellow-Grade Spherical Enemy Projectiles (tm), hovers in the air for a moment, then flies across the bridge and lands, repeating the pattern. It probably takes a few too many hits, honestly, but Goemon eventually destroys it.  Future Overworld Once it explodes, we head east and find ourselves back in town. Not much is different, though, and without Yae we can't reach the southern area since we can't swim under bridges. 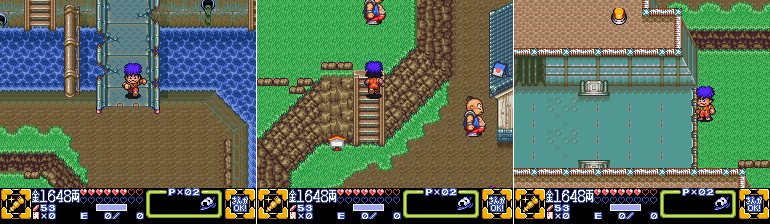 So the only thing we can do is head straight south and west into the Prison. Though in retrospect I REALLY should have visited the shop and picked up another set of armor and recovered our hearts at the Inn. That'll come back to bite me later. 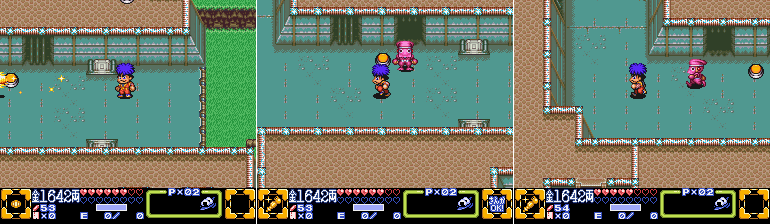 Prison Goemon can deactivate the totally-there energy barrier with his charged Ryo, and from there we can storm the prison. However as soon as we step inside many of the cells open and hordes of the masked thugs from earlier storm out after us.  Stormin' Bimmy: Where the Jimmies made up the bulk of foes in the past, the Bimmies are the default baddie of the future. The pink-masked variety can't do much but charge at the player, though they can certainly be overwhelming with their sheer number. They like to think they're at least as deadly as your average Stormtrooper, but since Stormtroopers were at least armed they're not even that deadly. 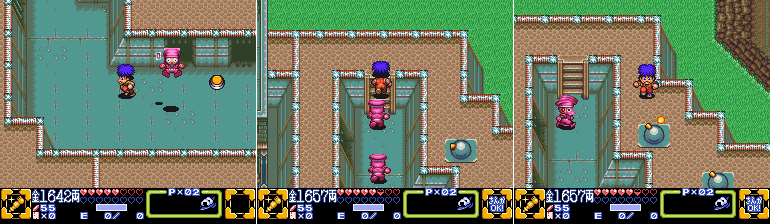 They do have a hilarious defeated pose though. Anyway, the path through the prison is fairly linear, but we do have to make detours now and then to hit switches. A new foe pops up from the floor as well, a turret. It doesn't get a profile though, it's more of a stage hazard. I mean, yeah, Stompy was more of a hazard and he got a profile, but he also had a face. There's no cartoony eyes nor mouth on that thing. 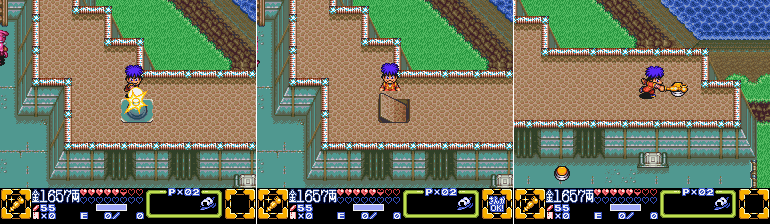 Smacking the turrets cause them to rotate back into the floor and not pop up again. A few of them are guarding the switch at the end of this path here. It's the same switch we saw earlier as we swam by with Yae! 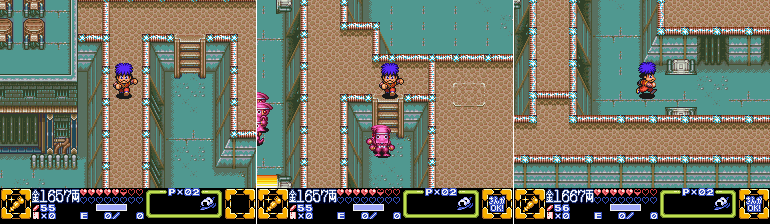 We return to the stairs and head back down the other path, and it eventually takes us to this energy barrier. It's actually gone, it's not a screenshot issue. The switch we just hit removed it.  More cells open up and more Bimmies give chase. If they didn't have the durability of paper-mache they might actually be threatening!  Another switch is in this open area, surrounded by six turrets. It's far better to destroy the hazards first, their bullets fire fast and you're bound to take a few hits if you just try to get in and out doing nothing but hitting the switch. Last edited by SpoonyBardOL; 12-03-2017 at 06:43 PM. |
|
#54
05-16-2015, 10:52 AM
|
|||
|
|||
 As an aside, Goemon's damage sprite is pretty hilarious.  We pass by another switch we can't yet reach and a few more turrets before hitting some stairs going back down. 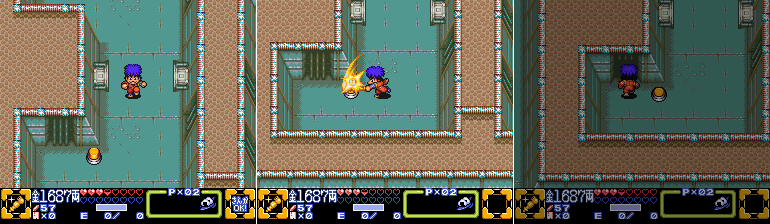 This energy barrier was deactivated by that switch surrounded by the Sinister Six Turrets from earlier, and this latest switch removes the one we just passed north of here. As soon as we hit this switch, though, the door next to it pops open. No Bimmies pour out of it, that's mighty suspicious...  Fortunately, Sasuke is right inside! Goemon: Sasuke! You're safe! Ebisumaru: I was so worried! Huh? Where's Yae? Sasuke: I'm so ashamed! I underestimated our enemy, he was called... Shokichi or something. He threw Yae into a different cell. Not only that, but the Triton Shell seems to be in enemy hands! Goemon: Damn it! Let's go you two! Ebisumaru: Right! Sasuke: I'll go on ahead and blow up the prison doors for you. I'll also get our escape vehicles ready. I'll entrust Yae's rescue to you two.  Well that's one ally rescued, though we can't actually swap to Sasuke yet. I will switch to Ebisumaru for the remainder of our trip here. Also I should point out, I was a bit incorrect when I said Ebisumaru's attack hit all sides equally. It reaches a bit farther in the direction he's actually facing, despite being a hula hoop, and it's possible for enemies to still get a hit on you from the side or behind even though they may also take a hit in the process.  Gotcha! Anyway, this door was sealed up earlier. Sasuke opened it for us like he said, so even if we went straight north after hitting the switch earlier instead of saving Sasuke we wouldn't have been able to enter anyway. Inside we find Yae in the grips of Koronda! Koronda: Gahahaha! I am this prison's boss! We'll be giving your friend here over to Lord Juurokubei! But before I do that, I'll just beat all of you too!  And then we get into a game of red light green light or, as it's known in Japan, 'Daruma-san ga Koronda', which is where this dude gets his name and appearance. I guess that would have been lost in translation, maybe if this game got localized his sprite would have been altered to have a traffic light on his body? Anyway, if you can read the hiragana on the top right you'll see the text 'daruma-san ga' whenever Koronda has his back turned. He'll eventually turn to face you immediately after the text changes to 'Koronda!', and if you're moving when he looks at you he'll blow you back down to the bottom of the screen. You'll also take damage from his smoggy breath as well. So move up when his back is turned, stop when he's about to look at you, and once you reach Yae, start attacking the rope. Attacking counts as moving too, so you have to be careful. 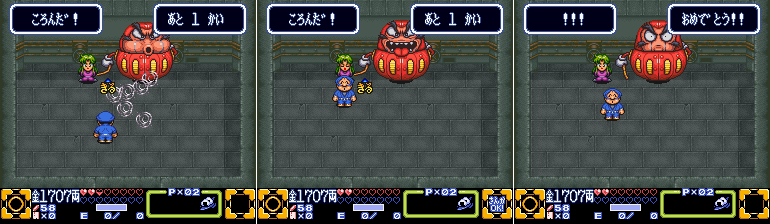 The text box on the upper right, by the way, tells you how many more times you need to hit the rope. 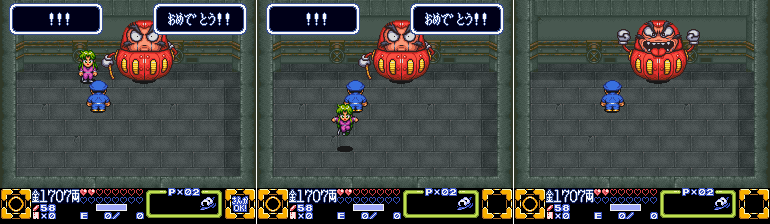 Yae: Thanks Ebisumaru! I owe you one! Yae escapes once the rope breaks, which ticks Koronda off quite a bit!  Kodonda: Once Yae is free the whole red light green light game stops and Koronda starts attacking for real! He hops around, targeting the player's general position, and also rolls from side to side. It's difficult to hit him with melee attacks without taking damage yourself, so stick to projectiles. 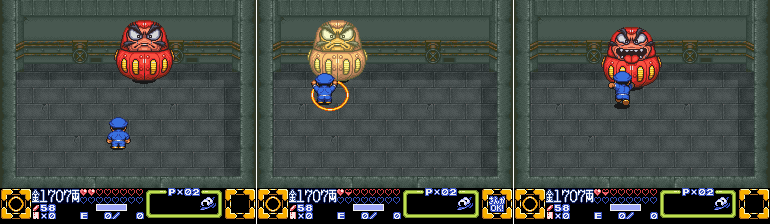 As his description says, attacking him with your primary weapon is usually a bad idea. It's like his hitbox extends a bit farther out of his normal sprite, so hitting the sweet spot where you can hula-hoop him without taking a hit is tricky. As you can see, I score a hit on him in the second image, but he got me as well at the same time. Last edited by SpoonyBardOL; 12-03-2017 at 06:44 PM. |
|
#55
05-16-2015, 10:54 AM
|
|||
|
|||
 In fact I wind up using the rice ball in my inventory because I just can't follow my own advice. 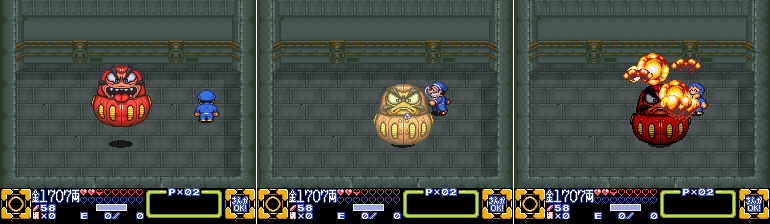 I finally get Koronda down, though, with two and a half hearts to spare! Good thing I'm out of danger now, right? 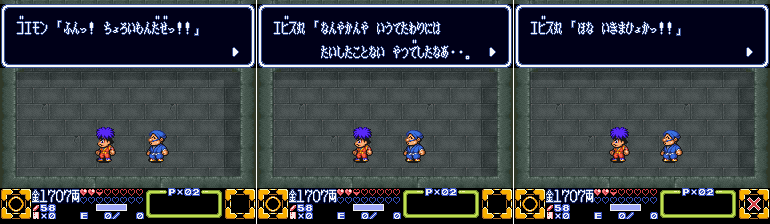 Goemon: Tch, that was easy! Ebisumaru: He talked big, but wasn't that tough. Goemon: Come on, Sasuke and Yae are waiting. Ebisumaru: Well then, let's go! No danger at all... 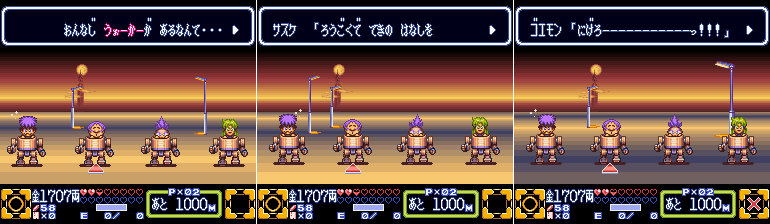 Making Our Escape Goemon: This time period has the exact same Walkers as the Edo period? Ebisumaru: Well, Sasuke was able to find four of them, he did a good job! Sasuke: When I was imprisoned I had the chance to listen to the enemy's conversations... Yae: Aaaaaah! There's a huge robot coming in from behind! Goemon: Run!!! 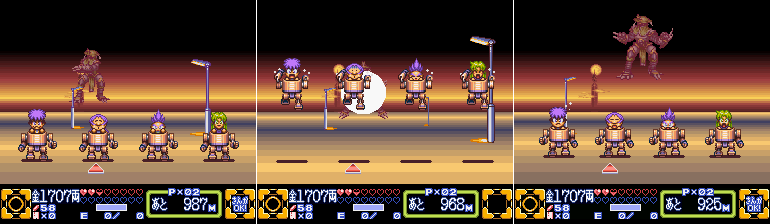 Run Faster! Balls. Yup, it's another chase sequence. I legit forgot this followed the whole prison scene, even though I had replayed the game right before starting this LP, I thought it came a bit later. So, just like the one from earlier, I have to dodge all of this guy's attacks, and now he has FOUR targets he could hit that I have to manage. And I only have five hits total to boot. Told ya not refilling my hearts and getting more armor before heading to the Prison would come back to bite me.  This robot, which bears a bit of a resemblance to that Omikuji guy, has a basic attack where it shoots a yellow projectile at a single targeted player, much like the Bismaru Elegant did when it was chasing us, but doesn't simply have the same attacks but harder, oh no. It can also fire out its claw out to the right-side of the screen, where it then slides across to the left hitting each person in succession. So basically you have to start with Yae and make each character jump one after another at the right moment. 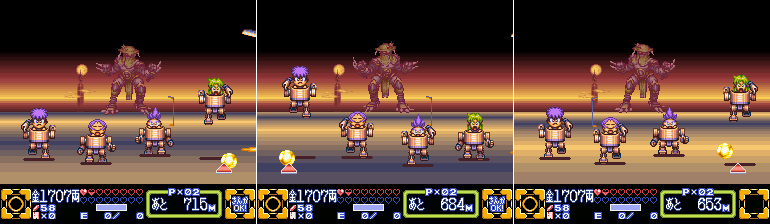 Of course each character that gets hit, even if it's technically from the same attack removes half a heart, and I wind up messing the timing up on two of em, so I go down to a heart and a half. 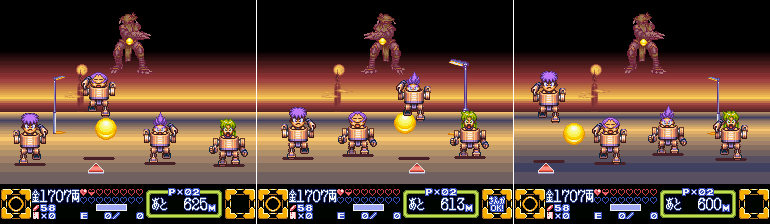 The Omikujizord can also leap into the air and fire a steady stream of projectiles at the party. They come quick and you have to make snap judgements about what projectile is going to hit which character based on its trajectory. Of course this is made all the harder due to the extra character. In the first sequence, since there were only three characters, you could always get to the other with a single button press, since pressing left on Goemon would select Sasuke. Here, though, there's four, so if Goemon and Sasuke are targeted one after another, or Ebisumaru or Yae are targeted one after another, that's two button presses needed to reach them. And trust me, that messes up your timing much more than you would think, these shots come fast.  Amazingly I managed to dodge all of them, and I even manage to correctly dodge his second claw attack as well.  And much like the Bismaru Elegant, Omikujigelion can run forward and try to stomp on the party, and I need to get ahead of that by pressing A. Last edited by SpoonyBardOL; 12-03-2017 at 06:45 PM. |
|
#56
05-16-2015, 10:56 AM
|
|||
|
|||
 I mess up the timing on his third claw attack, though, and take another two stupid hits. Well I'm down to a sliver of life now, one more mistake will end me. 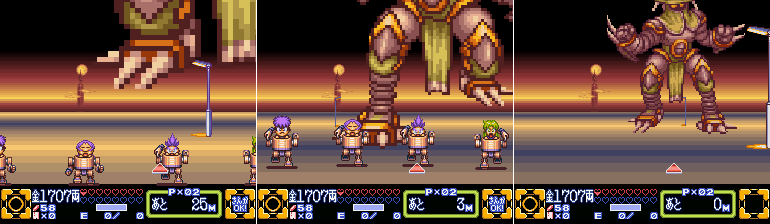 He makes one more big stompy attack just as the meters count down to 0, but I managed to get away! Whew! 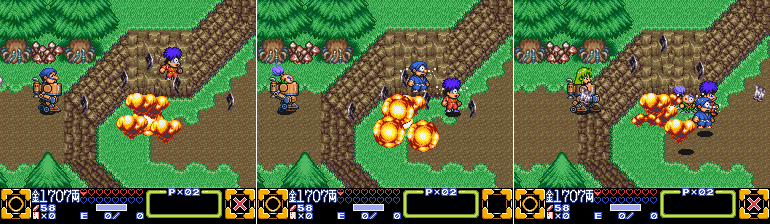 Everyone comes bursting out of the forest near where Goemon and Ebisumaru woke up, trashing their Walkers again much like before.  Ebisumaru: Well, we did great didn't we? Goemon: But the Wise Ol' Man's inventions, those Mechanical Walkers, are terrible aren't they? They're so fragile, Sasuke! Sasuke: Be that as it may, Goemon, I won't tolerate you insulting the Wise Ol' Man like that! Anyway, I heard from the enemy that they had the Wise Ol' Man developing a new model of the Walkers somewhere around here. Yae: I wonder why the Wise Ol' Man would work with the enemy... Ebisumaru: If that's true then we're in big trouble! Goemon: A new model of the Mechanical Walker, huh? It won't be any trouble for THIS sly thief to get... Sasuke: If I'm not mistaken, the Prison's Factory Building is to the south. We should gather information about how to enter the factory. So there we have it, a new objective! Find this factory and get our hands on a new Mechanical Walker! One that hopefully won't explode after colliding with a tree or stumbling down a shallow cliff. The game basically tells you here to Talk To The Townspeople, and I'm sure they would have lots of good information on how to actually reach this factory, but I have to rely on Mr. Walkthrough. Fortunately there's really only one place it could be in any area south of here, beyond that energy barrier we saw earlier as Yae that needed Goemon's charged Ryo attack to open. 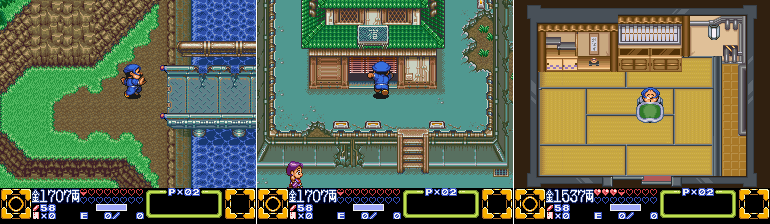 Future Overworld First things first though I'm staying at the Neo Hilton because goddamn that is some low health. 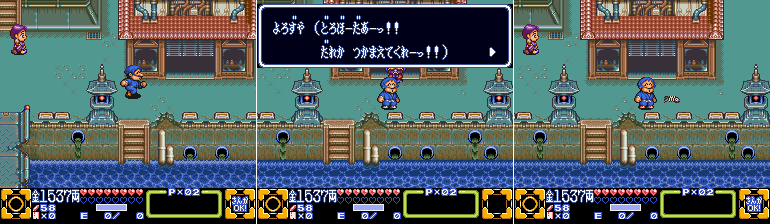 I also head to the shop to restock on my items, but before I can enter Ebisumaru is clobbered by a cat holding a bag running frantically out of the store. Owner: Thief! Somebody stop him! Nekokichi: That's impossible! I'm the greatest thief in the world! Catch me if you can, though I'm certain that you can't, meow! Before we can act, the cat makes tracks. It does drop a cartoon fish bone, though.  Picking it up causes another one to appear, and picking THAT one up causes another one to appear, and so on and so on.  The trail winds up looping around much of the northern area of Neo Hagure Town before coming to the door of this previously-empty house. 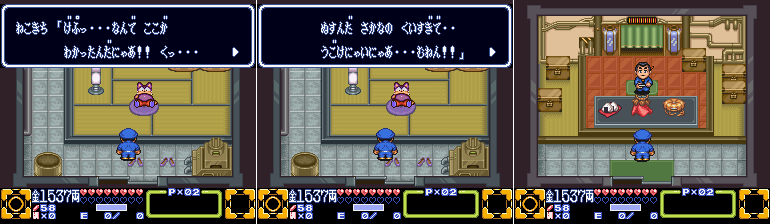 Cat Burglar Nekokichi: Burp... what the? How did you find this place, meow? Guh.. I ate too much of the fish I stole... how regretful.. I can't move, meow! Owner: Oh, you! Thank you very much for catching that sneaky cat! He's not really as famous as he claims. I want to give you this as gratitude. Narrator: Ebisumaru obtains the Reflection Shuriken. Store energy and throw it, and it will bounce off walls! Well, that's that little detour. Ebisumaru gets an upgrade to his secondary weapon that will prove useful later on.  Future Overworld As you can see here in the status screen. You'll also notice that the Triton Shell, which used to sit snugly between our Floatation Device and Field Ownership Sign is now missing too, looks like it WAS stolen by Omikuji! Also, before I head on, I go back into the shop and pick up some armor and a riceball. We'll be needing it. And I test out Ebisumaru's Reflection Shuriken, and it does indeed ricochet off of walls and such. Last edited by SpoonyBardOL; 12-03-2017 at 06:46 PM. |
|
#57
05-16-2015, 11:32 AM
|
|||
|
|||
|
Did Percy drop one of your posts? We jumped from Yae entering the woods to Goemon being back and Yae being locked up.
Quote:
|

|
#58
05-16-2015, 12:08 PM
|
|||
|
|||
 Moving on, I head back to the southern area of Neo Hagure Town and finally open up that barrier.  There's another store down here, this one sells an Iron Helmet, which absorbs an extra hit than the Straw Hat, and a more better riceball, which restores more hearts when you run out, and some mysterious fuel canisters which at the moment do nothing for me. I suppose I should have just picked up some straw armor at the first shop and saved my cash for the upgrades down here, oh well!  Futuristic Fortune Teller And right next door to this item shop is a Fortune Teller, which kind of seems redundant with those portable ones scattered around the overworld, but whatever. Anyway, we finally find that shady-looking guy we saw earlier, as we were walking by just a bit north of here, and we can finally see what he's up to. 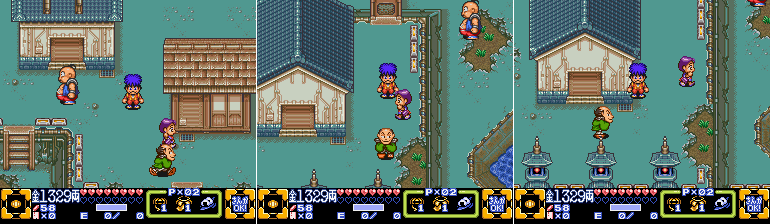 Future Overworld He he sees us he'll run off, fortunately he seems to only be able to see what is directly in his line of sight. As long as we don't walk in front of him we'll be fine. Of course, he DOES stop periodically to look behind him, so we have to make sure to hide behind something whenever he does pause.  Yes, surprisingly, he cannot see Goemon in that last picture. He must work for Shadow Moses or something.  A few more stops later and eventually we come to this building here. The door would be locked if we came on our own, but if we tail this guy he opens it up for us. The door doesn't stay open forever, so don't stick around or else it'll close in your face and you'll have to go back to the guy's starting point and do it all over again. No reason that would ever happen though. Y'know, unless you were trying to get a screenshot of the open door and delayed just a little too long and had to repeat the sequence a second time. Hahaha. 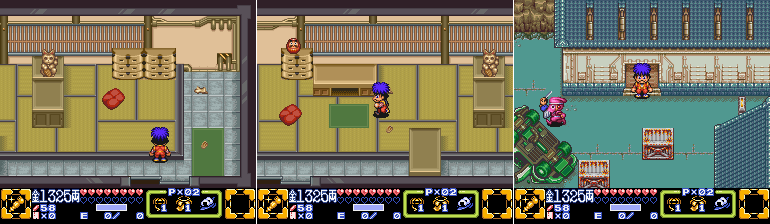 Nothing suspicious in this building itself, though it does take us to a new area from its other exit. Oh hey look, new enemy.  Puppetmaster Bimmy: These guys carry around little sword-wielding puppets which they use to attack. Amazingly this actually gives them a bit extra reach, though you'd think they'd just wield an actual sword.  We walk south, passing some upturned cars and lots of boxes we can't do a thing about. Lots of Bimmies running around this area, so it's got to be important!  We also pass by a Fortune Cat we can't do anything about at the moment.  Finally, we reach the entrance to the Factory. Just to the right of the entrance is a glowing sign, and using it will give us the option to save our game. That seems like as good a place as any to leave off for this week. Tune in next time as we storm the factory and hopefully get our hands on some new Mechanical Walkers! Last edited by SpoonyBardOL; 12-03-2017 at 06:48 PM. |
|
#59
05-16-2015, 12:15 PM
|
|||
|
|||
|
Quote:
Everything should be in the right order now. Wow, I still don't know how I missed that... Quote:
|
|
#60
05-16-2015, 04:16 PM
|
|||
|
|||
|
This is a pretty small thing, but that Takeshi conversation you pointed out early in this update is actually just saying Neo Hagure Town is dirty and a bad place to live, but it's the capital/metropolis. It may not be the actual capital, miyako is used for major cities like Tokyo, Osaka, Sapporo, or Nagoya. Anyway, it's a small bit of world-building, like a confirmation that they're in the future.
|