
-
Welcome to Talking Time's third iteration! If you would like to register for an account, or have already registered but have not yet been confirmed, please read the following:
- The CAPTCHA key's answer is "Percy"
- Once you've completed the registration process please email us from the email you used for registration at percyreghelper@gmail.com and include the username you used for registration
Once you have completed these steps, Moderation Staff will be able to get your account approved.
Let's Play: Star Control II: The Ur-Quan Masters
Back to Let's Play
< 1 2 3 4 5 6 7 8 >
< 1 2 3 4 5 6 7 8 >
|
#31
 06-16-2008, 03:48 AM
|
|||
|
|||
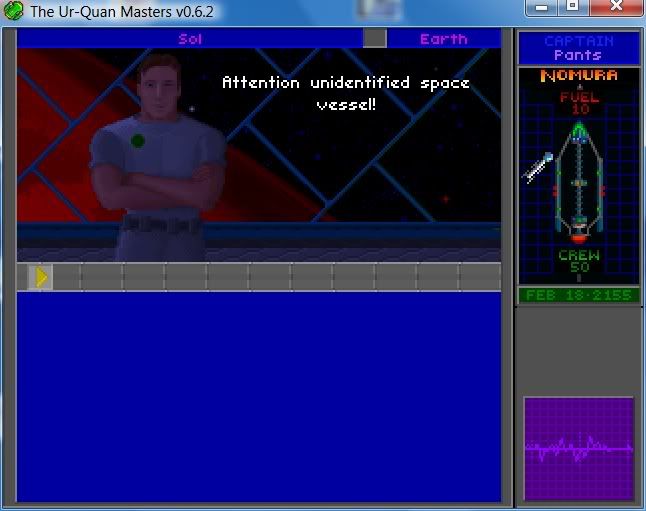
 Here begins the journey of the courageous Captain Pants and his proud vessel, the SCS Nomura. 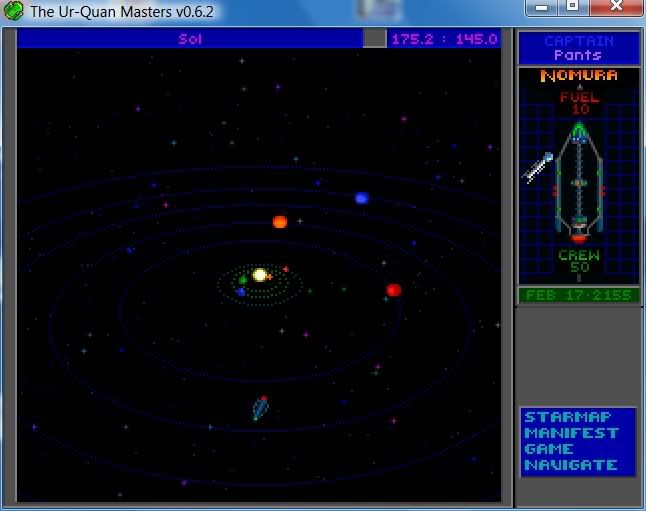 While we make the journey to Earth, I'll explain a few basics. Star Control II uses ship-relative movement and a quasi-realistic space physics model. It's realistic in the sense that your movement controls are generally limted to "turn left," "turn right," and "thrust." You maintain your momentum no matter which direction you're facing. That means that you slow down by turning 180 degrees and thrusting in the opposite direction. That also means you can be moving in one direction while facing (and firing) in another direction.  The physics are unrealistic in that your ship has a maximum speed, and that this maximum speed is set as a scalar, not a vector. That is: Suppose your ship's maximum speed is 10. You accelerate heading due north until you reach your maximum speed. You then turn 90 degrees left and accelerate westward. If you accelerate to, say, 5 westward, you'll slow down in your northward movement to maintain a constant speed of 10. Eventually, if you reach a westward velocity of 10, your northward velocity will decline to 0. So it's not like space travel insofar as you can't accelerate to relativistic speeds, and your velocity in one direction has an unrealistic impact on your speed in other directions.  Also, if you bump into a planet, you bounce off of it.  Ah, we've reached the vicinity of Earth. There's not much time to admire its pulsing red glow, however, as we're quickly intercepted by an angry red sphere . . .  Quote:
Last edited by MoltenBoron; 06-17-2008 at 09:05 PM. |

|
#32
06-16-2008, 03:49 AM
|
|||
|
|||
|
Well, that was disconcerting. If I were a new player, I would probably at this point go to Earth and see what was going on. But I'm not, so instead I went to the space station orbiting Earth, as that's where the next plot point is. I'll show you Earth later.
 Quote:
Last edited by MoltenBoron; 06-17-2008 at 09:09 PM. |
|
#33
06-16-2008, 03:50 AM
|
|||
|
|||
 For this first chapter, the game's quite fond of throwing Communist choices like this one at you. In any of these dialogue choices up until the star base comes fully on-line, it doesn't matter if you're diligent, flippant, or just confused, you'll just wind up in the same place by slightly different routes. This time, I chose the route of bafflement. Quote:
Quote:
Last edited by MoltenBoron; 06-17-2008 at 09:13 PM. |
|
#34
06-16-2008, 03:51 AM
|
||||
|
||||
|
Quote:
Quote:
Quote:
Quote:
 When you bump into a planet on the system map, you're taken to a zoomed in map of the planetary system. Most planets, like Mercury here, are just single planets, but you'll find planets with moons, space stations, ships, and other assorted things orbiting them.  And here's the planet screen. It gives you some basic information, some of it irrelevant (day length, tilt), some of it highly relevant (temperature, weather, tectonic level). Last edited by MoltenBoron; 06-17-2008 at 09:18 PM. |
|
#35
06-16-2008, 03:52 AM
|
|||||||
|
|||||||
|
From here, you'll want to scan . . .
 . . . for minerals . . .  . . . for energy signatures . . .  . . .And for any signs of life. Minerals are directly useful, since eventually you'll be able to trade them for fuel, ships, crew, and upgrades to your capital ship at the star base. Energy signatures tend to indicate plot-advancing bafmodads on the planet's surface. Life signs indicate native lifeforms to be captured and sold off into hideous alien zoos.  This is landing mode. You'll note that the main screen now shows a zoomed-in view of the planet's surface, with your lander at the center, while the menu screen on the bottom-right has turned into a status indicator for the lander. The green dots represent the number of crew members remaining in the lander. The red bar on the left indicates how full the lander's cargo bay is, while the blue bar on the right indicates how full its biological storage bay is. On the main screen, you'll notice two of the four exploration hazards: earthquakes, indicated by that set of concentric white rings, and hot spots, indicated by the flames. The colored spheres are mineral resources, which are collected by running over them. More on resource gathering later, as it makes up a disproportionate amount of the early part of the game. For now, back to Earth!  Ah yes, and here's Earth itself, now flourescent pink. If you try to scan the planet the game buzzes at you angrily. Clearly, something is amiss.  Back at the starbase: Quote:
Quote:
Quote:
Quote:
Quote:
Quote:
Quote:
Last edited by MoltenBoron; 06-17-2008 at 09:24 PM. |
|
#36
06-16-2008, 03:53 AM
|
||||
|
||||
|
Quote:
Quote:
Quote:
Quote:
Last edited by MoltenBoron; 06-17-2008 at 09:30 PM. |
|
#37
06-16-2008, 03:54 AM
|
|||
|
|||
|
Quote:
Quote:
Last edited by MoltenBoron; 06-17-2008 at 09:38 PM. |
|
#38
06-16-2008, 03:58 AM
|
||||
|
||||
|
Quote:
Quote:
Quote:
Quote:
 The moon's a lot less mineral-dense than Mercury, but also far less dangerous. It also has some sort of energy signal. . .  . . . And, bafflingly, non-trivial signs of life. Last edited by MoltenBoron; 06-17-2008 at 09:47 PM. |
|
#39
06-16-2008, 04:00 AM
|
|||
|
|||
 The life forms turn out to be these little miniature tank-like things with pulsating domes. They do no damage when you touch them, and in turn grant you no biological resources when you capture them. A loss for all parties involved! The energy is more interesting.    Having taken apart the lunar base (and, not coincidentally, gotten some use out of our energy and biological scanners), we return to Commander Hayes.  Quote:
Last edited by MoltenBoron; 06-17-2008 at 09:51 PM. |
|
#40
06-16-2008, 04:01 AM
|
|||
|
|||
|
Quote:
 Why, it's an Ilwrath, a member of a race of evil giant antisocial spiders! Quote:
Last edited by MoltenBoron; 06-17-2008 at 10:00 PM. |
|
#41
06-16-2008, 04:02 AM
|
|||
|
|||
 Here we have a number of options that all lead to the same place. The first one, however, grants us some useful information: Quote:
Quote:
Last edited by MoltenBoron; 06-17-2008 at 10:04 PM. |
|
#42
06-16-2008, 04:04 AM
|
|||
|
|||
|
Quote:
 Combat time! Here we select a ship. For now, our options are the flagship and an Earthling Cruiser. The Cruiser is often a poor option, but at the moment the flagship is an even poorer one. Fortunately this is an easy battle.  Battles in Star Control are a fancy version of Spacewar. Two ships warp in and the screen centers on the midpoint between the ships. Left and right turn, forward thrusts. The battlefield features a single planet, which damages you if you hit it and which has a gravitational field that sucks ships in (and which can be used to massively increase your speed if you whip around it properly). There are also several asteroids that won't damage you but will alter your course if you hit them.  Each ship has a main weapon and some secondary ability. In the case of the Earthling Cruiser, the main weapon is a nuclear missile with slight homing capabilities. You can see two of my missiles speeding toward the Ilwrath ship in this screenshot. The secondary ability is a short-range, low-powered point defense laser system, which is hypothetically useful for taking out certain enemy projectiles. The Ilwrath Avenger's main weapon is a short-range flame thrower that deals a lot of damage quickly. Its secondary weapon is a cloaking device. The combination of the two makes the Avenger both annoying and formidable. Fortunately this Avenger is hobbled; it has a minimal crew and its cloaking device doesn't work.  The battle is over in seconds. I turn the Cruiser to face the Avenger, fire off two missiles, and the Avenger disintegrates into the blackness of space. Before he was interrupted, Commander Hayes seemed to be advising us to close to point blank range with the Ilwrath vessel. Because the Ilwrath weapon only functions at short range, and melts through crew quickly once it connects, following his advice is an excellent way to die fast. No wonder we last the war. Back to the display: on the right side of the screen you'll notice status indicators for the two ships. Crew is used throughout Star Control as a cypher for ship health. Taking damage kills crew, when you run out of crew your ship explodes. Batt gives a measure of your batteries. Using your weapons drains your batteries, which recharge over time. Every ship in the game, on top of having different weaponry, has different crew levels, different maximum battery levels, different charge rates, different turning rates, different acceleration, and different maximum speeds. Back to the commander:  Quote:
Last edited by MoltenBoron; 06-17-2008 at 10:14 PM. |
|
#43
06-16-2008, 04:06 AM
|
|||
|
|||
 Note my options here. I decided to take inspiration from Tricky Dick Nixon and keep my options open by declaring my non-existent plan to be top secret. Quote:
Quote:
Last edited by MoltenBoron; 06-17-2008 at 10:17 PM. |
|
#44
06-16-2008, 04:08 AM
|
|||
|
|||
 What say you, Talking Time? What shall we call our grand alliance? The New Alliance of Free Stars! The Concordance of Alien Nations! The United Federation of Worlds! or The Empire of Pants! Also, a larger structural question: This game has a lot of dialogue. I haven't even done the heavy dialogue portion of the Starbase yet and this update took 152 images spread over 16 posts. If I keep up with this method, when I get into heavy diplomacy my updates will be mad screenshots for reals, yo. On the other hand, the dialogue is a big part of what makes Star Control II the great game that it is. So what do you think? Keep the maximal screenshots? Summarize the boring parts and preserve the most interesting dialogue as screenshots? Transcribe the dialogue as text? EDIT: Ignore this last bit; I've rejiggered it to cut out most of the screenshots and replace them with transcription. Last edited by MoltenBoron; 06-17-2008 at 10:18 PM. |
|
#45
06-16-2008, 06:34 AM
|
|||
|
|||
|
The Empire of <Captain Name>. Always.
I recommend the "Interesting Screen shot and transcription" option for pictures. |
|
#46
06-16-2008, 07:00 AM
|
|||
|
|||
|
You know, I came into this thread and was overwhelmed by the amount of similar-looking screenshots. As a result, I only scrolled down very, very fast, thus perhaps missing most of the dialogue happening.
I promptly wanted to post how I think �t would be nice if you could only post important or first time-screenshots and transcribe the dialogue/sum it up. Then I saw your question. Then I posted how I came into this thread and was overwhelmed by the amount of... EDIT: And if you want to be in the League of the Awesome Gentlemen, you could edit your earlier posts to resemble this coda,i.e. cut down on the screenshots and transcribe the dialogue. You know, Let's Play isn't really about a thumbnail theatre spanning the complete game. (IMHO) A nice idea could be cropping the one who is speaking into a picture and putting it beside his dialogue (No, that idea clearly didn't come from myself mentioning thumbnail theatre. Absolutely not.) |
|
#47
06-16-2008, 08:35 AM
|
|||
|
|||
|
You know you're building the empire of Pants. No question. Every Nixon-esque response suggests this; spread the glory of the Talking Time Hive Mind!
There should be more games where the de facto single player experience is spreading a Hive consciousness. Imagine System Shock 2: Adversary or something. Sweeeeet. But yeah - definitely post the interesting screenshots and sum up the conversations. If you feel like you can inject some of the flavour of the dialogue into your descriptions, so much the better! |
|
#48
06-16-2008, 09:59 AM
|
|||
|
|||
|
EMPIRE, duh!
Also cut down on the pictures, unless they're exceedingly hilarious (how the Fire Emblem LP is doing it is a good idea) or used as a lead-in. If you can find MP3s of dialogue snippets where even more hilariously appropriate then that would also be awesome! |
|
#49
06-16-2008, 10:10 AM
|
|||
|
|||
|
Yeah, could you transcribe as much of your posts as possible? I understand that not everyone's on a modem like I am, but updates like this are huge. And when most of it is just of a guy who's standing there with text changing, I don't think we'd be missing out if you were to type out some of his text.
|

|
#50
06-16-2008, 10:39 AM
|
|||
|
|||
|
This is a super text heavy game. I think you should screenshot important stuff, like combat, exploration, and first meetings, but just copy/paste the lectures from one of the sc2 guides. no one will fault you.
|
|
#51
06-16-2008, 11:31 PM
|
|||
|
|||
|
Seconding the "I'm on a modem so this is really hard for me" sentiment. I spent the last twenty or thirty minutes loading this page and still only got about a third of the shots loaded before I gave up. This is an LP I really want to see, so if you could make that possible on my connection, I'd appreciate it.
|
|
#52
06-17-2008, 08:52 PM
|
|||
|
|||
|
On further consideration, the last update did have far, far too many images. I'll fix it once this update is finished. In the meantime, I propose a compromise: Summaries for uninteresting matter, recap screenshots for dialogue I want to preserve, full screenshots where particularly relevant. The recap screenshots are a potentially useful function built into the game. If you hit spacebar at a dialogue selection point on the diplomacy screen, the view window switches to an all-text recap of the previous conversation branch. This will allow me, first, to compress a dozen screens of dialogue into a single screen, and, second, to crop that screen to just the dialogue portion, so individual screenshots will be smaller.
This will allow me to preserve the game's dialogue without having to transcribe thousands of lines of text. On the minus side, it's still screenshots of text, which require more bandwidth than plain text, and it may be less readable than a transcription. On the plus side, it's quicker and easier than transcription, which means more frequent and more reliable updates. I'll be doing this update in the hybrid style; tell me what you think of it. When last we left the Star Control universe, we had just declared ourselves Emperor Pants I.   (Note that there's a cut-away for two weeks while the ship is retrofitted right after this, which prevented me getting a recap of this dialogue. This is the last you'll see of Commander Hayes this update). Commander Hayes is a chatty Cathy, but most of what he has to say isn't super important. You can ask him about the star base's services, but I'll be covering that in my regular updates so I won't even summarize. You can also ask him for backstory. In brief: while you were off getting stranded and building fancy spaceships, the Alliance of Free Stars was busy losing, badly, to the Ur-Quan Hierarchy. When each race was defeated they were given a choice: They could either swear fealty to the Ur-Quan and maintain nominal freedom as battle thralls, or they could withdraw to their home planet and be encased forever under an impenetrable slave shield. Unfortunately for your quest, Earth chose the slave shield option. After winning the war the Ur-Quan disappeared and Hayes doesn't know where they went to. Hayes also has information on various species: The Shofixti   The Yehat  The Ariloulaleelay  The Chenjesu   The Mmrnmhrm  
|
|
#53
06-17-2008, 08:53 PM
|
|||
|
|||
|
The Syreen
 The Mycon   The Spathi   The Umgah  The Androsynth   The Ilwrath  The VUX 
|
|
#54
06-17-2008, 08:54 PM
|
|||
|
|||
|
. . . And he has a few leads on races that were neither in the Alliance nor the Hierarchy:
  He also has a little backstory on the Precursors, the mysterious creators of the factory that built your ship:   . . . Some information on one other ancient, non-Precursor race:   . . . And finally, a little more information on the Arilou:    So that's Hayes. You'll talk to him to offload minerals and for occasional news updates, but that's pretty much it for him from here on. Now we have access to the Starbase Screen:  Hayes takes your minerals, the Outfit Starship screen lets you reconfigure your flagship and buy fuel, and the Shipyard lets you buy support ships and crew members. |
|
#55
06-17-2008, 08:55 PM
|
|||
|
|||
 This is the Outfit Starship screen. Your ship has 16 slots for regular modules, 8 slots for turning jets (those green balls), 11 slots for thrusters (the red blocks), and 10 slots for planetary landers. The game is incredibly generous about reconfiguring your ship; any time you want, you can sell existing modules and landers for 100% of the purchase price, so you can play around with different configurations cost-free. At the start of the game you don't have a huge number of options. Fuel tanks, like the grey cylinder toward the back of the ship in this shot, increase your maximum fuel capacity by 50 units (you have a base capacity of 10 fuel with no tanks). You'll want at least another of these relatively early in the game, but they're not essential until you get beyond the resource gathering-heavy early game. The next unit up, with the colorful dots, is a crew pod. Each one increases your flagship's crew capacity (and thus health) by 50. Whether you ever need more than one depends on how you play and what you do with your flagship. Early on, an extra crew pod is handy since you'll lose a lot of crew by attrition on planetery expeditions. Later, if you decide to use your flagship in battle, you may want the extra durability that another crew pod provides. Plus it's always handy to have an extra reserve of crew members to replenish your support ships. Still, it's not particularly hard to complete the game without ever buying an extra crew pod. Next up, with the diagonal stripes, is the cargo bay. Each one adds an extra 500 units of storage to your ship. This is one of the first units you'll want to buy early in the game, since it'll increase the length of time you can spend out on resource gathering missions. Later, when resources are less important, you'll likely step back down to one, and by the end of the game you won't have any cargo bays at all. Up front is an ion bolt gun. You'll note that some of the module slots are outlined in grey, while others are outlined in blue. Guns can only go in the blue slots, and where they're slotted affects the guns' behavior in battle. A gun in the first slot shoots straight ahead, a gun in the second slot shoots two shots forward at 45 degree angles from the direction you're facing, a gun in the third slot shoots two shots directly out to the sides, and a gun in the rearmost slot fires a shot straight behind you. The most useful positions are the slots in the front and rear, which allow you to charge at enemies and hit them when running away, respectively. The other slots can be useful for strafing, but chances are the drain on your batteries outweighs their usefulness in that context. Speaking of batteries, not seen here are dynamos. Dynamos increase your rate of battery charge. I'll get into the specific math involved once more charging options become available, but for now it suffices to say that they're useful once you start adding more guns to your flagship, and pretty much useless in the early game. Thrusters and turning jets are probably your most useful improvements early on. You haven't seen it because these are all screenshots, but at the start of the game your ship is incredibly sluggish. It moves like molasses and turns like a cow. Turning jets and thrusters improve your turning, acceleration, and maximum speed, whether in the system screen, combat, or hyperspace. Plus, the slots can't be used for anything but thrusters and turning jets, so there's no opportunity cost involved. Between the two, thrusters are marginally more useful since they'll help you avoid encounters in hyperspace, but having a lot of thrust with little turning capacity is a recipe for frustration. Finally, you have landers. If you've nothing else to spend your resource units on, you may as well keep an extra lander around since they can always be sold for their full purchase price. Still, there's no real reason you should ever lose a lander, particularly if you're willing to be cheap about saving and restoring, and having extra landers creates a moral hazard that'll lead you to be less cautious than you should be.  Here's my initial layout. I don't plan to be doing a lot of fighting with the flagship early on, so I sold off the ion bolt gun and used the proceeds, along with the resources I picked up from Mercury and the moon, to add a few turning jets, nearly max out my thrusters, and buy as much fuel as I could afford. This isn't a "for reals" configuration, as I'm planning to gather more resources in the Solar System before heading out into hyperspace, but it'll do for now.  Here's the Shipyard. You buy ships and crew here. Right now the only ships you can buy are Earthling Cruisers, which aren't terrible, but also aren't great. If I were more cocksure I'd sell the Earthling Cruiser I have, but I'll keep it around for now. Crew costs 3 RU per early on. Commander Hayes claims there are around 1900 crew members available on the station, but this is sort of a lie. You can't ever run out of crew. On the other hand, after you've taken more than 1000 crew from the base the costs goes up to 5 RU per. As you recruit new races to your cause the RU cost goes down. There are also other actions you can take that raise the crew costs. Now it's time to strip-mine the Solar System!  First, an object lesson on the importance of reading planetary statistics. This if Venus. Note the planet's temperature and weather class. Venus is hot and stormy. If you land there, you're treated to this:  That's me getting my ass kicked by lightning bolts and hot spots. For reference, Class 8 is as high as tectonics and weather go. Venus isn't as hot as it's possible to get, but it's still hot enough that hot spots are really dangerous on their own. In terms of tectonics and weather, you should never be deterred by anything Class 2 or lower. I've played Star Control II a lot and I've never even seen a lightning bolt or earthquake on a Class 2 planet. Of the three environmental hazards, earthquakes are the least dangerous. They give you a hint about where they're about to spawn with a small pinpoint and they appear slowly enough that you can generally dodge them without much trouble up through about Class 6. Weather is less predictable; either the lightning bolts hit you or they don't, and there's no real way to dodge them. On the other hand, they only take off 1-2 crew per hit, so you won't generally get blown up all at once. Hotspots crawl around the ground in predictable lines, but there's no way to predict when they'll appear and they do a lot of damage, fast. It's quite easy to take one right down the center of your lander and go from a full crew to rubble in a quarter of a second. tl;dr: Don't even bother with Venus.  It's Mars! It's too cold for hotspots and doesn't have any weather or tectonics worth speaking of. It also doesn't have many resources to mine and no lifeforms. This is a pretty common pattern.  Here's Jupiter's planetary system. Astronomy dorks will note that Star Control Jupiter has many fewer moons than Real Jupiter. I show you this to give you a sense of what gas giants look like from space. Gas giants tend to have a lot of moons, which is great. Less great, though . . .  . . . Is the fact that they have no resources, no life, and you can't land on them. There's essentially no reason to ever visit a gas giant. And now that you know what they look like, you can avoid wasting your time!  It's Io! Note the part I've circled on the right-hand side of the screen, below the fleet status window, above the lander status window. When selecting your landing site, the date window briefly gives you a measure of how much fuel it'll cost to land on the planet. This is significant. The only time you use fuel is in Hyperspace and when landing on planets. Every time you land on a planet it costs however much fuel is indicated here, so if I, for instance, have to make three trips to Io to clean it out it'll cost me nearly a full unit of fuel. Since fuel costs 20 RUs per unit, I'd better be getting, at a minimum, 20 RUs out of Io's minerals.  Here's Europa, Jupiter's second moon. Europa provides another useful object lesson: |
|
#57
06-17-2008, 08:56 PM
|
|||
|
|||
 The game color-codes resources to indicate their value. Every time you pick up a resource, it'll tell you the name of the resource and how much of it you got. When you trade resources for RUs at the starbase, the amount of each resource traded is multiplied by its value to get the RU value. Unfortunately, the game uses two similar colors for resources with very different values. Radioactives are colored orange and are worth 8 RUs per. Corrosives are colored red and are worth 2 RUs per. It's not super-important early on, but later you'll have limited cargo space and you won't want to waste time, fuel, and crew gathering low-value resources that you'll wind up jetisoning to make room for high-value stuff. Corrosives are generally worth too little to be worth gathering, but for now we'll take them since our goal is just to clean out the Solar System.  Ganymede is an excellent example of a planet we wouldn't even bother with if it were later in the game. It has nothing but common minerals. Even though there's no real risk to the crew and the fuel cost is low, the opportunity cost of gathering common minerals rather than something else is too great.  I just put this in for all you Callisto fanboys. Callisto has no resources whatsoever. None!  It's Titan! The awesomest moon in the Solar System! Titan's neat because it has a primordial soup not unlike what's believed to have existed on earth before life evolved. At some point in the distant future it may develop its own life forms. For now, though, all it has are small deposits of base metals. I snag them and move on . . . To Triton, the poor man's Titan. Not much to see here.  Finally, Pluto, about which you should give a hooto. And here's another important point:  Note my ship's manifest. You can see the different colors of minerals and their respective RU values, as well as the quantity of each presently in the hold. Note also that I only have 9 units of free space. . .  . . . Which is indicated on my planet lander status screen thusly. Normally empty red squares indicate empty space in the lander, while solid squares are full space. When the squares disappear entirely, that indicates the end of space in your flagship's cargo hold. This is another important point: It's usually good policy not to fill up your lander entirely before returning to the flagship. Your lander can only hold 50 units of resources. Each resource dot on the planet is a discrete number of whatever the resource is. If that number is greater than the amount of free space left in your lander or flagship, you'll only take as much as you can carry, but the dot will be consumed. Thus, for example, if your lander has 49 units of cargo in its hold, and you roll over a dot with 10 units of radioactives, you'll collect one unit of radioactives and the other 9 are gone forever. It adds up over time. Here, we're about to do a very dangerous thing: Our flagship only has room for nine more units of stuff, and we're about to pick up a dot of Exotic materials, worth 25 RUs each. If there are more than 9 units in that dot, we'll have wasted some really valuable material.  It turns out all right this time, but next time we may not be so lucky! But that's not all that's on Pluto. In the next update . . .  What's this!? Administrative note: The next update shouldn't take much time; I'll have it up late tonight. Once this update is posted, I'll quickly revamp the last update. I may also go back later and re-do it in the new format, if people are liking it. For reference, the last update had 152 screenshots, and came out to about 25 megabytes. This update has 50 screenshots totaling about 5 megabytes. Too much? Too little? Just right? |
|
#58
06-17-2008, 09:37 PM
|
|||
|
|||
|
MUCH better. Unless things get really text-heavy, 50 pics / update is probably all you'll normally need for an LP update. So... so far, so good! I'm looking forward to how this revolution turns out.
|
|
#59
06-18-2008, 01:35 AM
|
|||
|
|||
|
Quote:
|

|
#60
06-18-2008, 02:18 AM
|
|||
|
|||
|
Quote:
|