
-
Welcome to Talking Time's third iteration! If you would like to register for an account, or have already registered but have not yet been confirmed, please read the following:
- The CAPTCHA key's answer is "Percy"
- Once you've completed the registration process please email us from the email you used for registration at percyreghelper@gmail.com and include the username you used for registration
Once you have completed these steps, Moderation Staff will be able to get your account approved.
Let's Play: Dawn of War - Dark Crusade
Back to Let's Play
< 1 2 3 4 >
< 1 2 3 4 >
|
#1
 07-12-2008, 03:19 PM
|
|||
|
|||
|
So, as I said in the Let’s Play Archive thread, instead of playing through the campaign in the original Dawn of War (too easy/boring) or the freeform campaign in Dark Crusade (WAY too long/hard), I’ve decided to play through the most interesting 2 player skirmish maps against AI opponents at the Hard or Harder difficulty levels. If this gets some momentum, I may even write up all of them.
The AI in Dawn of War is usually decent, but sometimes it does fairly stupid things, especially when it’s low on money. As a result, higher difficulty levels work like higher difficulty levels in Civilization, in that AI players get a multiple to their resource income. The more money the AI has, the less likely it is that any individual mistake will doom it, and the more easily it can tech up and start spamming high-end units. Once this starts happening, you’re usually screwed unless you’ve consolidated a resource advantage and are already working on taking out the AI’s production structures. Thus, the best way of winning games against the AI is to starve it of resources by capturing more strategic points and imperial relics, and capping your strategic points with listening posts while attacking the AI’s economy by killing their listening posts and capturing their strategic points. Given that the AI is cheating, this easier said than done. For the purposes of this Let’s Play, I’ll mostly be sticking to factions which I know I can use effectively. Of the 7 factions in Dark Crusade, these are the five I’ll be using, in order of how well I know/like them: • Space Marines – Classic, flexible, and easy to use. • Tau – Hyper-specialized, tech dependent, and generally accepted as overpowered. • Chaos – Space Marines with an evil twist. Most of the differences don’t show up until you tech up, though. I'm not as good with Chaos as I am with Space Marines or Tau. • Imperial Guard – Leader-dependent, infantry-skewed at the low end and vehicle-skewed at the high end. I'm even worse with Imperial Guard than I am with Chaos. • Eldar – Fiddly, specialized, and micromanagement focused. I'm actually pretty bad with Eldar, but I can beat the AI, and at least I know what I'm doing wrong. I’m not playing as Orks because the third resource they have to manage makes them even more fiddly than the Eldar. I’m not playing as Necrons because they work completely differently from every other faction, which makes them suck in skirmish vs. a resource-cheating AI (plus I can’t figure out how to use them properly). With that said, let's get to the killing! Map: Abandon All Hope Space Marines vs. Orks (Hard AI) Battle Report, White Scars Chapter, First Company: On our arrival in the Tartarus system, we found that the greenskin horde we had been sent to purge was already rampaging across Tartarus V. On orders from Warmaster Jaeger, First Company deployed via drop pods to the steaming jungles of the planet’s equator. Within minutes of landing, we found ourselves engaged a brutal struggle with the enemy. Abandon All Hope is a really small map, and so players start out almost on top of each other. Against another human player, a really aggressive build order might succeed, but to compete with the AI’s resource cheats, you need to grab and cap strategic points as quickly as possible. Also, apologies for how murky the screens are – this map isn’t very well lit to begin with, and the first time I played was with the Raven Guard color scheme on my Space Marines, which was significantly less readable – imagine trying to pick out black-armored dudes instead of vaguely gray ones from a black background.  I start the game with a Stronghold (top) and a servitor (builder unit), and unless you’re doing something weird, the first thing your builder unit should build is your faction’s infantry production structure – in this case, the Chapel-Barracks (highlighted). At the same time, I queue up 2 Scout Marine Squads and an extra Servitor at my Stronghold. This is the standard economy boom/expansion build order for Space Marines.  I’m playing against Orks, and despite the AI’s deficiencies in other areas, it always goes straight for the infantry production structure too. Oh, and it can handle the fiddly resource-management that Orks require just fine, so a wave of green-skinned death will soon be coming my way.  Here we have my first Scout Marine squad, which followed the rally point I set straight to the closest strategic point. Strategic points give you requisition (the blue number in the upper left corner of the screen), which you need to buy pretty much everything. You can end up with more requisition than you need in the late game, but in the early game you never have enough.  Here’s my second Scout Marine squad, rushing off after the second nearest strategic point. Like requisition, these guys are crucial in the early game, but they go obsolete a lot faster, as we’ll be seeing shortly.  Both my servitors are tasked to completing my Chapel-Barracks, so I can start producing Tactical Squads, the backbone of a Space Marine army. Though you can’t see it here, and though Dawn of War never makes a point of it, servitors are brain-dead human bodies animated and augmented by cybernetic implants. The Imperium of Man is a horrible, horrible place, but still manages to be less horrific than the rest of the Warhammer 40k universe. Last edited by Malefor; 07-12-2008 at 08:57 PM. Reason: Fixing saturation and gamma on images. |

|
#2
07-12-2008, 03:23 PM
|
|||
|
|||
 Once the Chapel-Barracks is finished, one servitor builds a listening post on top of the captured strategic point, to increase my requisition income...  ...and the other builds me a plasma generator, so I can start earning some Power (the green resource listed in the upper left).  Right about the time I finish my listening post, a group of Orks shows up in my base, ready for tea and crumpets. The lack of tea and crumpets prompts them to start smashing things.  Thankfully, my first tactical squad shows up about one second later. The dingy white armor of the White Scars makes them look like Imperial Stormtroopers, which is actually about right, except for the fact that Space Marines actually are superhuman badasses.  Oh, crumbs.  Just to give you an idea of how bad the Big Mek teleporting in is, here’s the UI that I’ve been carefully hiding from y’all in my previous screenshots. As you can see from the numbers under and next to his portrait, the Big Mek has 1310 hp, 550 morale, and deals a metric f*ckton of damage with both his ranged and melee attacks. Oh, and he’s strong versus Infantry, Heavy Infantry, & Vehicles… which is pretty much everything in the game except structures and daemons. I hate Orks so much.  For contrast, this is what my Tactical Squad looks like. Even if you multiply the damage values by 4, the only stat in which the squad has an advantage over the Big Mek is health. This encounter will not end well for First Squad here. Last edited by Malefor; 07-12-2008 at 08:58 PM. Reason: Fixing images |
|
#3
07-12-2008, 04:00 PM
|
|||
|
|||
 The Battle-Brothers of First Squad found themselves under attack from the instant they landed. Only their faith in the Emperor and the knowledge that their brothers would soon reinforce them allowed them to withstand the initial assault. The blue bar above the health bar on my two remaining marines is their squad’s morale value. When a squad’s morale drops to zero and stays in that range, it’s “Broken”, and its members deal significantly less damage. The surviving members of First Squad seem somewhat shaken by seeing their brother Marines hacked to bits by the Big Mek’s chainsaw claw. (I can’t imagine why.)  Apparently the God-Emperor of Mankind does protect, because by rights this guy should have eaten it before Second Squad here showed up.  Note the orange bar on top of the listening post’s health bar. That’s the build & upgrade indicator, and in this case it means that I’m in the middle of upgrading my listening post into a defensive emplacement. Assuming my Marines can last that long, it should help them fight off the Big Mek and his goons.  You’ll note that First Squad has two members again, despite being down to one about 12 seconds ago. Dawn of War lets you reinforce squads on the fly, so as long as you have the requisition and the last squad member isn’t dead, you can queue up additional squad members, who are added to the squad one at a time. This is great for attrition battles like this one, and even better for force projection, but it’s theoretically more efficient to use up all your command points before reinforcing squads beyond their starting loadout. It’s also slightly cheaper – a new tac squad costs $190, while four additional squad members costs you $200. Still, there are a lot of times, especially playing vs. the AI, when you need to toss the theory out the window and spam reinforcements like mad.  While Second Squad’s arrival provided a momentary respite, the xenos scum soon rallied. Within moments, Second Squad was also on the verge of destruction. Fun Fact! The Imperium of man is highly xenophobic, and has lots of pithy sayings to prove it. Thus all the “xenos scum” and “greenskin filth” you’ll hear from me and the game itself.  Hey, look, one member of First Squad is still alive! Plus, my listening post finally started shooting at things. Last edited by Malefor; 07-12-2008 at 09:12 PM. Reason: Fixing images. |
|
#4
07-12-2008, 04:07 PM
|
|||
|
|||
 I’ve also got another listening post and a Heavy Bolter Turret on their way. Things are looking up!  ...especially for poor Brother Caber from First Squad here, who just got impaled on the Big Mek’s chainsaw claw and then tossed through the air towards the camera. That’s sure to sting come morning.  Okay, two turrets firing on one target means I’ve turned this fight around. Also, the magic of reinforcements means that First Squad is still on the field, despite a greater than 100% turnover rate. You’ll notice that the Big Mek has decided to rail on my Plasma Generator instead of my troops, a decision which my Tactical Squads heartily approve of.  Meanwhile, my Scout Marine squads have been busy capturing all of the strategic points on my end of the field, and have even captured the two Imperial Relics on the sides of the map. Imperial Relics are just like strategic points, except that: • They take longer to capture • They generate a little less requisition • You can’t build certain high-end units without them Given the size of this map and the fact that many skirmish games never even make it to Tech level 2, I’m a lot more concerned with the extra requisition than with the option to build a Land Raider if I tech up all the way. Last edited by Malefor; 07-13-2008 at 03:47 PM. Reason: Fixing description of Imperial Relics |
|
#5
07-12-2008, 04:14 PM
|
|||
|
|||
 My tactical squads, heartened by their defeat of the Big Mek, push into the middle of the map, only to find an Ork turret and a bunch of Gretchin waiting for them. This isn’t great, but they would probably win, given time and reinforcements.  Unfortunately, the fact that the Big Mek was the only unit in my base means that the AI was massing a bunch of units for a second push. Here we see a squad of Shoota Boyz dispatching my hapless Scout Marines. As I noted earlier, the cheap, early infantry units (Scout Marines, Stealthsuits, Cultists) available to most factions go obsolete quickly unless you spend a lot of time and money upgrading them. Most of the time it’s not worth the trouble.  …and here’s more Orks, ready to flank my tac squads. First & Second Squads decide that discretion is the better part of valor and engage in a tactical withdrawal.  Hoo boy. Now we’ve got two squads of Orks trying to take out my listening post. This is actually a make-or-break moment. If I lose the listening post, I lose vital income, and if the Orks take the Imperial Relic, I lose even more income, probably dooming my chances entirely in light of the AI’s resource advantage. I have to keep that listening post alive.  The splatter just to the right of the listening post is the remains of a servitor I ran in there in a suicidal effort to get a little more health on the listening post. The remnants of my tac squads are moving in as well, in an attempt to get the orks that are firing on the structure to choose them as their new target. Last edited by Malefor; 07-12-2008 at 10:21 PM. |
|
#6
07-12-2008, 04:27 PM
|
|||
|
|||
 It worked! The Shoota Boyz focus on the remains of Second Squad (First Squad got wiped out in the course of the retreat), leaving the listening post alive long enough for its gun to show up.  The desperate circumstance in which the expeditionary force found itself moved Captain Desolaine to take the field himself, and he personally led the counterattack against the greenskins. Woo, Force Commander! As you may have gathered from how amazing the Big Mek was, Commanders are great in Dawn of War. The Force Commander is about as good as it gets for the Space Marines, though the Librarian and the Chaplain both have their points as well. The Force Commander’s Orbital Bombardment power is also awesome, though I don’t anticipate I’ll get to use it at any point during this Let’s Play, given the amount of teching up required to build an Orbital Relay.  Captain Desolaine’s arrival turned the tide of the battle, and he led Second Squad to crush the remaining greenskins, leaving no survivors. After a brief pause to regroup, he then led an assault on an enemy position, leaping into the fray without hesitation or fear. The Force commander deals significantly more damage with his chainsword than with his bolter pistol (about twice as much), so it’s generally best to let him lead the charge, unless his health is low or you need to use his morale-boosting ability to keep a squad from breaking. There are drawbacks to this, of course – just after this, my Force Commander tried to rush the enemy base on his lonesome. I had to change him and the rest of my troops into Stand Ground stance, so they wouldn’t go haring off on their own.  After pausing to strip control of the center strategic point from the AI, I sent my troops against the enemy base, though the appearance of another Big Mek meant that didn’t last. Thankfully, the Big Mek attacked one of my Plasma generators rather than going after my units. Concentrated fire took him out.  Though valorous, Captain Desolaine was not wise, and spurned the wisdom of the Codex Astartes. He fell leading a charge against the enemy without waiting for the rest of First Company to reinforce his command. Let his death serve as a cautionary example. I lost my Force Commander in a bone-headed move here… basically, I let him get too close to the guns on Da Boyz Hut without having the rest of my guys there to provide fire support & alternative targets. Just stupid. Oh, and in case it wasn’t already obvious – every Ork building comes with machineguns mounted on it, even their barracks & central structure. Last edited by Malefor; 07-12-2008 at 10:22 PM. |
|
#7
07-12-2008, 04:34 PM
|
|||
|
|||
 10 command points worth of tactical squads is 5 squads. Most of those squads are reinforced up to 8 members (the maximum without teching up). I didn’t even have to buy rockets to take down Da Boyz Hut once my reinforcements showed up. The sharp-eyed may have noticed that there are actually 2 command point indicators in the upper left, next to the resource readouts. The topmost is infantry command points, and the bottom is vehicle command points. Relic did away with the distinction in Company of Heroes, which is part of why that game tends to skew more towards tank rushing than Dawn of War does.  From there on out it was just a question of destroying Da Boyz Hut each time the AI tried to rebuild it, and systematically destroying every listening post and resource-related structure within reach.  This guy here is the Chaplain – you can build him from the Stronghold once you tech up to Tier 2. I didn’t get to use him or any of the other Tier 2 advantages in a meaningful way, but I figured I’d show him to you anyway. He’s a lot like the Force Commander except not as tough, and with an ability that lets him terrify enemy infantry into slowing down. Also commander units like the Force Commander & Chaplain don’t take up command points, so they let you bypass the unit cap.  At this point the outcome is no longer in doubt. I have most of the resources on the map, I’ve killed almost all their units, and I have 4 strongly reinforced squads against their single squad and the guns on their Settlement (Stronghold equivalent). I would have to really screw up to lose from this kind of position.  Needless to say, I focused fire on the Settlement, and won. Apologies for how dark everything was - I think I've figured out to edit my screencaps so you can actually see some of what's going on. Any requests? I've already played the next map, but if you want to saddle me with (for example) a fight against a Expert Necron AI using the Eldar, I'm game, even though there's absolutely no way that I'll be able to win that kind of fight. Last edited by Malefor; 07-12-2008 at 10:24 PM. |
|
#8
07-12-2008, 05:05 PM
|
|||
|
|||
|
It's okay to lose, and Orks have the best resource ever (WAAAAAAAAAAAAAAAAARGH), so I would like to see at least one game o' them. ;D
I always liked the resource structure in this game; for those who haven't played, you move your units to capture and control particular points on a map, usually located in strategic points (on a hill, in some ruins, et cetera). They slowly generate resource for you as long as you control them. Also: maybe bust out mspaint and highlight/circle stuff on the screenshots? Be a little easier to see what's going on. |
|
#9
07-12-2008, 05:22 PM
|
|||
|
|||
|
Quote:
As for the clarity, I'll probably end up using mspaint in certain bits, but I think a lot can be done with careful use of colors & choice of maps. I just recorded a game where I played bright red Tau vs. bright green Eldar on a snow map, which should help the visibility a lot. Edit: Maxing out the gamma seems to have helped a lot. I never noticed how dark the game's default lighting was until I started taking screenshots. Edit: Uh, wow. I'm not sure if this is something to do with my computer, but any tweaks to the gamma & lighting only last until I tab away from the game. Then everything gets way darker. No wonder those screenshots from the first game are so hard to read. Last edited by Malefor; 07-12-2008 at 05:52 PM. |

|
#10
07-12-2008, 06:36 PM
|
|||
|
|||
|
How I love the Orks. 'Ere We Go! was my favorite game book as a kid (hell, it might be my favorite game book now!)
|
|
#11
07-12-2008, 06:58 PM
|
|||
|
|||
|
Quote:
Anyway, it looks like I'm going to go light on the screen captures from here on out, because I have to restart the game every time I want one of them to look right. I've got the next map (Chaos vs. Eldar on Absolute Zero) written up, I just need to capture the images and upload them. |
|
#13
07-12-2008, 08:12 PM
|
|||
|
|||
|
Quote:
As for an in-game hotkey, a little investigation indicates that Dawn of War doesn't embedded screenshot functionality. I can copy screenshots to the clipboard with the PrintScreen key, but I have to tab out to actually paste them into mspaint. If there's a better way of handling things, I'd be glad to hear about it - the way I'm doing things now is a right pain in the ass. |
|
#14
07-12-2008, 08:21 PM
|
|||
|
|||
|
That's.. pretty bizarre to leave out. Watchoo thinkin', Relic? -.- In that case I'd google for "windows screen capture" or "screen shot" or something, there are programs you can run that make taking and managing screenshots a lot easier.
|
|
#15
07-12-2008, 08:37 PM
|
|||
|
|||
|
Map: Absolute Zero
Chaos vs. Eldar (Hard AI) The fact that this wasn’t the most utterly one-sided fight vs. the AI that I’d ever seen is solely due to another battle that I’m going to recount later.  Absolute Zero is a long map with the two starting bases sitting right next to each other, separated by a pair of cliffs. The expectation is that you have to move your units to the far ends of the map before closing in the middle, but there are ways around this. Specifically, Jet packs! Several factions (Space Marines, Chaos, Orks, Tau) can get jet pack units early, but since I don’t play Orks, the easiest way to get jet packs as of Dark Crusade is to play Chaos. Tau have to buy an upgrade to add jetpacks to their units, while Space Marines have to build the Armory to build Assault Marines (this is a change from vanilla Dawn of War – the Assault Marine rush was pretty broken). Chaos, on the other hand, still has Raptors at tier 1 with no prerequisites. I start out with the classic Chaos Temple, 2 Cultist Squads, Heretic build order, which is essentially the same as the Space Marine order I used on Abandon All Hope. Instead of building Chaos Marines from my Temple, though, I build a Raptor Squad, which immediately jumps the gap and starts hacking away at the AI’s Aspect Temple (barracks). Meanwhile, my cultists and heretics are capturing resource points and capping them with listening posts.  If these guys are in your base and you don’t do something, you’re kind of screwed.  The AI, seeking a cowardly Capture & Hold victory, sends a Guardian squad to capture the maps single Critical Location. I ignore this for now, as while holding more than 50% of a map’s Critical Locations can win you the game, the victory timer is 7 minutes long. If I crush the AI’s production capabilities early, there’s no way the game is going to last that long. Besides, those guys should really be back in the AI’s base, killing my Raptors.  Oh, look, a Farseer (a power-oriented Eldar commander that’s physically weaker than the Force Commander or Big Mek). Her Psychic Storm would’ve been a lot more effective if I hadn’t A) captured the Imperial Relic to the south already already and B) moved my cultist squad out of the way. The Farseer, accurately dismissing the cultists as non-threatening, sweeps past them to attack the listening post I build on the strategic point just outside my base.  Just to be clear - This is not a particularly good use of a Farseer. With the Critical Location captured, the AI sends its Guardian Squads to try to take out the listening post I’ve built on top of the Imperial Relic. I make them waste some time by throwing my cultist squad in their way, but the cultists are little more than a speed bump. Guardians don’t do much damage to buildings, so I start the upgrade process and tell my heretic to build a bolter turret next to the listening post.  The Eldar continue to focus on the listening post instead of attacking the heretic, so in a minute or so I’ll have enough defenses in the area to blast them to kibble.  Meanwhile, my first Raptor squad has destroyed the Aspect Temple and is killing the AI’s workers (Bonesingers) and the partially complete buildings they’re working on, while the second Raptor squad heads down and takes out the Farseer with the help of the listening post she’s attacking. Nearby, the paired Listening Post and Heavy Bolter Turret have annihilated the Guardian squad that was attacking them... while a second Guardian squad just walked back and forth behind them as they were dying. Nice unit-level AI, Relic. No, really.  Uh, guys, the enemy is THIS way… Needless to say, the second Raptor squad makes short work of those idiots, even after they decide to start shooting back. Once they’re dead, I send the Raptors to recapture the Critical Location, because, sadly, I can’t count the number of times I’ve lost to thinking I was the one who had the victory timer counting down to zero instead of the AI.  Meanwhile, in the AI’s base… well, I’ve already won. My Raptors are busily hacking away at the AI’s infrastructure, with brief breaks to kill off the Guardian squads that the AI keeps pumping out in a desperate attempt to disguise the fact that the game’s already over. The game goes on for three more minutes, with me building an Armory and reinforcing my Raptor squads up to 10 + an Aspiring Champion (squad leader) each, but the outcome is never in doubt. This map is completely unfair when one side can jetpack-rush and the other can’t.  Smells like… victory. |
|
#16
07-12-2008, 09:27 PM
|
|||
|
|||
|
So I'm going back and using what I learned this afternoon to make the screenshots from the first battle less murky and more readable. Looking over what I've said so far, I think that I'll probably do a basic mechanics post sometime soon as well, given that Dawn of War deviates fairly significantly from the traditional Warcraft/Starcraft model.
Nunix, Ample - let me know if you think the screenshots still need annotation. I'm trying to zoom in on the subject of the shot, and to highlight it as well, but there are times when it seems like it's not enough. |
|
#17
07-13-2008, 03:18 PM
|
|||
|
|||
|
Abandon All Hope 2.0 is way nicer to look at, thanks. ;D
I'd like to know more about each unit; what its strength is, weaknesses, how popular is the unit, what's the best situation to use them, and so on. Not every unit in the game maybe, but at least the ones that you use for your strategies, and maybe particularly troublesome enemy units as well. |
|
#18
07-13-2008, 03:43 PM
|
|||
|
|||
|
Quote:
Also, I've been digging into the Orks, and they're actually pretty interesting. Still kind of fiddly, but if you use the Overwatch mechanic (which isn't described in the tutorial), they're a lot less fiddly than I thought. My next non-mechanical update will be one where I play Orks. |
|
#19
07-13-2008, 05:14 PM
|
|||
|
|||
|
Dawn of War: Basic Mechanics
So I kind of glossed over this stuff earlier in my description of how the fight on Abandon All Hope progressed, but looking back over it, I felt that I wasn’t explicit enough. So I’m going to describe the core mechanics of Dawn of War is a little more detail. Resources: Most races in Dawn of War have 2 resources they have to manage – Requisition, and Power. This parallels the Warcraft/Starcraft model, where you need Requisition for everything, and Power for everything high-tech or worth having in the late game. Requisition is earned by moving an unit that can capture onto a Strategic Point, Imperial Relic, or Critical Location, and then ordering them to capture it. Assuming that the unit isn’t killed and you don’t cancel that order, once it’s been there long enough, the Strategic Point (or Strategic Point variant) will be yours. If you have a builder unit free, you can build listening posts on top of strategic points or Imperial relics to prevent other players from recapturing them. (Critical Locations can’t be ‘capped’ in this manner, for reasons I’ll explain later.) Listening posts more or less double the amount of Requisition that you earn from a strategic point or Imperial relic, and if you upgrade them, they increase your Requisition income even more. Given that games are typically won and lost on which player has more Requisition, capturing and fortifying strategic points is vital, as is destroying your opponent’s listening posts. Power, unlike Requisition or its parallels (Vespene Gas/Wood) in the Craft games, isn’t strongly linked to locations on the battlefield. You generate Power by building generators in your base, or by building advanced generators on special locations on the map. Not every map has these locations, and you have to tech up to be able to build advanced generators, so in most skirmish games, power will come exclusively from standard generators. While you don’t need Power to build most infantry units, you need it for commanders, leaders, heavy weapons, vehicles, and teching up, so pretty much every faction has to build a generator or two early on. Orks and Necrons don’t use the standard resource system, which makes them harder to pick up and play than the more traditional factions. Orks add an extra resource – the Ork resource, or WAAAGH, depending on who you ask – which they need to be able to build new units or reinforce existing ones. You start the game with a WAAAGH cap of 15, which is raised by building Waaagh banners, which are basically expensive machinegun turrets. Waaagh banners also increase the number of Orks you can have on the field, as well as the rate at which WAAAGH regenerates when your Orks die. If someone wants a more detailed explanation of how this madness works, I’ll get to it in my Ork-specific update. Necrons don’t use Requisition at all. Instead, if they capture strategic points and erect monuments on them, their build times speed up by 20% (to a maximum of 100%). They use Power for everything, and many of their low-end units, including their builder units and basic infantry, are completely free (other than their build time). Oh, and they can and will spam Power generators, though each successive generator costs more for them to build. The reason I hate playing against them is because the AI’s resource cheats means that generator spam gets them into end-game mode far faster than it should, and Necrons are essentially unbeatable in the end-game. Combat: Dawn of War’s combat system is distinct from that of other RTS games in two ways. First, the majority of the units in the game are infantry squads, composed of multiple squad members, and can be reinforced on the fly. Second, all infantry squads and individual units have a morale value in addition to their health value, and if their morale goes low enough, their damage output is significantly reduced. Note that squads have a collective morale value, which is another reason why it’s marginally better to have two 4-man squads than it is to have a single 8-man squad; if someone breaks the 8-man squad, everyone gets their damage nerfed, while with the 4-man squads, only half as many squad members have their damage output reduced. There are 5 different classes of targets in Dawn of War, and each unit has a list of the target types it’s strong against that shows up when you highlight it. The types are: � Infantry � Heavy Infantry � Vehicles � Structures � Daemons The game engine breaks these groups down even further, but for the sake of my sanity and yours, I’m not going to go into the 13 different kinds of armor in Dawn of War. I balance RTS games professionally, and just the thought of dealing with 13 different kinds of armor gives me a migrane. What it all boils down to is that bigger, tougher units typically take less damage unless you're using a weapon that's a specialized counter. Another important element of combat is the cover system. There are 2 kinds of positive cover (light & heavy), 1 kind of negative cover, and being in Melee combat, which works like cover. Light cover slows down infantry, increases morale regeneration, and reduces incoming ranged damage, and all of these effects are magnified by Heavy cover. Negative cover (usually applied to units standing in or crossing bodies of water) increases incoming ranged damage and slows down infantry movement. Melee combat reduces incoming ranged damage and almost completely eliminates morale damage from ranged attacks. For the curious, the melee combat bonuses and cover bonuses stack, so attacking melee units with ranged specialists is a recipe for disaster. Building: To build any structure in Dawn of War, you need a builder unit and (for most structures) an area of ground control. Builder units can be produced from your headquarters structure, and you have ground control in a radius around your headquarters and any Listening Posts you create. The only structures which don’t require ground control to build are Listening Posts (which you can only build on captured Strategic Points and Imperial Relics), Advanced Generators (which you can only build on Slag Deposits), and new Headquarters Structures and Heavy Bolter Turrets (which can be built anywhere except in the exclusion zone that surrounds Critical Locations). The fact that Bolter Turrets can be built anywhere gives Space Marines, Chaos, and Imperial Guard players a tactical option that other factions lack – you can even build Bolter Turrets inside an enemy base. Winning: There are 3 standard victory conditions in Dawn of War. The first way is an Annihilation victory, where you destroy all of your opponent’s production structures. The second is a Control Area victory, where one player controls 66% or more of a map’s strategic points for 8 minutes. The third is a Take and Hold victory, where one player controls more than 50% of a map’s Critical Locations for 7 minutes. The low threshold for a Take and Hold victory is why Critical Locations can't be capped - you need to be able to steal them back from your enemies to keep yourself from losing. Most online PvP games disable Control Area & Take and Hold victories, but when you’re playing versus the AI on Harder or Expert, sometimes the alternate win conditions are the only way you can win. |
|
#20
07-15-2008, 01:38 AM
|
|||
|
|||
|
Map: Outer Reaches
Orks vs. Orks Here, as promised, is a game where I play as Orks. In fact, since I forgot to save a replay of the single good game I played with Orks vs. Space Marines (the others involved the AI being a complete frigging idiot), it’s a game where I beat up on Orks with my Orks! Da Boyz like killin’ other Boyz just as much as killin’ Humies, don’tcha know. I start off with a bog-standard build order: Da Boyz Hut, 2 Slugga Boyz squads, and a second Gretchin Squad. My Slugga Boyz capture the closest strategic points, and then rush for the strategic point right in the center of the map.  Outer Reaches is a bit like Absolute Zero in that the starting locations are mirrored and quite close to each other, so most of the action on this map takes place in the center-bottom. Capturing and reinforcing this strategic point early is thus a major advantage. Shaddup, humie! Wurds hurt Thog’s brain. Uh, right, Thog. Please don’t kill me.  Anyway, back at the ranch, my gretchin have been building Waaagh! Banners. Waaagh! Banners increase your Ork cap (which is also the cap on how much Ork resource you can have). With one Waaagh! Banner, my Ork cap goes from 15 to 25. Note that I’ve already hit my cap, because that’s what Orks do. WAAAGH! Orks like smashin’, and bashin’, and killin’, and stabbin’, and slicin’, and... Thog forget what else Orks like.  Well, one other thing Orks like is fighting with other Orks. That’s ‘fighting with’ in the sense of having them on their side, as well as ‘fighting with’ in the sense of killing them. Here you see a reinforced squad of 9 Slugga Boyz facing off against a Big Mek. This is not a good matchup for me, despite the fact that the individual members of a squad of Orks grow in effectiveness as the size of the squad grows.  Oh, look. My Big Mek has teleported in, looking for tea and crumpets. Sadly, Dawn of War is rather short on the crumpets (and tea, for that matter), so he'll have to settle for stabbing the AI's Big Mek in his ugly gob. 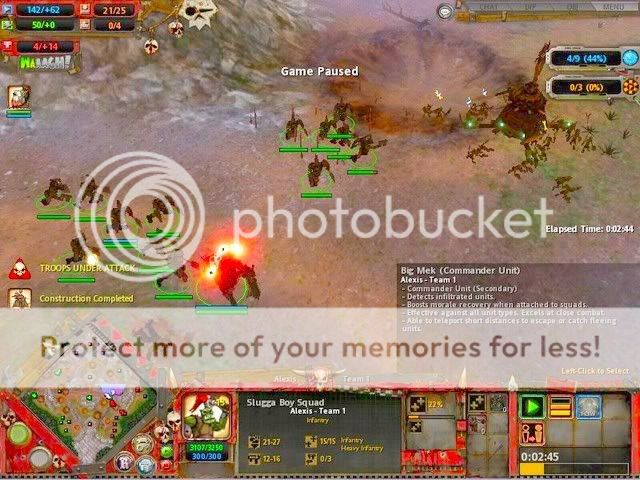 It’s a little hard to read, but the two reinforcements in the build queue here tell the story. This is a squad of 13 Slugga Boyz, with 2 more on the way. Ork squad sizes can get frankly silly.  Screenshots like this one are why my first Ork vs. Ork battle was unusable. In fact, this is significantly more readable than most of the fights from that skirmish, as there are only two squads and two Big meks engaged here. Now imagine what the screen would look like with three or more squads of Orks per player. There were times when I had literally no idea who was winning or losing a fight because there was too much shit on screen.  Anyway, now that the Boyz have driven off the other Boyz and killed the listening post that was capping this strategic point, they get busy and make it go neutral again. No resources for you, chump!  Meanwhile, in the middle of the map, I’m building another Waaagh! Banner. This is fairly typical of how Orks build, as you need to build a ridiculous number of Waaagh! Banners in order to be able to build more Orks. This also means that you can effectively reduce an Ork player’s tech level and unit cap by killing their Waaagh! Banners. Great fun, unless it happens to you. By the way, some people suggest that Orks are a newbie-friendly faction. This is a LIE. While the basic theory is simple (build lots of Orks!) the things you have to do so are highly counterintuitive if you play any other faction first. Not to mention that the Ork resource doesn’t work like the other two, in that the income rate listed next to it doesn’t have anything to do with how fast it accumulates except when you’re significantly below your Ork cap. Anyway, rant over. |
|
#21
07-15-2008, 01:39 AM
|
|||
|
|||
 As you can see from this, the AI is also spamming structures at its outlying listening posts. Orks pretty much have to do this, because the ground control radius around your headquarters building isn’t big enough for all the banners and generators you need. As a result, I’m busily taking out the listening post that giving them that pesky build radius.  Oh, fiddlesticks. The AI came with pixels of taking out my Listening Post with a Big Mek. Thankfully, I was able to prod my massive horde back to its defense in time to keep him from closing the deal before my gretchin (builder unit) could repair it.  Thankfully, his attack on my listening post in the middle of the map went less smoothly. Those smears on the ground used to be a Shoota Boyz squad that basically committed suicide by charging my Listening Post.  I’m, uh, not really sure what I was thinking here. Despite having overwhelming force at my disposal, as well as a fully built vehicle production structure, I sat around for over two minutes doing nothing. Thankfully, the AI was so far behind at this point that it didn’t matter.  Just for reference, these are Nobs, a later-game Ork unit. They have a ridiculous amount of Health and Morale, and deal a genuinely silly amount of melee damage. I don’t think they ever actually got to kill anything, though.  When I woke up and realized that I had a huge advantage both in resources and in terms of military force, I went on the offensive and rolled into the AI’s base. Despite the AI having guns on every structure, and having to race against my own Control Area victory, I scored an annihilation victory with 2 seconds to spare. Oh, and I got a Wartrak out in time for it to get in a couple of hits in on the Settlement & Da Boyz Hut. I don’t think that really counts as far as using vehicles goes, though. Thog like Wartraks. Thog like winning too. |
|
#22
07-15-2008, 02:30 AM
|
|||
|
|||
|
You weren't kidding when you said you were cranking the gamma and saturation up.
I'm enjoying this so far. Despite being familiar with the game, you're pointing out a lot of stuff I never knew. Keep it up. |
|
#23
07-16-2008, 01:08 AM
|
|||
|
|||
|
While the next game I want to show y'all is already recorded, I had a really long day at work today, so I'm going to stick to text for this update. Specifically, I'm going to go through all of the Space Marine units that I've built (or could build) in the first two tiers of the tech tree. No Terminator Squads, sadly - you need Tier 3 for those.
Servitors Your bog-standard builder unit. No special abilities, no nothing. You need 2-3 of them to get your base set up and to cap resource points and build generators, but aside from their creepy origins, there's nothing else to say about them. Scout Marines Scout Marines are a fairly standard early-game unit. Their strengths are that they're cheap, fast, and can be built from your starting structure. Their weakness is that they take 40% more morale damage than other units do, and that even if you reinforce them fully, they're pretty useless in combat unless you buy the Infiltration ability and equip them with sniper rifles. Still, you want to build at least one Scout Marine squad in the early game to go grab resources, and if you ever have exactly one command point free, it's better to build a Scout Marine Squad than to detail one of your combat squads to capture duty.  Space Marine (Tactical) Squad Ah, the glorious Tactical Squad. Space Marine Squads are a tad on the slow side, but they make up for it in strength and flexibility. They do a fair amount of ranged damage, but against ranged specialists, they can close to melee range and fight it out with their knives. Once you have the Armory and have upgraded your Stronghold, you can also outfit them with Flamers, Heavy Bolters, Plasma Guns, and Rocket Launchers. Flamers are fairly specialized (they deal morale damage), and Plasma Guns are of dubious utility unless you're fighting Necrons (they're strong vs. Heavy Infantry, and Necrons have no normal infantry), but Heavy Bolters are great vs. Eldar and the Imperial Guard (who are pretty much all normal infantry), while Rocket Launchers are good vs. everyone. Well, everyone who has vehicles and structures you want to kill. Which is everyone. Also, Space Marine Squads can be reinforced with a Sergeant, who grants a boost to maximum morale, morale regeneration, and the Rally ability, which immediately restores the squad's morale to full. This can be incredibly handy. Unless you're doing something very specific, a typical Space Marine army will mostly be composed of Tac Squads outfitted with Rocket Launchers. And despite what Relic's wiki claims, Tac Squads are more than capable of winning a game on their own.  Assault Marines Assault Marines require the Armory, and used to cost the same # of command points as Space Marines, until Relic realized that they were just flat-out better than Space Marines, at which point their CP cost went up to 3. Their ranged attack is pretty worthless, but their melee damage is good, and they can close quickly by using either their jetpacks or their superior speed. (They're 50% faster than ordinary Space Marines.) You can reinforce an Assault Marine squad with a Sergeant, just like a Tactical Squad, and you can also buy the Melta Bombs upgrade for use vs. vehicles or buildings. As such, Assault Marines are best used for micro-management heavy hit-and-run attacks, aggressive territory grabs, or for smashing someone's base when the bulk of their forces are off doing something else.  Grey Knights Grey Knights require upgrading your Stronghold to a Monastery, and that you control a Sacred Artifact. They also cost 3 CP, and can't capture strategic points. Oh, and they're unique, so you can only have one squad of them at a time. Given all of this, they should be pretty good, right? Well... kinda. They have the Psychic Inquisition power, which creates an AoE attack that deals damage over time, and you can buy and upgrade that makes thme deal damage to opponents when they close to melee. They're also strong melee combatants, and much stronger than Assault Marines at range. So they're worth building, but you pay for their power. Skull Probe I haven't played a game where stealth has played a major part yet, but when you're facing off against Infiltrated opponents, the Skull Probe (built at a listening post) is how the Space Marines can detect their enemies. A detector unit with no weapon, it can be attached to any Space Marine squad, and can also be sacrificed to deactivate an opponent's building, should you want to take one of them offline. They're mostly useful for letting you kill Tau Stealthsuits, though.  Force Commander The Force Commander is great, and probably the best brute-force Commander available at Tier 1 for any faction. (The Necron Lord and Tau Commander give him a run for his money, but both of those require more finesse than the Force Commander.) He's best used as a melee combatant, soaking up damage that would otherwise kill off line soldiers, but if you really need to keep a squad's morale up, you can attach him to it and let him heal for a while. Oh, and Orbital Bombardment is great, assuming you can tech up to build an Orbital Relay. Librarian Eh. The Librarian is the Space Marines' power-based commander, which means if you want to use AoE damage abilities, smash the morale regeneration of opposing squads, or keep your dying squadmates alive for a while after they run out of health, he's your man. The problem is that you have to build the Sacred Artifact to get him, and typically you're better off building a Machine Cult to make Landspeeders and Dreadnoughts. I'm told that his Smite ability is great, but it's never done much for me. Plus, his icon makes him look like he has indigestion. Apothecary A healer that can be attached to squads to up their health regeneration. Useful, but a little fiddly, and you build them from the Sacred Artifact, like the Librarian. It's typically just better to build the Chaplain instead. Chaplain The Chaplain has an improved version of the Apothecary's healing aura, and is also a highly effective hero in his own right. Better yet, you can build him directly from your HQ once you've upgraded it to a Monastery. He's not as immediately useful and brute-force powerful as the Force Commander, but damn is he hard to kill. Next up: Vehicles Last edited by Malefor; 07-23-2008 at 02:18 AM. Reason: Adding images |
|
#24
07-16-2008, 01:22 AM
|
|||
|
|||
|
Rhino Transport I really don't like specialized transport units like the Rhino and the Imperial Guard's Chimera. Sure, they let you move slow units faster, and help with force projection, but I tend to feel like the money you spend on them is better spent on something that can actually kill things. Landspeeder Landspeeders have the advantage of being the only combat vehicle you can build without increasing your Vehicle cap. They cost 1 CP, are highly mobile, and murder infantry. Sadly, they're also pretty fragile, so unless you need a quick response force or are playing against Eldar or Imperial Guard, they lose their value pretty quickly. Dreadnought Now we're talking! Dreadnoughts are huge, mechanized suits of armor in which mortally wounded space marines are encased. They're a tad on the slow side, but they take virtually no damage from infantry units, and just slaughter any infantry that engage them in melee. They have a flamer for ranged combat, but honestly, you should just have your Dreadnoughts wade into melee and hack your opponents apart. If you use them right, the game should be over before your opponent comes up with a counter. Hellfire Dreadnought Dreadnoughts with ranged weaponry. While I used to like these guys because they were cheaper than Dreadnoughts, experience has taught me that they're just not as good as their bigger brothers. There's pretty much no circumstance in which these guys are better than Dreadnoughts when playing against the AI. Last edited by Malefor; 07-23-2008 at 02:19 AM. Reason: adding images |
|
#25
07-17-2008, 03:14 AM
|
|||
|
|||
|
Map: Titan’s Fall
Space Marines vs. Imperial Guard Okay, so this time through I deliberately chose a build order that would showcase vehicles and tier 2 units, even if only for the last few minutes of the game. The fact that I’m playing against Imperial Guard actually helps a little, because spamming Tactical Squads actually isn’t that great against a Guard player. The map we’re playing on is an urban one, and most of the map’s terrain is made up of chunks of a fallen Titan. Titans are basically cathedral-sized mechs used by the Imperium which can annihilate pretty much anything other than other Titan-class walkers.  The Guard’s cheap, crappy resource-capturing unit (Imperial Guardsmen) is actually their standard infantry unit, which means that they’re not that crappy to start with. They’re also cheap to reinforce, as evidenced by the profusion of soldiers in this squad.  Also, the Guard specializes in pumping out cheap commanders that you attach to squads to improve their performance. The guy with the cloak and the sword here is an Imperial Commissar. He buffs the Guardsmens’ morale and increases the rate at which they heal. He can also execute one of soldiers in his squad to make the rest of them shoot faster for a brief period of time. This is consistent with the Warhammer fiction – most Imperial Commissars keep their men in line through fear.  Up north, I’m pursuing a slightly different build order than usual. I still go Chapel-Barracks, 2 Scout Marines, Servitor, but instead of building a Plasma Generator immediately after finishing the Chapel-Barracks, I have my Servitors build two listening posts first. I also build a Force Commander instead of my usual Tactical Squad. What I’m doing here is trying to resource-rush, so I can capture and cap as many strategic points as possible while harassing the AI to keep its resource production to a minimum. Tactical squads are great for going for the throat, but too many of their (very expensive) members tend to die off if you’re just trying to keep your opponent from building up their economy. Given that the Force Commander is made out of meat, and takes a really long time to die, he’s a much better harassment unit. Also, I’m going to need as much requisition as possible to buy the plasma generators & various upgrades I’ll need to field any kind of vehicle force.  Here we see the Force Commander driving off a Commissar-led squad of guardsmen from the central Critical Location. The AI is very wisely retreating – if it tried to stand and fight, the Force Commander would butcher its guardsmen in melee combat.  It’s 4 minutes into the game, and I’ve already upgraded a bunch of my listening posts. Again, I have to do this if I want to be able to build vehicles that will see any use before the game ends.  Here we see a squad of Guardsmen taking on a Tactical Squad. When led by a Comissar or Priest, Guardsmen can actually be pretty dangerous, even if their weapons aren’t that great on their own. Also, the AI is probably buying upgrades that increase the health and morale of all their Guardsmen, which makes them become more dangerous as the game goes on.  With two reinforced guardsmen squads and a Command Squad facing my Force Commander and Tactical Squad, I decide to beat a hasty retreat so I won’t lose all my guys.  A squad of guardsmen follows me, but another tactical squad and supporting fire from my listening post help take them out handily.  Meanwhile, the other squad of guardsmen and the Command Squad are attacking my base. Here you see the Command Squad, which is the Imperial Guard’s equivalent of a Big Mek/Force Commander/Farseer. Instead of being one unit, though, the Command Squad is made up of between 1-5 individual members, who have to be bought individually. You can only have one commander, but you can double up on Commissars, Psykers (who have powers like the Librarian), or Priests (who buff morale and squad damage) as you like.  Here we see the Command Squad facing off against my entire army. Its end was, unsurprisingly, swift. |
|
#26
07-17-2008, 03:18 AM
|
|||
|
|||
 Having wiped out the Command Squad, I turn on the Guardsmen that had killed the servitor which was working on my Armory. I think the sprays of blood speak for themselves.  As my army rampages back and forth across the center of the map, making sure that I kept my resource advantage, my Stronghold became a Monastery, allowing me to start on my Machine Cult.  I took a lot of pictures of my rampage, but this one is probably the best, despite the absence of enemies. Space Marines aren’t exactly nimble, but they’re quick enough to control most of the map if you can project overwhelming force.  Here we see a pair of Landspeeders, the first products of my Machine Cult. You’ll notice that the one I made first is already mostly dead, despite facing off against a bog-standard squad of guardsmen. There’s a reason Landspeeders only take up a single command point. Still, the massed firepower of the listening post and the landspeeders means those guardsmen are doomed.  These guys here are Grey Knights. They’re great in melee combat (thus the absence of a Imperial Guard listening post), but can’t capture strategic points. Oh, and they have an area DoT power that I can rarely be bothered to use.  Here we see my damaged Landspeeder (which had a grand total of 19 health left when I sent it home to be repaired), as well as my first (and only) Dreadnought. Dreadnoughts are amazing, but by the time this guy gets across the map, pretty much everything will be over but the crying. I generally try to build my Vehicle production structures as close to the front lines as possible, for this very reason. Ah, well. At least he’ll speed up the process of killing the AI’s structures.  Here we see my Grey Knights, my Chaplain, and my Dreadnought hammering on the AI’s Infantry Command. For some reason, the AI was busy building plasma generators instead of sending its Techpriests (builder units) to repair its structures or build infantry squads. Also note that at this point, the AI’s Field Command is at full health.  I took this screenshot 17 seconds later. 18 seconds after that, I won by Annihilation. I <3 Dreadnoughts and Grey Knights. |
|
#27
07-18-2008, 04:00 AM
|
|||
|
|||
|
Okay, so no update today, but I've got replays of several decent battles in the can. What would you like to see next?
1) Me explaining how broken the Tau are as I use them to annihilate the Eldar. 2) Me explaining how broken the Necrons are as I desperately try to stomp them flat before they destroy me. 3) Me playing against an AI on the Harder difficulty and eking out a win. 4) Me playing against an AI on the Expert difficulty and being handed my arse. The last option is the only one I don't have a replay for already, but that should be easy to rectify. |
|
#28
07-18-2008, 04:04 AM
|
|||
|
|||
|
Quote:
|
|
#30
07-18-2008, 04:16 AM
|
|||
|
|||
|
Quote:
|