
-
Welcome to Talking Time's third iteration! If you would like to register for an account, or have already registered but have not yet been confirmed, please read the following:
- The CAPTCHA key's answer is "Percy"
- Once you've completed the registration process please email us from the email you used for registration at percyreghelper@gmail.com and include the username you used for registration
Once you have completed these steps, Moderation Staff will be able to get your account approved.
Imperialist Looting For Fun And Profit! Let's Play Renowned Explorers!
Back to Let's Play
< 1 2 3 4 >
< 1 2 3 4 >
|
#31
 07-16-2018, 05:54 PM
|
|||
|
|||
|
We have decided to throw caution to the wind and totally do the ritual to honor Cernunnos the Horned God.
Update will come later this evening. |

|
#32
07-16-2018, 09:31 PM
|
|||
|
|||
|
Captain Emilia is all for protecting the environment, but she figures that if she's not going to do a ritual for Cernunnos the Horned God when the chance comes up, then why even bother being an explorer?
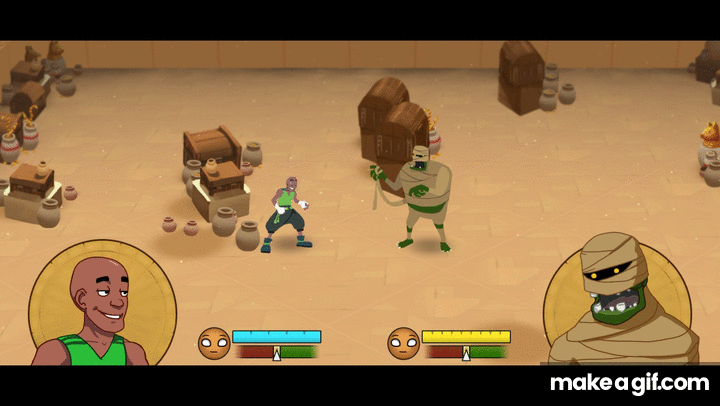
Go, Emilia!  Swing and a miss. Even with 74%, we failed. Torzelbaum may now laugh smugly, while the rest of us pay the price for our foolish attempt at cultural appropriation.  So we've lost one of our only two Resolve points, but as a consolation prize, Emilia picks up a level in Archaeologist skill anyway.  Back to the map. The node to the northwest isn't particularly interesting, but check out the empty node southwest of it - that could be the hidden rare token node for this map! So that's the plan. Get the Status node, check out the empty node, and then double back to hit the final node, beat the boss very carefully, and end this wretched map. This plan will also use up the rest of our Supplies, thus exploiting everything we could possibly exploit on this map without taking a starvation debuff.  Emilia looks like she's having the time of her life winning 1 miserable Campaign token, but deep down, we know she's as disappointed by this node as we are.  Next up - grabbing an extra rare token before we go home!  Whoomp, there it is. We'll reclaim our Discovery token, thank you very much. With that, it's a quick trip to the final node - and our first boss encounter!  We've had enough of this island, thanks. Bring it on!   Behold our nemesis. As we progress in this game, Rivaleux (get it?) will serve as the Belloq to our Indiana Jones. Seriously, exactly like Belloq. He's a French asshat who's dropping in at the end of our opening adventure to steal our hard-earned prize after we've already taken all the hits getting to it! (If you're curious, those people behind him are his own explorer crew. We'll be taking their shit all game, too - starting right with the fact that Rivaleux has three companions while Emilia is allowed only two.)   Amir Akhtar is the Scout of Rivaleux's crew, a Devious bully with no indoor voice. He's going to have a social battle with us while his boss steals the menhir. But we have a perfect party to counter Devious opponents like him, so we're going to curbstomp him - without losing a Resolve point!  This battle brings two new things. See the skull, the "...", and the green X icons there? In some battles, we get a better or worse outcome in the aftermath cutscenes if we win with a certain mood. In this case, Devious is the best outcome, Aggressive is just average, and Friendly is worst. The other new thing is that we only have to defeat the boss (Amir) for this one. Even if his henchmen still surround us, taking him down is an instant win.  The battle opens with Amir a bit out of reach, and half a dozen Mobster henchmen scattered about. So here's our battle plan. With 1 Resolve point, we can't afford to take chances. All of the Mobsters can be taken out with one hit of any of our Friendly moves, so we'll start by moving hard left and taking out the two Mobsters there. That will force Amir and all the other Mobsters to congregate towards us. With any luck, we'll be able to nail most of them with a well-aimed Party Time move by Pedrinho, while Maria and Emilia focus their own Friendly moves on Amir. Wait, what's that you're protesting? Going Friendly will get us the worst outcome? Yes, but it will also do something much more important for us right now. Watch.  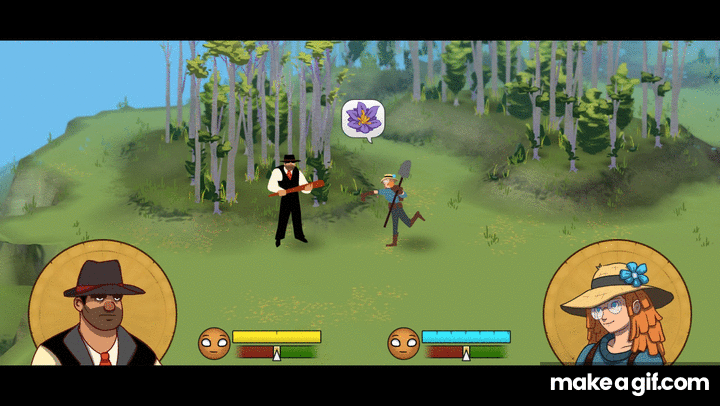 There are hardened, club-wielding thugs who can resist the charm of a Polish archaeologist with a shovel. Amir's Mobsters are not among them. So we've taken out one of the two leftmost Mobsters, but look at what else we've done:  Our stance is now Friendly against Amir's Devious. Friendly trumps Devious, so now our crew has +25 Speech Defense - a crippling barrier between Amir's Speech attacks and our last Resolve point!  Now we position Maria and Pedrinho around the other leftmost Mobster, but I'm going to show you a new stunt - Maria is going to target Pedrinho with her Excite move. Wait, what? That's right, Friendly moves aren't just for winning over your enemies - they can be used to heal and buff teammates, too! In this case, Maria is going to give Pedrinho the Excited buff, increasing his Speech Power by a whopping 25%! Not that Pedrinho needed the boost to defeat this Mobster, but next turn, his big Party Time move is going to be epic!  Pedrinho turns to the Mobster, closing in for the kill befriending. Note how his status bar has the happy green Excited icon - and the man himself is glowing green with flower power! A moment later, Pedrinho drives the Mobster from the field with a ludicrous amount of Friendly damage, and it is the bad guys' turn.  Start of round 2. Our expert positioning paid off - the bad guys have moved in, but none of them were close enough to launch even a single attack. And now Amir is exactly where we want him - in striking distance of all three of our crew.  Go, Maria! We choose you! So we're going to start by having Maria aim her new Seduce special move right at Amir. Look at the power of that move. Amir is a boss, but if this shot lands, it'll take almost two-thirds of his Spirit total! Better yet, that pink face icon means it'll inflict Amir with the Impressed debuff (the only Friendly debuff there is), giving him -25 Speech Defense until another social attack changes his mood, which in turn will make it even easier to finish him off. 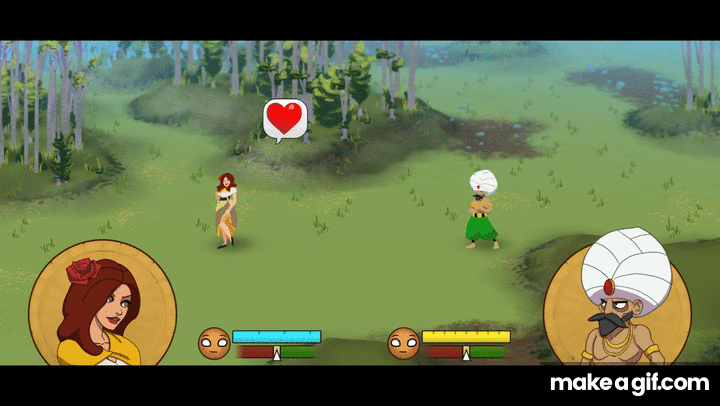 Maria shows some leg, catching Amir's eye - and his fate is sealed.  The coup de grace will be delivered by Pedrinho, courtesy of his Party Time move. Observe that it will do enough Spirit damage to send Amir AND both of his Mobster escorts packing. Show us how it's done, Pedrinho. 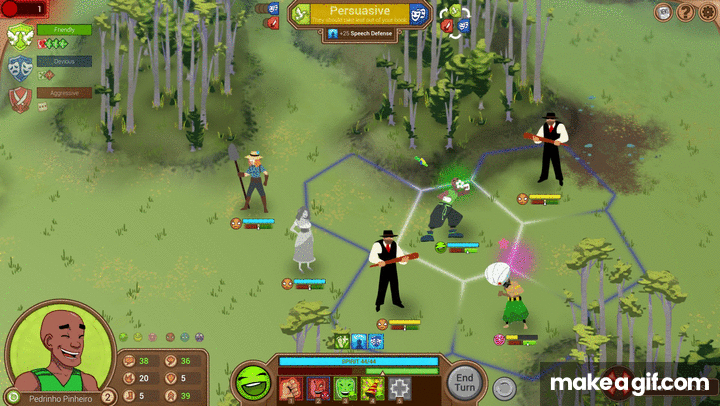 Check and mate, Amir. And a flawless victory for us - we ended this boss fight without taking a single damn point of damage, much less lose any Resolve. Our crew's new special moves made all the difference.  Rack up another Friendly victory and a bonus pile of Campaign tokens. Okay, we got the "bad" outcome, but for the starter map victory, it's really not so bad. We miss out on a couple of Study tokens and a permanent but measly +1 to everyone's Speech Power. We still get the same treasure as the good outcome!  Yeah, our weakness. Says the guy who got love-bombed off the field before he could even do anything. It's nice to see that Emilia has a mood other than Stepford Explorer, though. Next post: the conclusion of our first expedition, the main treasure for this map, and the return to civilization to spend all the Research, Gold, and Status we've collected! Last edited by Vivisector 9999; 07-18-2018 at 09:55 PM. |
|
#33
07-16-2018, 09:32 PM
|
|||
|
|||
  We're doing a Research strategy, so we'd like to make an amazing contribution to the sciences, please.  Our new druid friend makes a show of divining a location to a treasure. Look at how Emilia and Pedrinho are laughing. I think they realize the druid already knows damn well where the treasure is, and he's just pretending to be magical to build suspense. Well, let's see what we're getting.  The Sea Sapphire. Emilia already has the Naturalist skill, and I plan to get her still more levels in Naturalist as the game progresses, so we'll take the Study bonus for that.  We did conclude our starter expedition on a high note, what with curbstomping the boss and getting a treasure with a bonus we can use. But the path getting here was about the roughest I've ever had on the first map. A restart and losing a Resolve point? Ouch. No matter. It's time to return to civilization and spend our rewards!  The sum total of everything we earned in our first expedition. Not bad, but we could have done better. We will do better.  The end of every expedition also shows us our current rank among explorers. As this was our rookie expedition, we're still dead last on the list, while Rivaleux is at the top. You may rest assured that we will dethrone him by the end of expedition 4 at the latest.  And here it is revealed that the Renowned Explorers are a British organization. With all the imperialism of our mission, of course, there was never any doubt. Still, another treasure just for showing up? We'll take some of that action!  Our official Renowned Explorers: International Society Membership package comes with a mild Renown bonus, a free Insight point, and a permanent +2 for our Supply capacity. Nice (even if it's apparently dog food), but we're going to need even more Supplies. And we're exactly where we need to be to get them.  Behold the Research screen. This is where we can complete the research fields I talked about in the first post. At first, only two of the fields are available - Observations and History. History is good if you're going for a Status / entourage game, while Observations is good for everyone else (particularly Research strategies). We will be taking Observations... and we'll be able to finish the entire field before we set off for expedition 2. From this particular field, our crew will get the following bonuses:
 The starter jobs are geared towards Collect, Campaign, and Study. Right now, we're most interested in Research, so we're doing the Study one. With all the various bonuses Emilia gets towards Insight spending, we can get more Research out of one Insight point than we get from a rare Discovery token! It takes three of our five Insight points, but we earn enough Research to complete the Observations tree, gaining:
 Since we're focusing on Research, I choose to boost our Renown awards from THAT.  Of course, Research is not everything. We're going to need a bit more Gold to prepare for the next expedition, so I send Pedrinho over to trade Insight for Gold. (Scouts get the best deal for Gold, just as Scientists like Emilia are the best for Research.)  Pedrinho gets his money, leaving us with one Insight point (which I will save for a future expedition). In the shop, we have just enough Gold to equip Pedrinho and Maria with Monkey Wrenches. This will grant them both Terror resistance (one category of Devious attacks), thus further strengthening us against Devious encounters. It will also grant them both an Engineering skill, thus ensuring that all crew members have at least one science skill. Now why would we want science skills on anyone but Emilia? Here's a hint:  Now that Maria, Pedrinho, and Emilia all have at least one of those skills, all three of them will gain +1 Study token on every challenge ever. And thanks to our Student helper, that token will be worth another point or two of Research than before. And those Research points will contribute 50% more to our Renown than before. If you're the sort of player who likes analyzing systems and breaking them wide open, this game can be a delight. (I know what you might be thinking now - why the Cthulhu-banging hell didn't I buy any Armor for our crew? Because, dear tyrants, I think that - with careful play - we can handle the second expedition without upgrading our gear, especially if we choose our next map wisely. And if we don't splat, we'll end up with WAY more Research than we would otherwise! Yes, I am gambling once again.) Anyway, we've spent all the Gold, Research, and Insight that we can for now, but we still have one more reward to enjoy: Status!  Meet our first official entourage specialist - the Spanish folk hero "El Vigilante". He will teach Pedrinho another level of Survivalist skill and grant him +1 Study token on all Survivalist spins. (On top of the Study bonus Pedrinho will already earn for having an Engineering skill!) Sadly, that cost almost all the Status that we had, so we can do no more for our entourage at this time. But our new specialist and our Student helper have already served us well. With all our purchases concluded, there's only one thing left to do.  Yes, tyrants, it is time to vote again. We have three choices for where to go next:  Right now, we have exactly one of those skills - and exactly one crew member who does not suck at Devious attacks (Maria). This map might not be a good choice for us, guys.  Now this is more like it. We actively hunt all Nature challenges and Research... but can our super-Friendly crew handle a largely Aggressive map?  Also intriguing! When it comes to being Friendly, our crew could bury Mr. Rogers himself, so the encounters for this will probably be another cakewalk - and we definitely could use more Gold to upgrade our pitiful Armor. But is that more valuable to us than the all the potential Research from the Roche Treasure map? So where should we go?
Commence voting, tyrants! Last edited by Vivisector 9999; 07-22-2018 at 12:07 PM. |
|
#34
07-16-2018, 10:56 PM
|
|||
|
|||
|
Quote:
Quote:
|

|
#36
07-17-2018, 06:39 AM
|
|||
|
|||
|
Quote:
Concerning the non-Beguiler challenges - yes, that is one possible drawback to a Mali expedition. But the challenges might not be too harsh (this is still only the second expedition) and if there's one we really, really need to succeed at, we'll have Emilia's Tool to help us. Granted, we're still gambling there. But losing this one (ie being forced to walk away from a few challenges) will not hurt us as much as the Roche map's big threat (getting battles where Friendly is not a workable option). As for your second question - you can always go to any map that has been unlocked (you can only visit a map once, though). However, it is indeed best to visit the highest-tier maps available, as the rewards are much better and our characters will keep growing. The only time I've ever gone to a lower-tier map is the final expedition when I already had 2500+ Renown - and I've already promised not to do that. Last edited by Vivisector 9999; 07-17-2018 at 09:23 AM. |

|
#39
07-18-2018, 02:40 PM
|
|||
|
|||
|
Although the Research potential of the Roche treasure map was tempting, we have decided to visit Mali, where Gold is allegedly plentiful and where our "Care Bear stare" approach to conflict resolution will be welcomed.
Update will come later this evening. |
|
#40
07-18-2018, 09:52 PM
|
|||
|
|||
|
Expedition 2: Mali Mystery begins!
 You know, I'm not sure if I care for the slant of the narrative here. What was the thought process involved? Quote:
So yeah, Emilia, our crew better get in there now before the other colonizers walk off with everything!  Our first expedition was small, but from now on, the maps are going to be much larger - in fact, I couldn't quite get all of this map on one screen even with maximum zoom out. Luckily, we've managed to increase our Supplies to help tackle it. Also note the final node:  Winning the final treasure here will require more from us than merely showing up and beating a boss in two hits.  And the narrative gets even better. So to recap, our mission here is to find this witch doctor - a man who is already cranky from all the shit he's had to put up with from other foreigners - and find a way to suck up to him until he yields his treasure. Okay, no one's talking about straight up raiding the village and plundering it like the opening of Conan the Barbarian (Arnold version), but still. We're totally barging into this guy's turf and imposing our will on everyone for the sake of material gain and bragging rights. So yeah, I'd say the Renowned Explorers are overdue for a stern discussion about our imperialistic ways. I don't think it's an accident that a conniving thief like Rivaleux is the #1 explorer of our ranks.  With our morally questionable mission set before us, we must still decide how to proceed. Interestingly, this Technique challenge node has a path to another node that costs 0 Supplies - we could go there and then hit that Gold node for free. So we'll start with that.  Again, we run into El Vigilante. He's not just a Spanish folk hero and the owner of that dog food company that is so helpfully increasing our rations - he's supposed to be in our entourage! So yeah, what the hell is he doing out here? (I mean, other than causing typos?)  A challenge to help El Vigilante experiment on some hyenas, using a skill we don't have, for a maximum 37% chance of success. And failure will cost us a Resolve point. Ha ha ha ha NO.  Emilia picks up a couple of Collect tokens for our trouble, but really, we're not off to a good start here.  Back on the map, a treasure node has revealed itself. But we can still get that Gold node for no Supply loss, so let's do that first.  We're not an Aggressive party, and this isn't an Aggressive map, so the loss of strength doesn't particularly scare our crew - least of all Emilia.  Emilia scores a few more Collect tokens at the cost of an Armor hit for this expedition. Meh. We should be far more concerned about the Mali villagers' Speech Power. Now we make our way over to that treasure node.  A diplomatic challenge! Maria is so ace at these, she doesn't even need to spin the wheel for this one.  Every continent has sword fanboys, it seems. We'll tell him we're from far away.  Okay, then, let's talk about our accomplishments. Unfortunately, that also results in the same screen. As does any combination of any of the top two options. It just loops endlessly. We can only leave the sword fanboy.  And we're sent back to the map with no treasure. Argh. If we'd collected any kind of sword as a treasure in the first expedition, we could have shown it to this guy and received another sword-based treasure.  Our next move is a no-brainer. Nearby is one of Emilia's beloved Nature nodes, with the bonus of a star event.  It's not necessarily a good idea to intrude on strange noises in a dwelling, but in our quest for treasures, we fear nothing.  Thankfully, the noises were completely innocent. But now we have another bogus challenge that will cost us a Resolve point for failing. I'm actually tempted to use Emilia's Tool and go for it because succeeding at this will give us something to help when we meet the witch doctor at the final node, but even with the Tool, we'd only have a 45% chance of success - not good enough for me. Not when a Resolve point is at stake.  Wow, look at Emilia's nonchalant expression there. Running with the narrative we started this map with, our crew isn't even pretending we aren't jerkasses anymore.  The revealed nodes are interesting. I think we'll pick up those Supplies, and then move west for our second attempt to get a treasure.  Our crew is not too proud to gather Supplies alongside elephants and gazelles. Now it's treasure acquisition, second down.   From the narrative to the challenges, this map is seriously starting to piss me off. Well, I'm not letting a second chance at a treasure go, and I don't fear a temporary Speech hit as much as a Resolve loss, so I'm breaking out Emilia's Tool and going for it. This is another place to possibly get something to help us with the witch doctor.   And our ill-advised attempt ends in wretched failure. Luckily, Pedrinho had the least Speech Power among our crew anyway. (And we get to keep Emilia's Tool for the next challenge.) By this point, I just want something, anything, to go right on this expedition. Our adventure continues (and turns around!) in the next post. |
|
#41
07-18-2018, 09:54 PM
|
|||
|
|||
 As though in answer to my desperation, the Maria and Pedrinho romance storyline continues! Despite the hardships of this expedition, the Riot of Rio has found the balls to approach his crush. Complimenting Maria's hair is about the most boring and generic icebreaker imaginable, but the other option? Dancing is how Pedrinho wins all his other battles, and that is how he'll approach Maria, too!   Success! Pedrinho and Maria aren't madly in love yet, but she has definitely noticed him. He can't turn back now! As a result of his romantic success, Pedrinho's "Loves Maria" Speech bonus gets bumped up to +25% - enough to offset much of the Speech penalty he incurred trying to scale the walls of Fort Bullshit. And unlike the Speech penalty, that +25% bonus will last all game long.  Back on the map, we have two choices going forward. As I am an idiot who has not failed enough challenges on this map yet, I opt for the node to the southwest.  Oh, sweet. If we're going to walk off with the local witch doctor's bling, the least we can do is punk some other white raiders while we're in the neighborhood (and get a secret document of some kind for our trouble). I'm going for it! And I'm using Emilia's Tool to bump Pedrinho's odds up to 83%. Because dammit, Pedrinho is on top of the world after impressing Maria, and I'm not going to let him embarass himself in front of her now.   Pedrinho makes out like a bandit himself, allowing this expedition to enter Chapter 2: Now We're Kicking Ass. The document turns out to be a clue to the hidden rare token spot... which unfortunately doesn't describe any node currently visible to us.  Our luck seems to continue with the sighting of a Nature/Supply node. Moving on it!   Pedrinho is on fire! First he impressed Maria, then he punked those bandits, and now he's going to get all the Supplies effortlessly (thanks to his awesome Survivalist skills). I'll point out that even though we've failed to procure any treasures yet, we're still at 10/12 on Suppplies. So dammit, we're going to keep going on this map until we find something. In the meantime, though...  Don't mind if we do. Maybe our campfire card will further improve the roll our crew is on.  Emilia The Botanist and Campaign Charm are from last time, but the two new cards are disappointing. Secret Report increases the yield from rare Secret tokens by 25%, but that doesn't really excite me. And Renowned Archaeologist is the same near-worthless Renown card we had before the first expedition reset. I'm playing Emilia The Botanist, keeping Campaign Charm, and ditching the other cards. So before Maria's love story has even ended, we're going to see the start of Emilia's campfire story!    Basically, tapping Nature nodes now improves our rare Discovery tokens... and there might be a rare prehistoric plant on a Caribbean map for us to find. Roche's Lost Treasure was a Caribbean map... and there will be another for expedition 4.  Speaking of Nature nodes, there's one right over there! Moving on it.  Emilia gets a special option, picking up a couple extra Study tokens.  The northeastern Supply node is the least unappealing of our current choices.  It was inevitable - we're actually getting called out for being here to loot the region. As cheeky as it would be to totally admit that we're here to take his cultural treasures, Maria attempts to smooth things over. It's a gamble, but there's a lot to gain here, and Maria's Speech Power is so high that a 5 point hit wouldn't make much of a difference.   Boom! And Maria - not to be outdone by Pedrinho - gets a special Up To 11 option as a chaser.  The now-friendly miner reveals a few special sites on our map - including one that is only two nodes away! - while awarding us our first rare token of the expedition, a Secret. (After I've already thrown away the campfire card that enhances Secrets, of course.)  We are eager, indeed. For now, though, I'm going to call it an update. I somehow managed to avoid having an encounter or even an issue for you to vote on, but I hope you all found this amusing (and possibly confounding) anyway. While this expedition started off lamely (especially concerning our lack of Athletic skills and, well, our imperialistic goal), Pedrinho and Maria suddenly brought out their A-game and turned things around. We scored even more Supplies from that last challenge, bringing us back to 11 /12 and almost half the map exposed. For reference, usually my Supplies are almost gone when I've finished half the map. In fact, we will easily have enough Supplies to visit all the mine sites that were revealed, including the treasure-bearing Crystal Mountain site (and now we'll have a special tool to help us when we get there). So despite our problems at the start, we might yet make it home with an admirable haul. We just have to figure out the least horrible and exploitative way to do it (if it's not too late for that). See you guys next update. Last edited by Vivisector 9999; 07-19-2018 at 08:16 AM. |
|
#42
07-21-2018, 12:15 AM
|
|||
|
|||
|
Welcome back to the LP for Renowned Explorers: International Society. We've got one massive update for you today!
In our last episode, our expedition to Mali got off to a rough start, but we rebounded to explore half the map with almost all our Supplies intact. We've also charmed the natives into letting us check out the legendary Crystal Mountain, pointing out all the best mining sites, and even providing us with their special mining tool. Friendly though we may be, we're still treasure-hungry imperialists.  Crystal Mountain is that purple node with all the icons at the top. So we're going to proceed northwards towards it, visiting every Nature node (and anything else of interest) as we go. Case in point, our next node is a special star node - and our first potential encounter for this map.  What luck! Playing our cards right with these guys will make it easier to see the witch doctor. Luckily, Maria the Beguiler has a special option to help us. (As does Pedrinho. I forgot to mention that he picked up a free level of Beguiler from the Maria romance storyline.)  This time, Maria's special blue option doesn't get us anything as good as a pass to Crystal Mountain. We're going to have to throw down with the waiting committee.  Again, the mood of our victory will affect the outcome. And this time, the consequences go far beyond this node. Beating this encounter with a Friendly victory is one step to getting the best possible treasure from the witch doctor. Given that Friendly is the good outcome, a Friendly victory also offers the most tokens, we're already horrible enough invaders without straight up bullying or pulverizing these people, and all our best moves are Friendly anyway, our optimal approach for this encounter is rather obvious.  On turn 1, we find ourselves surrounded by a group of friendly Mali villagers. We are fortunate. Their stats are slightly tougher than the wolves from expedition 1, but their Friendly approach will test our crew's Speech Defense (which is significantly better than our Armor). Not that we can be totally careless, though, as that blue guy way on the right is a special Wise Villager who has an AOE attack. But then, so do we. 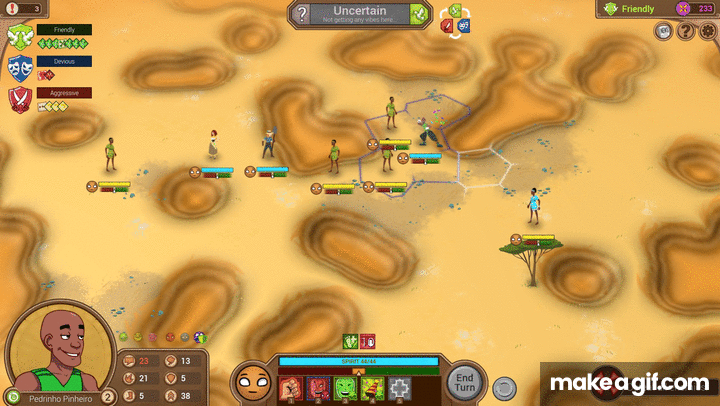 I open by having Pedrinho do his Party Time move. Usually, I prefer to wait until it can nail at least three opponents (as Party Time gets more powerful with each adjacent enemy), but in this encounter, it won't be necessary. The villagers are specifically vulnerable to the Excite element of Pedrinho's move, and yield immediately to this mysterious lord of the dance. If you're wondering about that "4" that appears over the Party Time icon in this sequence, that's the move's cooldown. You can't spam your special moves endlessly.  So this is another quirk of the encounter system. If your mood matches the other side's mood, you get a bonus to moves which counter that mood. This is actually one strategy for Aggressive runs - manipulate the moods until both sides are Friendly, and then do a super +50% backstab physical attack (preferably an AOE one). Our genuinely nice crew will be perpetrating nothing of the sort here.   Instead, we deploy Maria to charm the lone villager to the left, who soon also becomes too Excited by our cause to resist.  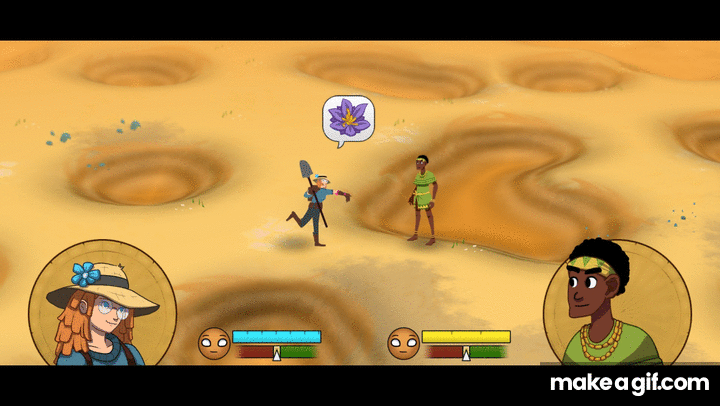 Last up is our captain, who approaches the middle villager who missed out on Pedrinho's Party Time. She, too, has an Excite move that he is vulnerable to. I know we're breezing past these guys, but we're going to be in real trouble if we get an encounter with Excite-resistant (or even immune) enemies. Now only the Wise Mali Villager remains, and it is his move. 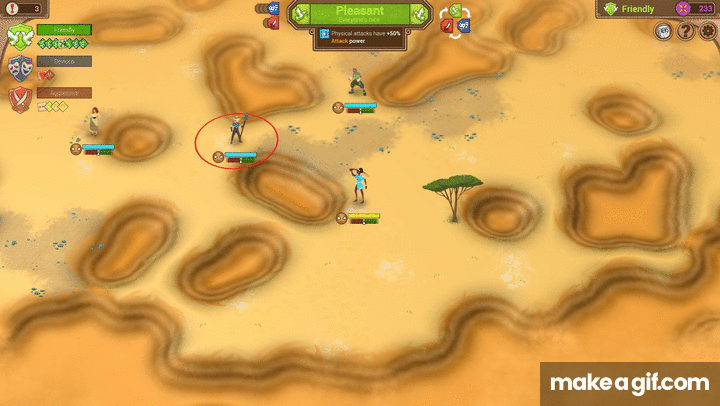 The Wise Mali Villager advances to do his AOE move, but I strategically placed our crew so only one of us could get caught by it. While Emilia took an Armor debuff earlier, her Speech Defense remains strong, and she easily survives the Friendly counterattack.  A moment later, our crew Excite-bomb the last villager into the next area code, and claim a Friendly victory.  Great. But we'll also need to find a special way to pacify the cranky witch doctor... and we've blown all our chances to obtain that so far.  For our next move, there are - to our delight - two Nature nodes within reach. We'll hit the closer one first.  And we're back to the bullshit Athletic challenges. Again, though, I don't fear Armor penalties on this map, so what the hell.  Wow, we came so close to actually making that one.  The tribesmen laugh at Pedrinho's hail mary attempt to walk across burning coals - but Maria doesn't. Despite this debacle, she still cares for him as a teammate - and perhaps something more!  Next stop, that other Nature node - and one of the spots the miner marked on our map!  Pedrinho elects to enter the sealed mine in the smoothest way he knows how.   The mine is... not quite what we expected. But despite Pedrinho's evident frustration, Emilia can slam-dunk this challenge and get TWO rare Discovery tokens!  Another marked node is nearby. We'll investigate that, then circle back around to the Supply node.  As is its command of possessives.  No rare tokens this time, but damn. Maria's success with that miner has really opened up this map. |
|
#43
07-21-2018, 12:17 AM
|
|||
|
|||
 Hard northwest, to the Technique challenge node.  If only I'd been able to buy a Monkey Wrench for Emilia, too. Failure doesn't look particularly harrowing on this one, so I'm going for it.  I failed to get a shot of the aftermath cutscene, but basically Emilia tried to build a booby-trap, only for Maria to walk into it. But the trap was so poorly constructed that Maria wasn't even hurt. So no consequences for failing here at all. But why friendly Emilia even WANTED to make a trap is left to our imaginations.  We've already enjoyed tons of bonus Supplies this expedition, but I'm not about to say no to even more.  This asshole seems like a vastly more deserving target for our looting than that witch doctor or that uber-helpful miner. Note the repercussions of the highlighted option here - this is another thing that sometimes happens. Certain crew members will disapprove of certain choices. You can still make that choice, but they gain a temporary debuff if you do. In this case, Emilia and Pedrinho are genuinely kind people, so it would depress them to be on a crew that cuts deals with slaving warlords. I'm not cool with that, either, so we're going to sneak around and see if we can't stick it to the warlord - by stealing the fruits of his maggots' labor.  A difficult challenge that we're not prepared for, with severe debuffs to Armor and Attack Power for the one who fails. I don't care in the least about Attack Power or Armor for this map, so Pedrinho's going for it.   Pedrinho doesn't have any Rogue skills, but he's just too damn good for that to matter. And for once on this map, there's no moral ambiguity about what we're doing at all. We still have yet to claim a treasure for this expedition, but our haul of tokens up there is starting to look pretty sweet.  After all the challenges he's done, Pedrinho proudly ascends to level 3. Instead of skills this time, he has the choice of two perks: +6 Speech when our attitude is Devious or +1 Collect token on a Friendly victory. That's a no-brainer decision for us. This level is also where Pedrinho gains the ability to equip a second trinket and unlocks his Disarming Smile special move, a Rage-flavored attack which prevents the target from doing a physical attack for one round. It'll be the only worthwhile Devious attack Pedrinho will ever have.  The big moment is here - Crystal Mountain is up next, and with it possibly our first treasure for this map. Let's do this.  You know what? We passed so many unlikely challenges to locate this site, get the Supplies to make it up here, and even procure a special mining tool to properly exploit whatever is buried here, but yeah, it's too dangerous. Let's just turn back now!  So we need to pick someone to go in there... with no hints about what challenges might be involved other than our adventure sense telling us something might go "horribly wrong". Chivalrously, Pedrinho decides to step up, sparing both his captain and his love from the danger ahead.   Of course. If Pedrinho runs immediately, he gains +25% to an upcoming challenge. The exit challenge to escape this cave without taking a massive hit. But then he wouldn't be able to collect those rare tokens on the ground!  Again, Pedrinho must choose between self-preservation and tokens. The option to flee would grant another +25% bonus to that upcoming challenge. Instead, Pedrinho decides to show off his intense Survivalist training.  You're not fooling me, game. The "Olympian task of reaching a high ledge"? WTF, we all saw Pedrinho get a boo-boo falling down the walls of Fort Bullshit. All the same, we'll gratefully accept Pedrinho's new level in the useful Quick-Thinker skill.  One last time, Pedrinho must choose between something shiny or getting another bonus to survive the upcoming challenge. Guess, gentle tyrants. (Oh, and it's nice to see that our man's new Quick Thinker skill is already paying off!)  Pedrinho aces the challenge to pick up our (super long-awaited) first treasure of this expedition! Of course, he's stopped to loot so much shit in this cave, the exit challenge is probably going to kick his ass 365 ways from New Year's Day, but still. Shouldn't we take a moment to check out our new bling? Yes. Yes, we should.  Now that's what I call a treasure! Only the right two choices are worth considering, though. We have enough Collect tokens to get either 3 Treasure Hunt tokens or 17 (!) Study tokens. Well, we're a Research crew, and we can't say no to such a metric bangton of Study tokens! Now let's face that exit challenge and see what price Pedrinho is going to pay for all this glory.  ...yeah. Just as the Star of Africa and our giant pile of tokens are awesome, so too is the punishment for our hubris. Dammit, we're going to end up limping around the map with 1 Resolve AGAIN. I wish I had at least skipped the middle looting choice (the one with all the common tokens). I'd gladly trade that crap for a +25% on this roll. No, wait, that was where Pedrinho also got his new Quick Thinker skill. WHICH IS ALREADY HELPING HERE, TOO! Whatever, I regret nothing. So come on, Pedrinho. You can do it. Just think about how hot you're going to look when Maria sees you dance your way out of THIS one.   Holy dick-blasting shit. HE MADE IT. We went in that legendary mountain cave, stopped to loot everything that wasn't nailed down, pried up everything that was nailed down, and TOTALLY GOT AWAY WITH IT.  Quote:
Especially as we will not have a special thing to please him and get the best possible treasure. But 1) that's not an option, and 2) I can't help but notice that the longer this expedition continues, the sweeter it gets. |
|
#44
07-21-2018, 12:18 AM
|
|||
|
|||
 As though to underscore my last point, the Crystal Mountain node was also a Nature node, and we've now done enough of those to permanently upgrade our Discovery tokens (courtesy of Emilia's campfire story). We already have a lot of Research incoming and we need to start earning more Gold, so I'm going for option 2.  Aww. Our crew are all just so supportive of each other. And now all of them are contributing wonderful things to this expedition.  Our plan now is to proceed toward the final node with the last of our Supplies, hopefully uncovering another treasure between here and there. I know we're doing great on tokens, but I'd like to close this map with more than two treasures. I'd also like to bump Emilia and Maria up to level 3 before the boss. Next stop, that Nature node to the left which is also one of the last marked mining nodes!  Ridiculous. I'm not gambling our (now-dwindling) Supplies on a hail mary pass this time. We'll just study the cave instead.  Emilia picks up her one measly Study token - to toss among the 53 other Study tokens we already have for this map - and slinks off. And that's the last we'll get out those special mining tools. Thanks, Maria!  The only paths forward lead into encounters. The one on the left offers us the best path to the final node.  So we can either give up two Collect tokens, burn a Supply point moving around them, or insist that explorers like ourselves aren't subject to tolls. I know two Collect tokens isn't much to ask (we have 35)... but I still need to get everyone to level 3 before the boss. So (sigh) engage!  Another battle where we get a different outcome for what mood we win with. One thing I didn't mention earlier is that if you mouse over the actual victory icons for each mood, you can learn more about why you're getting that outcome (or what you can expect for it). In this case, if we're Friendly, the villagers will share their knowledge. (And award us another nice pile of tokens.) But if we're Devious?  And here is the Aggressive outcome:  So yeah. We may be weaseling out of a toll, but we're not throwing the first punch - or even the first insult.  As it turns out, the resulting encounter is much the same as the previous one (our crew versus a small gang of Mali villagers), to the point that I didn't bother with screenshots or gifs. The Mali villagers, while Friendly, are no more numerous or less vulnerable to our Excite-flavored moves than before, and the resulting conflict is again easily resolved by the first move of the second round. I tell you, we may have punted a ton of Athletics challenges on this map because we didn't have a Fighter, but we brought exactly the right party to sail past all the encounters.  As a show of gratitude for the overwhelming power of our Care Bear stares, the toll collectors tell us there's something interesting in one of their villages, adding a marker to our map. It's a spot all the way on the other side of the map, and one we've already been to. In fact, it's where Pedrinho failed that Athletics challenge climbing up the wall. The site that I have so affectionately referred to as "Fort Bullshit". I can't help but think that the toll collectors are attempting a subtle revenge on us.  Meanwhile, that encounter was enough to push Emilia to level 3. She unlocks her Amnesia Shot (a neutral attack that will weaken an opponent's defenses for 1 round), gains an extra trinket slot, and gets a choice between +1 Study token in Berlin (when spending Insight there) or +1 Campaign token when Emilia succeeds on the Adventure Wheel. We'll take the extra Study token power, thanks.  We have just enough Supplies to get those Gold and Science nodes before entering the final node.  This payout didn't deserve that many exclamation points.  I love the implication here that our crew are familiar with the cockfighting styles of different snakes.  With one Supply point left and nothing nearby worth taking a starvation debuff for, it's time to visit the final node. We know that the cranky witch doctor will greet us as greedy, looting foreigners - and by this point, we are in little position to deny that - but can we win him over with a nod from the audit committee and Pedrinho's dance moves?  Yes, I think we've brought enough grief upon this land. It's time for one last big colonizer act, then we're going home.   Oh, how delightful. Some other foreigners were already here to make sure the witch doctor is in an extra cranky mood for our visit. Look at this poor guy, too. You can see the crushing weight of the burden he carries, having to deal with foreigners who see him as nothing more than a 19th century ATM. Luckily for us, Maria is no mere scallywag. If she can talk a miner into helping our crew loot the countryside, she can easily persuade the witch doctor to let us beg for a treasure hear us out.  Come on, Maria, let's not be TOO transparent about this.   Our Friendly victory over the audit committee in that first encounter pays off now.  Here we go - the moment of truth. Maria talked her way in, the audit committee honored our victory over them, and now this is the final challenge we have to pass to determine what level of treasure we will be awarded. On the way here, we failed to pick up any special techniques or knowledge that would help us amuse the witch doctor, so our crew is just going to have to go with our native talents. Pedrinho will once again dance to victory. This isn't going to work, and we will not get the best treasure. |
|
#45
07-21-2018, 12:19 AM
|
|||
|
|||
  The witch doctor proves to be a tougher audience than Maria was, and Pedrinho's dance fails to impress him. Pedrinho's insistence on receiving a treasure anyway is the final straw for the witch doctor, who hilariously slams us as the self-entitled invaders that we are and calls in his villagers to deal with us. Being arrogant imperialists, we of course will throw down with them.  With this final encounter, a glance at the outcome icons - "..." for each - shows us that all the pretense is finally gone. We're still best off staying Friendly until the village gives us a treasure, but we can also be Devious and annoy them until they give us a treasure to go away, or be Aggressive and straight up beat the treasure out of them. Any way you slice it, though, we have grossly overstayed our welcome in this place, yet we refuse to leave without a treasure. Our only choice is whether to use the fist, the biting wit, or the honeyed tongue.  Despite the witch doctor's frustration, his scolding squad starts the encounter Friendly. We're badly outnumbered here, but most of these guys - the blue and green shirts - are the same type of villagers we've encountered before, who are Excite-vulnerable and low enough in Spirit to be one-shotted by any of our Friendly attacks. The villagers with red shirts are a new class of opponent - ironically, one with tougher stats, twice as much Spirit, and lacking the other villagers' Excite vulnerability. They could be trouble.  For our first round, my strategy is not entirely dissimilar to our first boss fight - I'm moving the everyone hard left to tackle the opponents on that side, who are easily swept aside by our Excite moves. I haven't used any special moves yet, because next turn the rest of the enemies will move in - and that's when we'll really need those moves to be off cooldown.  Round 2. Our placing ensured that the other side failed to get any attacks off... but their own placing has left them in a bad place for us to counter. We really need Pedrinho's Party Time to hit more than two of them. I end up deciding to pull our crew back a little farther and let our opponents gather closer. I also use their Excite moves to have them buff each other. They're going to need the extra Speech Power for the Care Bare staredown apocalypse that will surely erupt next round. 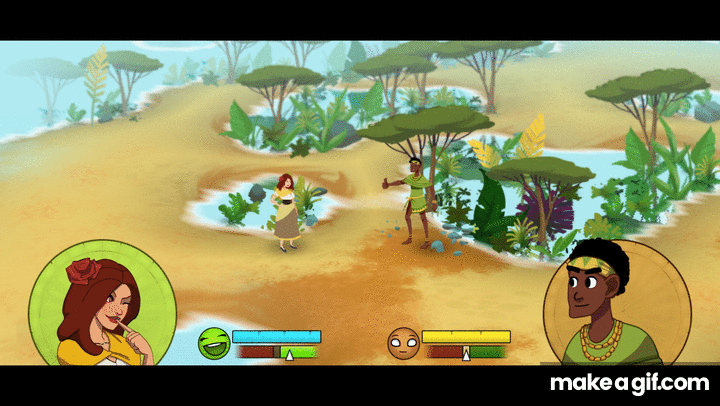 Alas, I failed to get Maria far enough away, and a villager attempts to win her over with a Friendly thumbs-up move. It takes off a good chunk of her Spirit! I keep forgetting that despite how hard our crew can hit, we're kind of glass cannons ourselves. But it's okay. If we survive this encounter, we'll be able to afford some nice defense items for our next expedition.  Start of round 3. The villagers continue to make confounding use of the terrain, preventing any clusters where I can get a triple (or better) hit with Party Time. I need to think about this carefully.  I move Maria up to where her Seduce attack can target one of the red villagers.  Again, the mere sight of Maria's leg is enough to distract a man to near-defeat. And again, the coup de grace will come from Pedrinho. I move him into place next to the doomed villager.  Pedrinho uses his basic Excite move to usher the redshirt off the field, and Emilia moves in place to Excite the villager who nailed Maria.  We'll dispense with the gif this time.  End of our turn for round 3. I positioned our crew specifically to avoid the blueshirts' AOE attacks hitting more than one of them at a time, but if the villagers all concentrate their moves on Maria or Pedrinho... it could get bad. 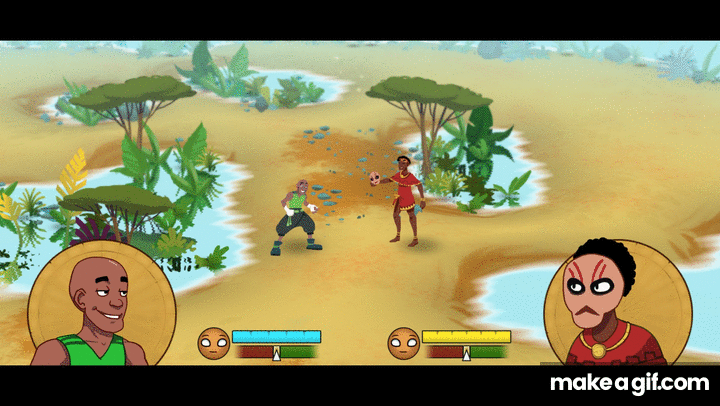 Attempting to avenge the charming of his brother redshirt, the second redshirt advances on Pedrinho... but the Riot of Rio's Spirit will require more than that.  Maria, meanwhile, took a AOE hit from one of the blueshirts. We were lucky that she didn't go down (and cost us Resolve), but we need to either heal her or finish this encounter quickly.  I move our crew around so Emilia can use her healing Tranquility move. Boom! That is way better than just using our basic Friendly attacks to heal. Now our whole crew has full Spirit and the Speech-buffing Excited mood. Maria and Pedrinho sieze the momentum to Excite the two blueshirts over to our cause.  Now it's just us and the final redshirt... who fails to do enough Spirit damage before he, too, is Excite-bombed into compliance. Wow, we ended up not even using Party Time at all.   For better or worse, our honeyed tongue has compelled the witch doctor to hand over a precious treasure. Although in a final attempt at a burn, he acts like us he's just dumping crap he doesn't even want on us.  The Friendly approach is the only mood our crew really does well, and so anything to make Friendly victories better is a good thing. If we had passed that first Athletics check (with the woman who needed her furniture moved), we could have learned a massage technique to soothe the witch doctor. Then we'd end up battling HIM to get a treasure, but it would have been a higher-class treasure than this one. Alternately, if we had a crew member who is a pranking trickster, that also would have amused the witch doctor, again allowing the harder battle and better treasure.  Yeah, we sure showed him, Maria. Seriously, our crew hit Mali like a bunch of drunken American frat boys. At almost every turn, we made the most greedy and irresponsible choices possible. We seduced the natives into helping us loot their own homeland, we stole from warlords and bandits even though they were clearly dangerous, we scaled fortress walls like jackasses without the first hint of an invitation, we danced heedlessly through unstable caves for even more plunder, we manipulated toll collectors into proclaiming friendship to us rather than yield to them even one coin from our massive haul, we dogged the local ruler like a plush-stuffed Terminator until he surrendered yet more treasure to us, and we ran over hot coals for shits and giggles. And we totally got away with everything. No Resolve hits and no permanent debuffs, just a nice spending spree when we get back to the world map in a minute. Then again, history is written by the winners, isn't it? In the historical annals of the Renowned Explorers, I'm certain that the record of this expedition will read something like this: Quote:
Oh, and the running over hot coals debacle? Well, Maria is a woman of surpassing beauty, and a young, super-extroverted man like Pehindro is liable to do some silly things to try to impress her. Perspective aside, let's see what our haul for this expedition was.  Our number of treasures is disappointing, but our tokens are off the chart for a second expedition. So overall, not too shabby. That's definitely enough Gold to make significant improvements to our defensive gear, and we'll be seeing most (if not all) of another branch of the science tree, too.  For our efforts, we climb a couple of places in the rankings. Next post, we spend our new earnings on the world map, and - FINALLY - we get a new vote! Last edited by Vivisector 9999; 07-21-2018 at 01:20 PM. |
|
#46
07-21-2018, 12:21 AM
|
|||
|
|||
|
Now that we're back from our excursion to Mali, it's time to spend and upgrade and unlock a bunch of stuff.
 As a bonus for finishing expedition 2, we get a choice of city to unlock. Constantinople has a new Entourage Hall and a modest Trinket Shop. New Orleans has a better Equipment Shop, but a modest Entourage.  We're more interested in equipment than entourage, so I went with New Orleans.  First things first. That final encounter pushed Maria to level 3, so let's tend to that. She gets a choice of Sadden has +25% power against Impressed targets and has a stronger Sadden mood or Targets of Seduce gain -25% Attack. Maria is the only crew member who can really do Devious attacks well, so I choose the first option. (The second one would be better for an Aggressive crew.) Now it's time to spend our Gold, Status, and Research. We didn't get much Status, so let's start there.  The newly-opened Entourage Hall in San Francisco has this charming specialist. (He is not the famous British captain and explorer James Cook - it's about a century too late for that.) He can teach Emilia another Naturalism skill - and add 1-2 Gold to every Study token. After that, we spend our remaining Status on a couple of Merchant helpers, who increase the value of our Collect tokens. The mid to end game is mostly about gold, guys. Next up is Research spending.  After expedition 2, it's open season on all fields of Research. Aside from the two we've already seen - Observations and History - there are fields specializing in Status (Psychology), Gold (Engineering), Research (Nature Science), and Encounters (Anthropology). For our run and our current strategy, Nature Science and Encounters would be the most beneficial - but I think I'll go with Nature Science. This time, we have enough of it to finish almost the whole tree (except one field) before I have to put Emilia to work in Berlin, trading Insight for Science.  This is why I saved Insight from last time. Emilia's science-gathering powers have only grown since the last time we were here - and now we're getting a bit of Gold for it, too. A few points of Insight later, we have the completed Nature Science tree:
Oh, and a treasure? Yep, this one:  No choice of bonuses this time, but nice. Here's what Emilia's Insight spending looks like now:  It would help us to be able to open one more research field, so Emilia's going to go nuts with the rest of our Insight. She manages to just barely get enough Research, so I open the Engineering field. I can't do more than open it, but even that gives us another Tool (+25% to one challenge) for each expedition! Later, as we explore the Engineering field, our Gold income will increase dramatically. And speaking of Gold, that's our final resource to spend.  I end up outfitting our crew with the best Momentos we can afford - Pehindro and Maria have worse defenses, so I get them slightly nicer Master Momentos, while Emilia makes due with a mere Good Momento. This will improve their Armor and particularly their Speech Defense and keep them from being quite such glassy cannons. I'd have loved to give our crew more trinkets to help fill their new trinket slots, or even some offense items to make their Friendly attacks hit even harder... but we didn't pull in THAT much Gold. And now, the moment I've been DYING to bring to you over the course of this long-ass update:  We must vote on a new map to explore. Here are our choices for the tier-3 maps:  Another Friendly expedition, except we're beguiling the people of Scotland instead of Mali this time. We could probably pull this off.  Research is good, but the Devious approach and the skill list are not suited to us. (Except Survivalist, we're awesome at that.)  Right now, any mention of the Athlete skill makes me shudder. But we're good to go on Survivalist and Archaeologist, and we can always use more Gold. Curiously, this one has no mention of which attitude we should have, but I'll go ahead and tell you that Friendly and Aggressive are both good approaches here. The choices are not as clear cut as last time:
|
|
#48
07-21-2018, 01:56 PM
|
|||
|
|||
|
Let's get High(land)!
|
|
#50
07-22-2018, 10:00 PM
|
|||
|
|||
|
Quote:
Besides, it's all the circle of life. Kalir up there got me interested in Invisible Inc (I had tried it once and somehow it didn't click with me, but after reading his LP of it, I've been having a lot of fun with it), and I greatly enjoyed your own LP of ADOM, as well. (After I'm done with this LP, I might try a LP for the updated graphical version of ADOM - if that's cool with you.) Anyway, we need a tiebreaker vote here. Highlands or Egypt. I can't choose for you all. |
|
#52
07-23-2018, 11:18 AM
|
|||
|
|||
|
Quote:
|
|
#53
07-23-2018, 05:19 PM
|
|||
|
|||
|
The tyrants have spoken! Our next expedition will be Egypt, and the update will be posted tonight as time allows.
|
|
#54
07-23-2018, 10:39 PM
|
|||
|
|||
|
For our third expedition, we have elected to continue plundering exploring Africa. At last, we're going straight to where all the classic archaeology action has always been - Egypt!
And this time, we will not be obstructed by a cranky witch doctor who can't be bothered to participate in his own damn boss encounter. No, for this one, you may rest assured that the newly-resurrected war goddess Sekhmet will eagerly join her legion of mummies in the battle against our crew. (I know, that sounds like kind of a bullshit leap in difficulty compared to the last couple of bosses, but I'll keep trying to do my best for you guys.) Given the prominent mention of the Athlete skill in the description for this expedition, I decide to make a final change to our crew's gear:  I sold back Emilia's Good Momento to get a Machete for Pedrinho. It'll slightly increase the power of Pedrinho's Terror-based attacks (of which he has none) and - less uselessly - give him a free level of Athlete. Combine this with our TWO +25% Tools, and we won't be totally helpless if those challenges pop up again! Before we set off, I'd also like to bring your attention to one more thing:  After all our screwing around with Insight, bonus Research, and our new Origin of Species 2 treasure, we've gained enough Renown to bump us up to #6 on the list. (Soon to be #1.) I know, right? I'm happy for us, too.  Let's make this happen.  If Pedrinho is whining now, just wait until he sees some of the Supply costs on this map.  Ladies and gentlemen, our target - the War Temple of Sekhmet.  The intro cutscene features some passing British explorers who are surprisingly accommodating to our crew. But then, they're not French assholes like Rivaleux.  The British dude updates our map to reveal a few Supply oasis nodes. Like all nodes, they're one-shots, but we'll be making strategic use of them as we gather loot learn about Sekhmet.  And with that, we can finally get to work. Let's plan our first move!  The game throws a new obstacle at us - now certain paths cost 2 Supplies instead of 1. As such, we will have to navigate nodes even more carefully. The northeast node has a Nature challenge AND Supplies. As much as I hate going to a Supply node for our first move (it'd be better if we could save it for when our Supplies aren't still full!), it remains that we get 4 Study tokens just for going to a Nature node, making this the least craptastic of our current options.  It's just my opinion, but I think the narrative is being a little hard on Pedrinho here. Seriously, our crew lives in a 19th century world with Final Fantasy-style airships. And undead mummies, and demons, and talking statues, and voodoo monkeys, and vampires, and ghosts, and dinosaurs, and war goddesses, and fricking steam-mecha. In light of that, an ice cream truck in the middle of this desert really isn't so improbable.  So the ice cream truck is real, and its driver is Pedrinho's sister. Okay, now we're getting a little improbable.  Aww.  And thus Pedrinho continues his journey with our crew, forever to carry the burden of knowing he may be "Dance the bad guys into submission" cool, but he'll never be "Wear a festive outfit and drive an ice cream truck around an unexplored desert like a boss" cool. Meanwhile, we get 2 Supplies (one of which is wasted) and a Festive Hat from Pedrinho's sister. A Festive Hat?  This would be more useful if Maria didn't already have Beguiler - Charms (and also had the ability to equip a second trinket). We'll have Emilia use it. The Speech reduction power will help make up for how we had to sell her defensive Momento back. And now all three of our crew have at least one level of Beguiler. Rather fitting, considering our MO so far has been to charm people into letting us walk off with their bling. Next move!  Quote:
 I held out hope that this might have been the hidden rare token node for this map, but no sell. Next move!  Encounter, ho!  I really like how we don't get an option to NOT open the door here. Maybe this game learned its lesson from all the ass we kicked at Crystal Mountain.  I'm not sure why Pedrinho is bothering with a torch when the walls are already lined with torches, but we'll just roll with it. I'm also not sure what we can expect to find searching an ancient embalming room - but I do know that it's got to be more than we'll find NOT searching it!  As surreal as it is, loving mummies are preferable to the alternative. The friendlier an encounter is, the better our crew performs!  Wow, guys, I have no idea which attitude we should pick. Maybe I should stop here so we can vote on it?  Unfortunately, these Mummies are easily the toughest things we've faced yet. As you can see, even Maria's big Seduce move only takes off barely a fourth of their Spirit. Also, the battlefield for this one is - for some reason - squares instead of hexes. This also hurts us, as squares do not count as adjacent if only their corners touch, and thus Pedrinho's Party Time loses a lot of its utility here.  So this is our opening plan. The crew will gang up on the Mummy at the far end there, where Pedrinho can block the approach of the other Mummies. When they crowd around him, that should leave them vulnerable to a Party Time move next turn. (Pedrinho has the highest Speech Defense and dodginess of our crew anyway.) In the meantime, Emilia will buff Maria with her Excite. The only question is whether we can outlast them - and whether I'll have to "cheat" and go Aggressive for a few turns (and risk the haul of tokens for a Friendly victory).  The undead prove more able than most to resist Maria's allure... but even they are not entirely immune to her.  I close out the round by having Pedrinho use his new Disarming Smile move (his only move - other than Party Time and his shitty default Devious attack - that can reach the Mummy). I tragically failed to record a gif of it, but he'll be using that move a lot more in the future. Unfortunately, all four Mummies are still on the field. This is going to be a long battle. |
|
#55
07-23-2018, 10:40 PM
|
|||
|
|||
|
On their turn, the Mummies only manage to double-up on Pedrinho, hugging him. One hug misses, but the other?
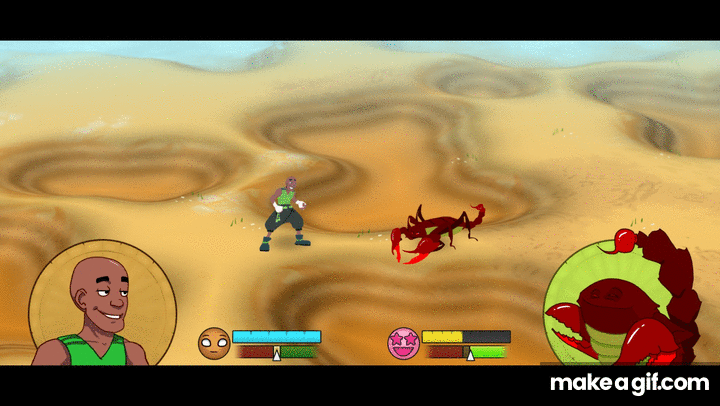
 Still more than enough damage to worry me.  Start of round 2. Pedrinho is Sad (reducing his already-inadequate social damage output). The Mummy we almost defeated has retreated (as Pedrinho's Disarming Smile left him unable to attack), but our plan is holding... as long Pedrinho can keep dodging attacks.  Maria rushes over to finish off the Mummy that we started on in round 1.  Maria's Excite move forces the Mummy off the field, as the undead menace is unwilling to compromise this game's rating by returning her flirting.  Now Emilia is going to use her Excite move to restore some of Pedrinho's spirit.  And then Pedrinho is going to cheat. You're seeing this right - we're about to launch our first Aggressive move of the whole game. Relax, tyrants. I know what I'm doing! 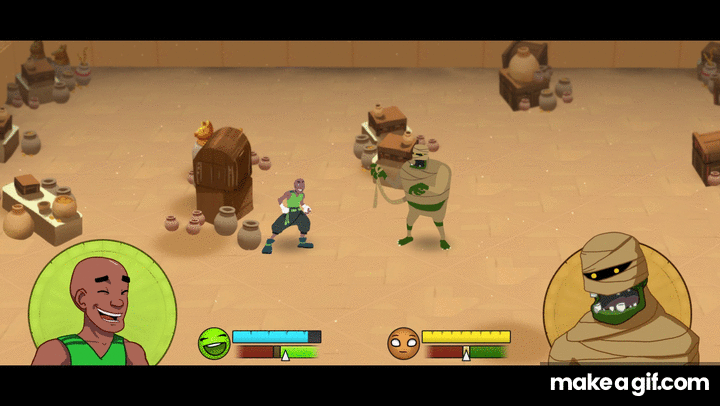 Wow. For such a super-friendly guy, Pedrinho has a pretty solid roundhouse kick. While his attack fails to take down the Mummy in one shot, it does something else we could really use right now:  We're now Aggressive to their Friendly, so we have trumped their stance for +20 Speech Defense! The Mummies take their turn now, changing their stance to Aggressive (to match ours), and hitting Pedrinho twice (almost downing him). They also slap Emilia for good measure, but as our Captain, she has way more Spirit than even the Riot of Rio.  Start of round 3. We've lost our bonus Speech Defense (not that it matters with the Mummies doing Aggressive physical attacks anyway), but gained something even better:  That's right, a bonus to Devious attacks. Go, Maria! (She's going to use her basic Devious Sadden attack now, and it's going to be super effective.)  Now THAT's the kind of damage we should be doing to our enemies. 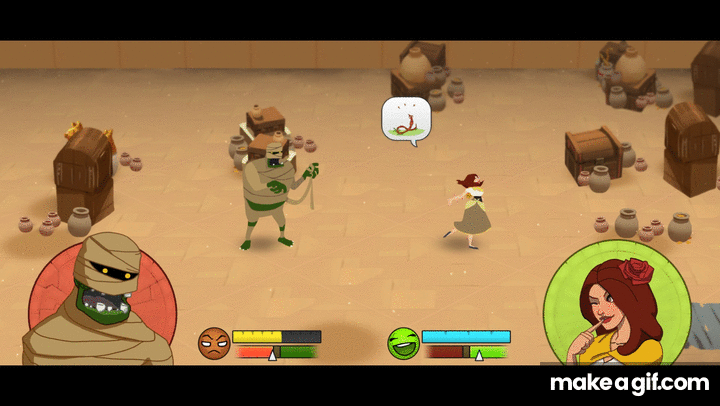 The only depressing thing here is that two of these walking toilet paper rolls are still in our face.  For her part, Captain Emilia uses her special Tranquillity move to heal most of the damage from last round. Go team! Isn't it cool how this dorky scientist is a more effective cheerleader than Maria?  After regaining his Excited mojo (and the valuable Speech Power bonus that comes with it), Pedrinho will close out the round by trying to make one of the Mummies mad with his basic Devious attack. His Devious attack sucks, though, so we might still be in trouble here...  Pedrinho shoots and scores! He doesn't do enough Spirit damage to take down the Mummy, but that wasn't his goal. This was:  I expected the Mummies to go Aggressive when we did - and I was planning to trump them all along by doing enough Devious attacks (with a bonus!) to switch our stance to Devious. Which we just did! Now it's the Mummies' turn - and they're facing trying to attack us when we have extra dodginess from our +25 Grit bonus. The outcome of this battle is no longer in doubt. The only question now is whether we'll be able to swing back to Friendly hard enough to still claim a Friendly victory (and the pile of tokens that comes with it).  Start of round 3. The Mummies have foolishly switched to Devious, granting a bonus to all Friendly attacks - and once again leading the encounter exactly where we wanted to go. Despite our enhanced Grit, they manage to slap both Pedrinho and Emilia, but there are no longer enough of them to cause worrying amounts of damage.  Oh hey, look whose Seduce move is back online. Hooray, that's hitting so much harder now that Maria is Excited and we have +25% to all Friendly moves.  A moment after Maria makes her pass at the Mummy, Emilia offers to relieve the creature of its remaining Spirit. This guy never had this kind of luck with women when he was alive.  After Emilia's move, only one Mummy remains - and our stance is back to Friendly, trumping the Mummy's Devious. From there, the encounter quickly ends. After Pedrinho does a pathetically weak Party Time (because it has only one target), the Mummy changes its stance back to Friendly as a prelude to desperately hugging Pedrinho (and almost taking him down!) Then Maria politely escorts the Mummy off the field.  Despite how we shifted our moods more than a schizophrenic on crack in that battle, we have claimed a Friendly victory - with all the bonuses we've been stacking into Friendly victories over the course of this game. And I got to show you guys a non-speedbump battle that actually required a bit of deftness.  So our big reward for that tricky battle is... two - count 'em, TWO - entire Collect tokens and a trip back to the map. Awesome. And with that, we'll call this an update. Nothing to vote on, sadly, but we'll continue our adventure later this week! Last edited by Vivisector 9999; 07-24-2018 at 08:16 AM. |
|
#56
07-23-2018, 11:00 PM
|
|||
|
|||
|
Quote:
|
|
#58
07-25-2018, 07:57 PM
|
|||
|
|||
|
Quote:
Quote:
|
|
#59
07-25-2018, 08:17 PM
|
|||
|
|||
|
Our adventure in Egypt continues. Last time, we fought some Mummies that were buried in an abandoned basement for some unfathomable reason, and would have got virtually nothing for beating them if we hadn't upgraded our Friendly victories so much.
But I must say this expedition is opening better than our Mali expedition did - and let's hope the final payoff will be correspondingly even sweeter, too.  Per Kalir's advice, I'm giving the ice cream sister's Festive Hat to Pedrinho (who in turn will give his Monkey Wrench to Emilia, as he cannot equip three trinkets). While this humiliation will cost Pedrinho his Study bonus on challenges (as the Monkey Wrench was his only source of science skills), it will make his Party Time and other social skills even more effective. And now Emilia will have at least one level in all science skills (Archaeology, Naturalist, and Engineering), which is great for a Scientist like her.  Never you worry - Pedrinho remains a man of many talents. Now onward! After our fight with the Mummies, we ended up surrounded - AGAIN - by a bunch of empty nodes. Out of sheer desperation, I choose the one that has the best combination of a) still 1 Supply cost, and b) the most paths to new territory. This is our reward:  Come on, desert, this isn't funny anymore. And the new nodes revealed?  Not a great improvement. I think we'll hit that oasis and try to refill our Supplies.   Again, a surprisingly friendly and helpful encounter with other human beings. So we have three choices here: 4 Supplies, or 3 Supplies and 3 Collect tokens, or 2 Supplies and 8 (!) Collect tokens. Our crew has always allowed our greed to get the better of us.  With that pleasant meeting out of the way, it's time to move on.  This... fucking... map.  Hell yeah, northwest! I don't care if this path is totally the opposite direction from the final node! We're not paying 2 Supplies to move, and this map can't make us!  We've seen this event so many times now, I'm starting to forget what other popup events even looked like.  A red encounter icon! Oh, thank you Sekhmet! SOMETHING TO FIGHT!  Scorpions. The exact fricking opposite of treasure. I don't know what their problem is, but we're going to make these bastards pay for inhabiting such a boring, Supply-draining wasteland as this.  OH YEAH! Who wants red meat? Because we're about to serve up all the red meat!  Oh right, I keep forgetting we're firmly committed to the path of Mr. Rogers. Hey, scorpions, won't you be our neighbors?  They very definitely do not want to be our neighbors. So this is a nice puzzle. The blue Scorpions are about as much of a speedbump as any enemy we faced before those Mummies (although they've got high Speech Defense, they have little Spirit). The Red Scorpion, though, is much tougher - and it gets an Attack buff for every regular Scorpion we defeat. So I think I should move everyone back a bit and clog these pests along that one-tile path. Their physical attacks only have a range of 1 tile, but many of our own social attacks are not so limited! Whichever Scorpion ends up in front, we can potentially hit it with all three of our crew!  We'll start by moving Emilia back and using her Excite to buff Maria.  With Maria newly empowered, we'll move her over to this spot where she can reach a Scorpion with her Devious attack. 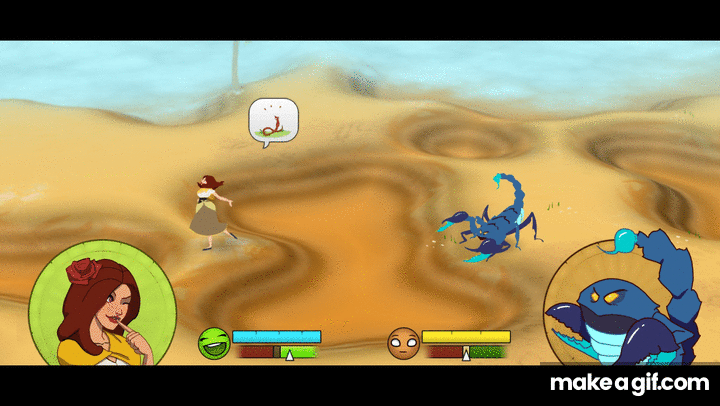 Maria is so good. And now our stance will be Devious, trumping the enemy's Aggressive stance for a very useful +25 Grit bonus.  We close the first round by having Pedrinho move back and buff Emilia with his own Excite move. ... I'm starting to think we need a more innocent way of describing our crew members using their "buffing" moves on each other. Anyway, Pedrinho - the dodgiest of our crew - will be the one blocking when the Scorpions advance on us through that narrow space. 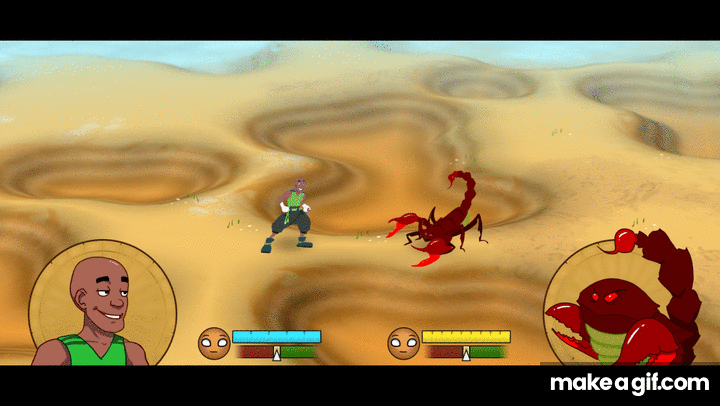 So of course the Red Scorpion goes in first. After all the build-up for its appearance, the monster's attack misses Pedrinho by a country mile. This is exactly what we wanted. Maybe we can defeat it first, before it can get any buffs of its own.  Start of round 2. In their desperation to eat us, the Scorpions are foolishly trying to cram themselves into our little bottleneck. Except for one Scorpion that is cleverly trying to sneak around the bottom there - we'll be dealing with its shit next round.  We haven't needed to use Emilia's Amnesia Shot yet, but the Red Scorpion merits it. As you can see, the Shot itself won't do much damage to it. But it'll significantly weaken all its defenses - and then Pedrinho and Maria can bring the pain! 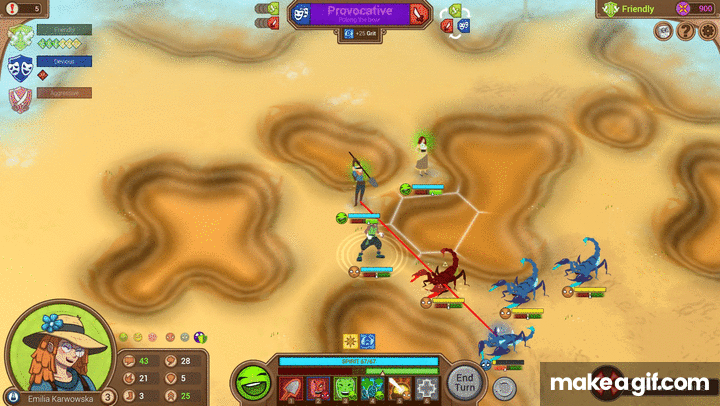 Unfortunately, the Amnesia Shot's animation is not super interesting. I'm sorry.  With the Amnesia Shot addling its brain, the Red Scorpion forgets that it's not supposed to be attracted to Maria. I wasn't in the mood to watch Maria flash her leg for the 800th time, so we'll skip right to Pedrinho's move.  The Red Scorpion's new Impressed debuff further weakens its Speech Defense, and Pedrinho can hit it hard with his Disarming Smile. Last edited by Vivisector 9999; 07-25-2018 at 09:34 PM. |
|
#60
07-25-2018, 08:20 PM
|
|||
|
|||
|
Here it comes, our first gif of Pedrinho's patented Disarming Smile.
 The Disarming Smile is a complex gesture, perhaps understandable only to Pedrinho himself. He almost manages to defeat the Red Scorpion, but it will survive one more turn - a turn that, thanks to the Disarming Smile's special effect, it won't be able to attack on.  End of round 2. The Red Scorpion will retreat (because it can't attack), another Scorpion will advance on Pedrinho, and that bottom-feeding Scorpion will attack either him or Emilia. We'll survive.  Sure enough, a new Scorpion attacks Pedrinho, dealing him a not terribly impressive amount of damage. And the bottom feeder decides to go for Emilia.  Yeah, I think we're going to be serving up a lot of blue meat, too. Start of round 3. The tide has turned in our favor, and our goal is now to swing things back to Friendly so we can get the best pile of tokens.  To that end, Emilia is going to, er, enhance Pedrinho with her Excite move. Because it's gonna be Party Time in a minute, and Pedrinho needs to get Excited!  Now empowered, Pedrinho is going to drop a bomb on the Scorpions. A love bomb.  While Pedrinho's big Party Time move has taken no fewer than three Scorpions off the field (including the dreaded Red Scorpion), that singlehandedly shifted us to Friendly stance - which is trumped by the Scorpions' Aggressive stance, giving us -20 Armor. We'll need to finish this encounter quickly.  We don't want to risk our Friendly victory, so we have Maria close out the round by Exciting one of the remaining Scorpions.  Maria almost takes the Scorpion out, but not quite. It is now the Scorpions' turn. Luckily, even with the Armor penalty, they don't have the Attack Power to do much to us. With that established, the Scorpions begin their final desperate barrage on our crew.  We don't even have the Devious dodge bonus anymore! These Scorpions couldn't hit the ground with their own piss. 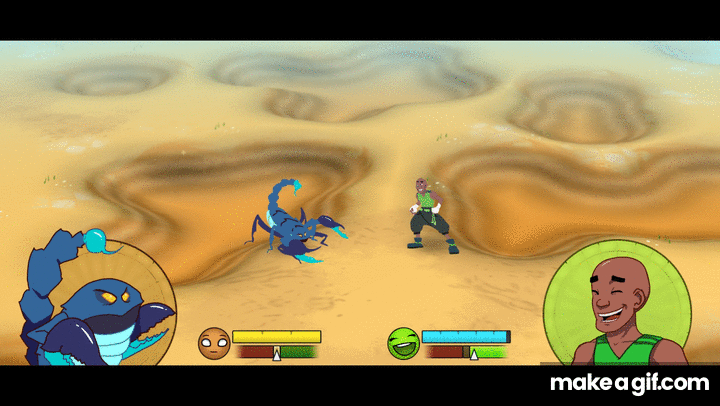 So the Scorpions missed Maria and Emilia with all their attacks, but have hit dodgemaster Pedrinho twice. Even in the world of Renowned Explorers: International Society, a brother can't catch a break. The question of arachnid racism aside, the encounter ends quickly. The remaining Scorpions are too depleted in Spirit to withstand the Excite storm that follows.  We have earned another Friendly victory - and the pile of tokens that go with it. I'm starting to think maybe we should have taken the Encounters research field after all. (But when we start hitting challenges that we can't do, we'll be thankful we took Engineering so we could have a second Tool instead.)  Our cutscene reward for defeating the Scorpions is... slightly better than our reward for defeating the Mummies. Slightly.  Back on the map. Is that a Nature node we see? It is! Finally, another chance to find something worthwhile.  Hmm. Emilia and Pedrinho have the most exploration-worthy skills, so Maria can stay behind. And if some horrible thing happens to our camp while Maria is guarding it on her own, well, that's why we have Tools.  Case in point, Emilia and Pedrinho are barely out of sight before bandits descend on the camp, and the resulting challenge is going to kick Maria's ass. In fairness to our Speaker, this is a Tactics challenge, and none of our crew have that skill (or the Fighter class which would also help here). So it's Tool time. The resulting 42% chance is still not great, but we've lost enough of our Supplies to bullshit on this map.   Failure. The bad news? We lose a Supply point (and an insignificant amount of Gold) and should probably make a beeline to the nearest oasis node. The good news? Well, uh, we didn't lose our Tool. And those bandits were content to simply ransack the camp rather than stay and beat all of our Resolve out of Maria. Before we move on and try to forget this ever happened, though, another surprise awaits us here.  With the most amazing timing ever witnessed in the history of the universe, Pedrinho decides that NOW is the time to confess his love to Maria!  Okay, two points. One, Pedrinho has traveled alone with two ladies for the course of two-and-a-half expeditions without making any passes at them until now. And two, Pedrinho isn't the one here who used his Seduce move on a fricking scorpion, sister.  It's a riot everywhere but in his heart. And so Maria's Lovely Lady campfire storyline comes to a disappointing end. If you're curious, the only crew member who can successfully complete this storyline - ie, get Maria to fall in love with them, too - is Ivan. That's right, that useless son of a bitch Ivan. The good news, though, is that Pedrinho gets to keep the +25% Speech Power buff he got from this melodrama. We're gonna see about getting him an offensive item next expedition so he can properly abuse that blessing.  We haven't yielded to a 2-Supply node yet, and we're not starting now.  This fiendish node would have cost us further Supplies just to explore it, but Pedrinho is a sufficiently wicked sick Survivalist to spare us this bullshit. After that, it's time to camp.  We drew three new cards this time - Collect+ (a pile of Collect tokens), Encounter+ (a pile of Encounter tokens), and Field Research (+4 Study tokens for every level of Naturalist we have). Holding from before is our Campaign Charm (pick a level 3+ Beguiler to gain +4 Campaign tokens on Beguiler spins). The choice is obvious.  Sixteen Study tokens were way better than anything we could have gotten from the other cards. With that, we're going to call it an update. We're not doing so badly on this map. True, we're not having much luck locating treasures, but we're weathering the encounters nicely, which indicates we're doing a good job keeping up with our gear and our special moves and our tactics. Next update, tyrants, we're going to tear this map a new asshole. Last edited by Vivisector 9999; 07-25-2018 at 09:41 PM. |