
-
Welcome to Talking Time's third iteration! If you would like to register for an account, or have already registered but have not yet been confirmed, please read the following:
- The CAPTCHA key's answer is "Percy"
- Once you've completed the registration process please email us from the email you used for registration at percyreghelper@gmail.com and include the username you used for registration
Once you have completed these steps, Moderation Staff will be able to get your account approved.
Let's play Lords of Xulima
Back to Let's Play
< 1 2 3 4 5 6 7 8 9 >
< 1 2 3 4 5 6 7 8 9 >
|
#91
 08-24-2015, 01:36 AM
|
|||
|
|||
|
Going over your weight limit just speeds up the in-game clock rather than making you waste your real-world time. That's actually a really smart way to do a weight system!
Thanks for doing this Let's Play, Mogri. I'd sure never play this game myself, but you're hitting a great balance of rules discussion and humor here. I don't have a lot of time to keep up with LPs these days, but I enjoy catching up on this one each weekend. |

|
#92
08-24-2015, 06:06 PM
|
|||
|
|||
|
D'aww <3
PREVIOUSLY ON LET'S PLAY LORDS OF XULIMA: KILLED HERALD AND NOW  Like they do after you beat Nengorth, the townsfolk throw goodies your way after you cleanse the temple. The merchant gives us three Remedy potions that will sit in our pack until the end of time, Terry or whoever he's claiming to be today gives us 500 coins, the trainer gives us another skill point, and the priestess gives us 1 HP and 1 PP.  She got the idea from Yul. She got the idea from Yul.Oh, and the food vendor gives us food, but we never redeemed the food from beating Nengorth. The result:  She thanks us for both endeavours and fills our bag with enough food to last 3 days, twice. Now, after you've filled a bag with enough food to last 3 days, it already has enough food to last 3 days, so doing it a second time is less helpful. But this is the bed we've made ourselves. Anyway, let's get down to business.  To defeat the Huns. I'm sorry; that was instinctive. Blame Donny Osmond. What we actually killed was the ogre blocking the path to Sorrentia -- you know, the one that we don't use now that we've activated the wayportal. 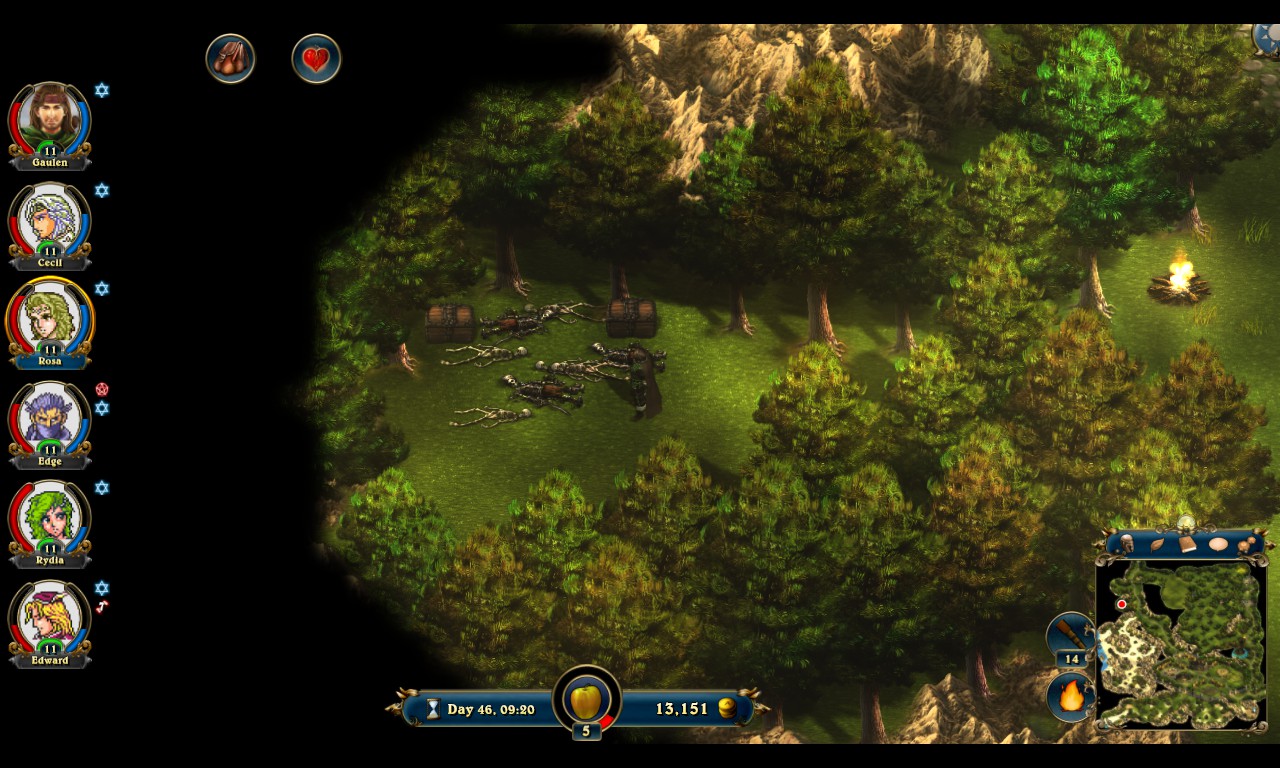 But getting him out of the way is still convenient, because the glade to the left of the ogre is full of dead bodies. (Context: the dead bodies have treasure.) While I'm over here, I experimentally take on one of the supershroom formations in Sporia Plains. We can beat them, but not as easily as I'd prefer. There's no rush, so we'll come back for them. 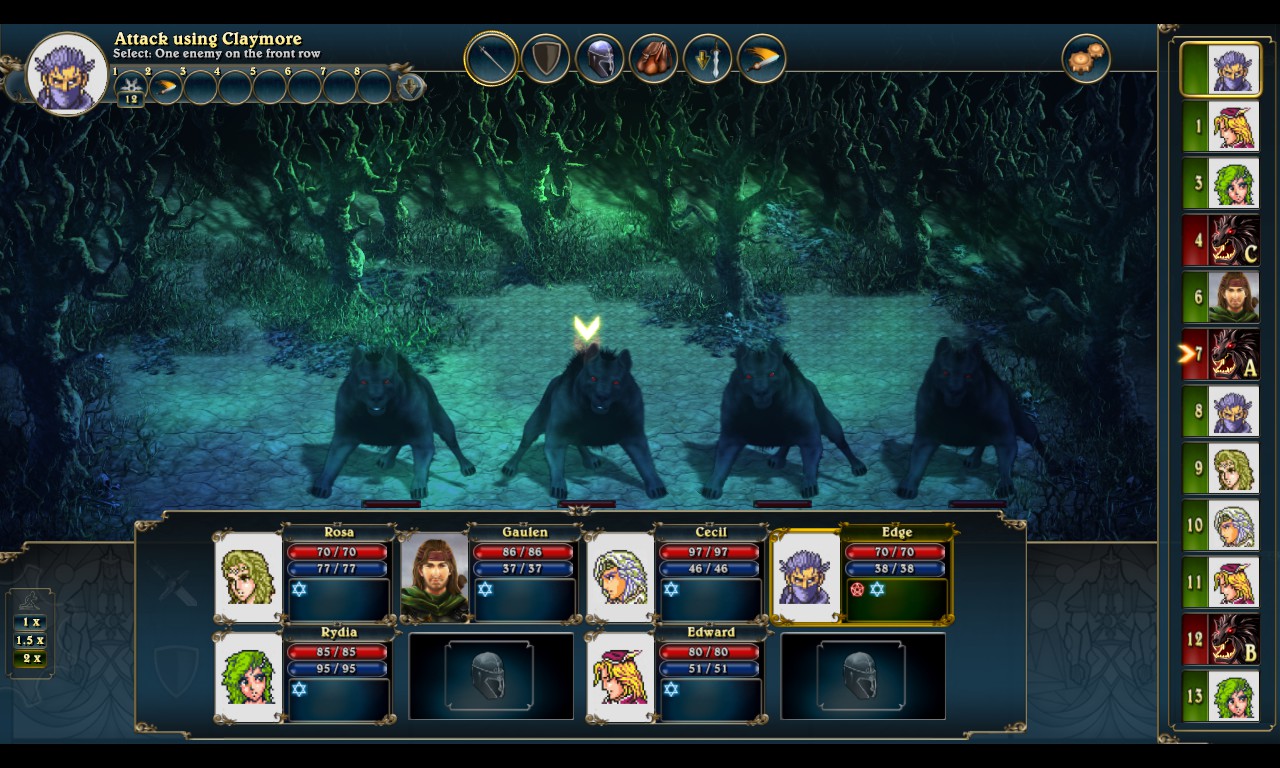 Is the hounds joke played out? Probably? Well, just in case... AROO AROO AROO AROO I think we've reached peak aroo. We'll start seeing bigger hounds instead of more hounds down the line.  I've been cursed! Everything's going dark... I've been cursed! Everything's going dark... That's awfully melodramatic for -10 evasion. That's awfully melodramatic for -10 evasion. Our next order of business is the Valley of Whispering Rocks, which is the area in Sorrentia you have to cross to reach the map with the witch. There's nothing game-critical to do here, but the area is home to a puzzle that you should really do. Also pictured: now that we regularly get three mushrooms/herbs per harvest, I've taken to grabbing them as I see them. 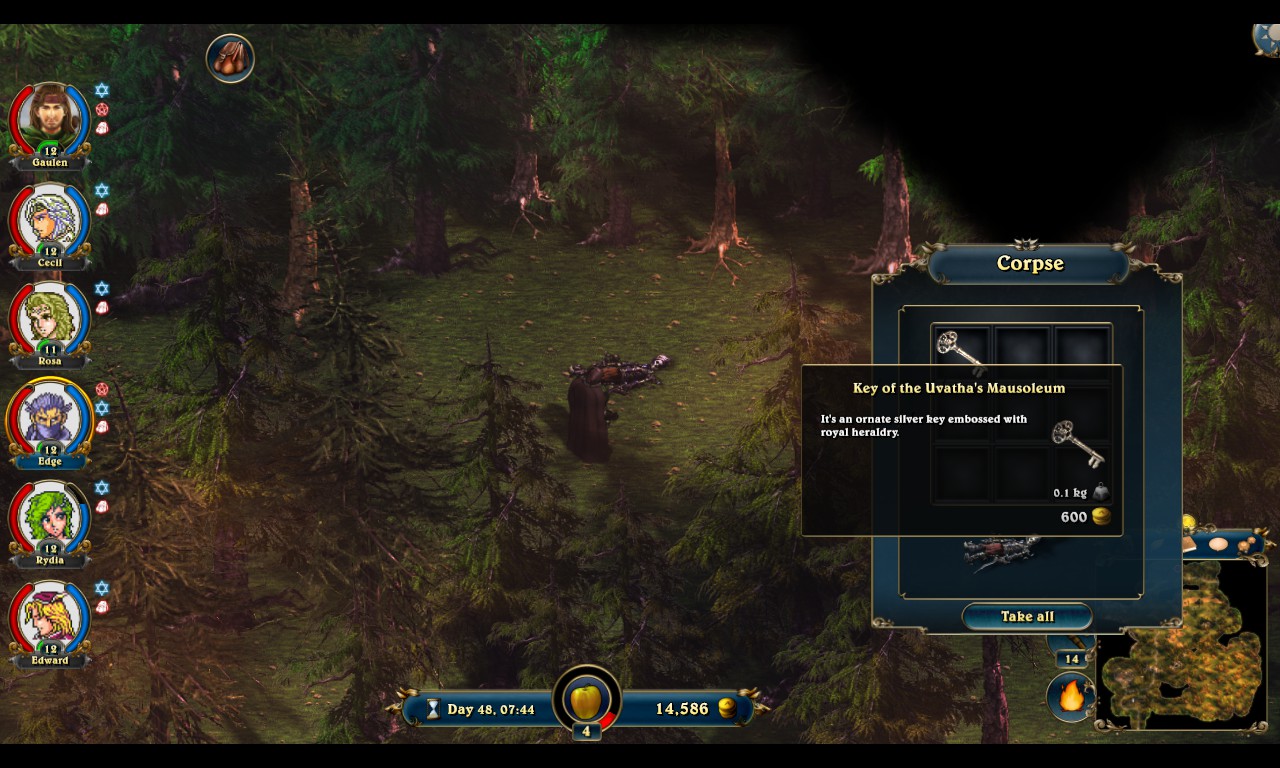 Also, another mausoleum key. We haven't seen the mausoleum, but you always find the key on the same map as the mausoleum, so we'll keep our eyes peeled. Anyway, the puzzle:  The statue asks you if you've heard the rocks, and if you say yes, it asks you to tell it the order in which the horse, lion, rat, snake, spider, and vulture died. There's a good chance you have no idea what the big chunk of stone is talking about, but remember that this is the Valley of Whispering Rocks. A good search of the area will turn up some stones you can talk to, sneakily hidden among a lot that you can't.  A good search will also probably clear the area, as an added bonus. Here's my collection of talk-rocks, spoilerpopped because there are quite a few of them:
In summary: The snake eats the spider. The horse crushes the rat. The horse smashes the lion's skull. The horse runs off the edge of a cliff for no good reason. The vulture sees the dead horse. Now, there are a few problems with this puzzle, not least being that I'm pretty sure I missed one of the rocks. I'm about 75% sure that the missing rock says the rat kills the snake in some fashion. But even if we had that clue, there's no way to pin down a definitive ordering for the lion. So there's some guesswork involved. But the puzzle is fun, and guessing isn't penalized, so I enjoyed this.   Where was it keeping that thing? Where was it keeping that thing? Pretty! I bet Kersket would like one of these. Kersket created all the earth and its gems. It doesn't make sense that he would want this one. Pretty! I bet Kersket would like one of these. Kersket created all the earth and its gems. It doesn't make sense that he would want this one.This is another permanent-blessing item, like the Book of Life. We haven't seen the appropriate altar for this item, and it's still a ways off. Let's just remember that we have it.  North of the valley, we can travel to two maps. The northeast exit leads to a pit of hellfire and despair. We'll take this one instead. |


|
#93
08-24-2015, 06:08 PM
|
|||
|
|||
 Cunavarn is a nice map for a variety of reasons. One of those is that thieves show up regularly here. This fixed formation has an honest-to-goodness Thief, one tier above the Robbers we've been fighting. He has more health and hits noticeably harder with shuriken. The real challenge of this fight is killing everyone before anyone can run.  The second reason to love Cunavarn is the town of Cunavarn. The merchant in Cunavarn sells better stock than we could buy in Velegarn. Conveniently yet mysteriously, the merchant in Velegarn chooses this exact moment to upgrade his own stock to match.  A new town means a bevy of new quests. These are, in order:
We're likely to complete most of these incidentally while doing something else. It makes no difference whether we officially accept the quest, but we might as well.  Cunavarn's portal is to the west of the town. Not every map has a portal (the first witch's map is a good example of one that doesn't), but there are enough portals in enough locations to make them the preferred method of travel. Just in case, though, I bought a Cunavarn Travel Crystal. We still have one for Velegarn in our pockets, too. 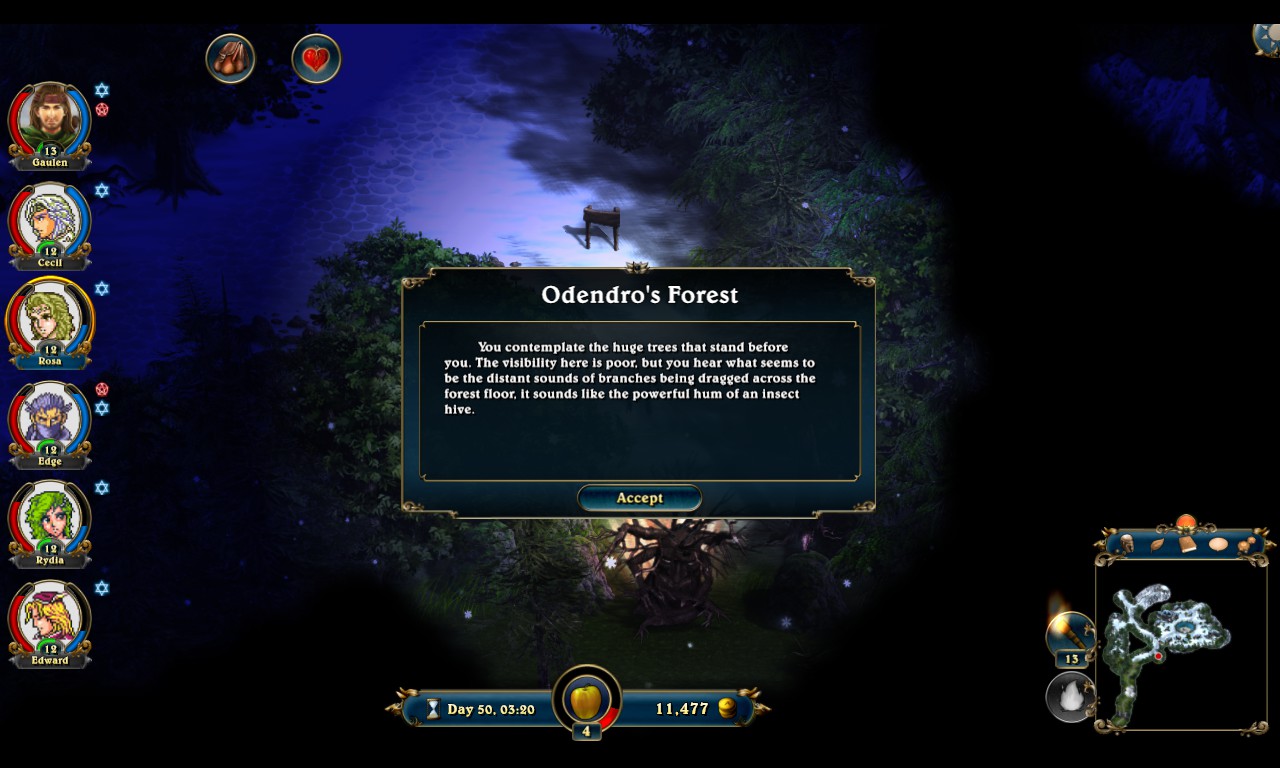 The third reason to love Cunavarn is Odendro's Forest. The big tree with a face to our south? That's an Odendro.  Odendros have way too much health, they can breathe bugs on the entire party to damage and just barely stun, and they have a powerful melee attack that inflicts a long-duration stun. Odendros are great.  See, Odendros drop herbs, five to seven per head. Ten herbs equals a stat point. This makes Odendro's Forest a great area to clear out. It also makes this map a special kind of headache for minmaxers, since you would want to ensure that you got the most and the best herb drops from each battle. Optimal Lords of Xulima play sucks. You could extend this to all enemy drops, but very few enemy drops make any real difference. The herbs do. Gaulen shines here, since the treefolk don't bleed and resist stunning but can be easily poisoned and less-easily wounded.  On the other hand, the wasps are back, and they brought a friend. We've moved to the second-tier wasp, which is more of the same but with a much more poisonous attack. They're pretty troublesome for our party, who like a target they can hit. Song of Stunning is still our go-to, but Big Wasp (not its actual name) likes to resist it.  AROO AROO AROO AROO again? But we come out of this without any new curses, so I won't complain. Well, not too much.  Level 14 will allow Edward to learn Song of Dream. Edward won't learn Song of Dream. The nice thing about sleep is that the status is indefinite. Once asleep, always asleep until you take damage. This suggests some potential for abusing Divine Prayer to top off everyone's health (and Rosa's PP), but that's A) more trouble than it's worth and B) less helpful than it sounds, since our nap schedule generally rotates around Rydia or Edward running out of PP. Speaking of Divine Prayer, at the peak of its power, which is conveniently this very point in the game, it has the capacity to fully heal Rosa. It has too wide of a variance to do so dependably (36-60 HP, 9-15 PP), but still. The spell costs nothing. It's amazing.  One of the quests we picked up in town was to find this kid. Found! If you're using this LP as a walkthrough for Golot knows what reason, then check the minimap to figure out where he is. Or just wander the forest until you find him -- it's not hard.  Next in her line of "buff all the heralds" skills is Rydia's Heralds Power (again, no apostrophe). This is worth picking up at some point, since the heralds, and especially the Herald of Nalaet (the healing one), are running up against their PP limits. Since we will definitely want the skill that increases the summons' duration, this goes hand in hand. One minor detail regarding summons that I haven't touched on yet is that you can refresh an active summon by recasting it. There's never yet been an occasion to do so, and the cost of the summons makes it hard to justify, but I could see refreshing the Herald of Nalaet if she had run out of PP halfway through a boss battle. While I'm at it, I should add that you are limited to two concurrent summons. This is an even hair-splittinger detail, especially since A) you usually have party members occupying six of the eight slots and B) no way do you have three appropriately-leveled heralds anyway, but it comes up if you put your summoner in the arena, where you would often like to have more targets.  There's another riddle imp in Odendro's Forest. Since I love you all, I provided the answer this time. This one was guarding some real junk. One of the items in the chest was a high-quality ring with no enchantment. The other was only nominally more useful, and they both went to the nearest vendor.  Late in the encounter rotation and in one fixed encounter, the game asks you to fight two Odendros at the same time. This is an endurance battle; you'll want to get topped off before these fights. If you are, then it's not too tough, even if the tree people have too much health to rush down. Fire helps.  If you're trying to optimize Odendro drops, this is where you need to to start making compromises if you value your sanity. Hey, those Odendros were guarding... Another of Golot's sacred artifacts is in there. Another of Golot's sacred artifacts is in there.NEXT TIME ON LET'S PLAY LORDS OF XULIMA: TELPROT MAZE OLOXPS COUNT: 12 (mushrooms, locks and traps, cereal plants, encounter clearing, herald of Golot, bard songs, Golot's blessing, mausoleum keys, the arena, minions before bosses, riddle imps, Odendro drops) UNSOLVED MYSTERIES:
|
|
#94
08-27-2015, 01:01 PM
|
|||
|
|||
|
PREVIOUSLY ON LET'S PLAY LORDS OF XULIMA: KILLED TREES
AND NOW  That's awfully considerate! That's awfully considerate!ONE FLOOR LATER  Thousands of years in the tower seems to have done a number on your sanity, pal. That didn't make a lick of sense. It might be a hint, however odd it sounds. I'll write it down. Thousands of years in the tower seems to have done a number on your sanity, pal. That didn't make a lick of sense. It might be a hint, however odd it sounds. I'll write it down.ONE FLOOR LATER  Chatty bunch, these skulls. I suppose they don't get out much.  Try "Rumplestiltskin." Try "Rumplestiltskin." Try "Ifnkovhgroghprm." I don't even know how to pronounce that. Try "Ifnkovhgroghprm." I don't even know how to pronounce that. I guess we need to check the walls, then. We haven't seen anything so far, so let's do some exploring. I guess we need to check the walls, then. We haven't seen anything so far, so let's do some exploring. The Tower of Resilience is a giant teleporter maze. Everybody loves a good teleporter maze, right? Well, even if they did, the Tower of Resilience is not a good teleporter maze. See, unlike its cousins in games like Pokémon, there is no endpoint to reach here. The teleporters are additionally all one-way, and many of them dump you at the base of the tower, meaning you must retread the first two floors of the tower to get back into the game. The walk doesn't force you into battles -- indeed, there are no encounters in the tower. It's just a slog. Quicksave/quickload is highly recommended here to preserve your sanity. So if there's no finish line, what's the point of the maze?  Well, there are two bonus rooms to find, and they're well worth it. This one has five basins to drink, and the three green ones are skill points, which I always appreciate. The other one has some scrolls and quite a few books. Good stuff. But the bonus rooms are just that. In order to complete the tower, you're expected to find every other room in the tower. The reason for that might be self-evident if you examine the minimap.  The rooms are shaped like letters! "Neczah"? No, that's not right. What did the second skull say..? "The light is the order: first those that shine less, and then those that shine more." The rooms are shaped like letters! "Neczah"? No, that's not right. What did the second skull say..? "The light is the order: first those that shine less, and then those that shine more."That's right, dear player! Screw you all over again. See, you have to order the letters by the number of candles in each one. The minimap shows the candles, but the teleporters also look like candles on the map. You could go through them all again and make a note of how many are in each, or... Cenzah. Hancez. Nachez. Chenza. Zanche. Cheanz. Zhance.EVENTUALLY  (I think the correct answer is Zanceh, but don't quote me on that.) The gate opens, and our intrepid party is free to move to the top floor, where they find...  An EYE, again. At the top of a tower, again. They're called "Tower Sentinels" for a reason, you know. This is their natural habitat! An EYE, again. At the top of a tower, again. They're called "Tower Sentinels" for a reason, you know. This is their natural habitat!
|
|
#95
08-27-2015, 01:02 PM
|
|||
|
|||
 This incarnation of the not-a-Hasbro-owned-monster hits everyone with silence and sleep. The former really limits Edward's and Rydia's ability to contribute to this battle (should've learned Song of Speech!), and the latter is generally a waste of a turn: it has no single-target attacks, meaning it'll wake everyone up at the same time, and each party member has a low chance to resist the status. Interestingly enough, only some of the Cleric/Paladin spells are affected by silence -- specifically, the ones that fall under the heart icon. Unaffected abilities include Divine Prayer (!) and Aura of Protection. So while Rosa was unable to heal anyone else, she could heal herself, and in theory, she could have soloed this fight despite her 36% hit rate and 2-3 damage. We may spend most of the battle asleep, but getting in an early shuriken or two makes this battle a breeze. The 48 bleed on the Sentinel is an indication that I went a little overboard.  Sure enough, Rosa ends the battle in good shape, with everyone else on death's door. The entire party was sleeping when the Tower Sentinel died. Good job, team.  Now I am become death, the destroyer of worlds. Now I am become death, the destroyer of worlds.Wow is that a weapon. More on this in a second because wow.  Nice shoes. Wanna explain how you can make shoes out of ivory sheet?  Finally, here's our artifact. We haven't found anything that needs hammering yet. It sounds like it would make a rockin' weapon, but you can't equip it. 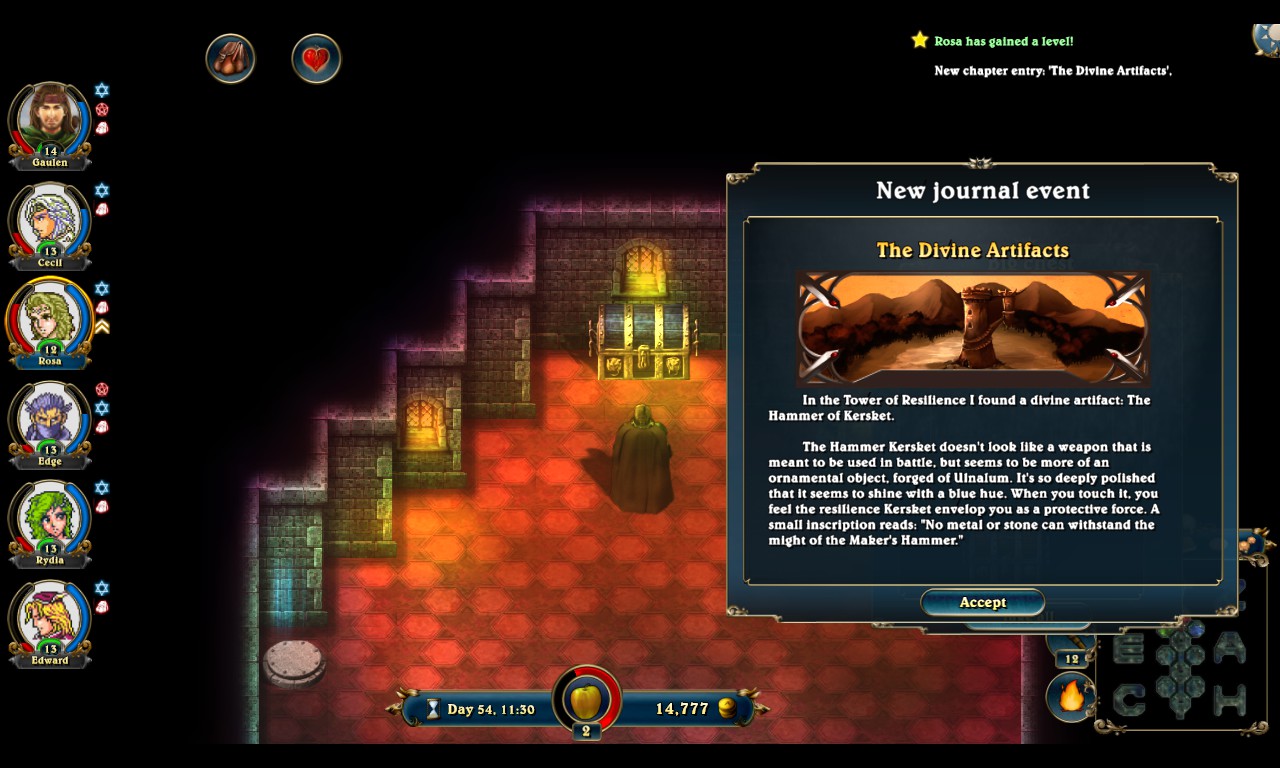 "Ornamental object" my rear. If it can smash through metal, it's good enough to kill a goblin. Anyway, that axe.  Look at that axe. For comparison, we were using the four-star iron battle axe. The 11-star brastinium battle axe is... an improvement. In one swoop, we've doubled his offense. Due to the way the defense formula works, Gaulen will deal more than twice as many wounds as before, and he is by far our best attacker now, too. Gaulen doesn't have the raw stats to hold it, so he gets the new boots to give him the boost he needs. Time for some fun.  DESTROY DESTROY(Actually, though, I needed Rydia to get through this fight, since our buddy here hits way too hard. But Gaulen did more than his share of arena clearing in this round.)  Killing the Tower Sentinel and picking up the artifact gave a huge boost to experience. We get a peek of Rosa's next must-have spell. This is the first upgrade to Light Heal, which is, you know, it's about time. I wonder when the Herald of Nalaet is going to catch up. NEXT TIME ON LET'S PLAY LORDS OF XULIMA: YOU DECIDE We have a lot of paths open to us now, and for once, I'm not way ahead of the LP. So let's get interactive. Choose an option!
There are more paths that we could travel, but we won't:
Our options are not created equal: some are more challenging, some are more rewarding, and the two don't always go hand-in-hand. Vote! OLOXPS COUNT: 12 (mushrooms, locks and traps, cereal plants, encounter clearing, herald of Golot, bard songs, Golot's blessing, mausoleum keys, the arena, minions before bosses, riddle imps, Odendro drops) UNSOLVED MYSTERIES:
|
|
#97
08-27-2015, 05:21 PM
|
|||
|
|||
|
2 does sound like the path of least resistance. Of course in this game that's probably all relative.
|
|
#98
08-27-2015, 06:17 PM
|
|||
|
|||
|
It can also be dependent on your team composition. Right now, my threat assessment highly values evasion but devalues high HP and resistances (both elemental and status outside of perhaps bleed). If we had a mage, then I would be less afraid of bees but more reluctant to go to area #1.
We will, if memory serves, run into bees in parts of area #2, but it's still the lowest-level challenge currently available to us if I haven't forgotten anything. (I have definitely forgotten something, since I can't remember where the second prince is. Luckily, only Nengorth serves as an actual roadblock; the other three can be beaten in any order. In any case, I'm sure we'll find him sooner or later.) |

|
#100
08-27-2015, 08:38 PM
|
|||
|
|||
|
Quote:
|
|
#101
08-27-2015, 08:46 PM
|
|||
|
|||
|
Come to think of it, I'm not entirely certain that you can't beat all of them in any order. Very few of Nengorth's guards can't just be battled. The only one I know for certain can't be bypassed is just blocking a temple, although I think there's at least one more.
|
|
#102
09-03-2015, 04:46 PM
|
|||
|
|||
|
PREVIOUSLY ON LET'S PLAY LORDS OF XULIMA: KILLED MORE NOT-BEHOLDER
AND NOW We've voted to explore the area south of Nabros. But first, let's look at some screenshots that I skipped last time.  Curiously, the southeast exit from Cunavarn has a guard formation that doesn't vanish after you kill Nengorth. (Well, it's not that curious -- these are a different prince's guards.)  More curiously, this would be an underwhelming enemy formation if we faced it in Nengorth's castle. By this point, it's a joke.  Most curiously, the guards are immediately followed by this whale of a fight. Two of the ogre that was blocking the path to Sorrentia and one ogre the next tier up. We haven't fought the latter yet, but we also don't want to.  So we warp to Nabros. If I had to put money on a casual player clearing out a region, I'd choose Nabros Forest. Nabros will be something of a hub for a little while still, and there's enough food in the region to make it worth wandering. The bonus isn't incredible, but it's nice.  The southeast exit from Nabros has these high-level guards, also marked as soldiers of Khornil. Don't try to make sense of all of this. It's only elite soldiers and elite archers, so we could take these guys, but we still don't want to. "Difficult" is on the mark here.  AROO AROO ARoh my heart just isn't in it this time. That's a lot of four-hound formations. I'd like to speculate at this time that the hound progression is tied to your game progression, like so many other things. If you're a very diligent reader, you can go back and check my hypothesis against the hounds we've fought so far. That's more work than I care to put into confirming it, though. Cursed Hound Young are rather passé at this point.  Oops -- excuse the timing. This is Hamaleth, the region south of Nabros. You can go ahead and forget that name, since it really is unimportant. This is just a connecting map from Nabros to the west, although it does have some notable features we won't explore yet.  And this is why we won't explore them. Why is this gate here? The only item of strategic importance it's blocking is a temple, but it's not as if any of the other temples have dedicated royal guards. Khornil, ladies and gentlemen!  So we go west instead. Hey, the hammer is glowing! A sign from the gods! Let us follow the light of Kersket. The hammer glows even more brightly as we approach this colossus. Had we come here earlier, this fight would have been rated "Titanic." Presumably, it's possible to kill it without the hammer, but the designers certainly didn't want you to. Still, you know in your heart that someone has tried, and we all weep a little for those who attempt optimal Lords of Xulima play. If I knew whether the hammerless version gave extra XP over the weaker one, I'd feel confident in awarding an OLOXPS here.  The Ulnalum Guardian doesn't have any more health than the toughest foes we've faced so far, and it has almost zero evasion. It's still a very difficult fight. Ulnalum is the best metal in the Xulimaverse. If you've been paying attention, you may have noticed that our weapons have been getting gradual materials upgrades, from iron to bronze to silver and so on. Ulnalum is the pinnacle of metallic quality. If we're very lucky, we might end up with two ulnalum weapons by the end of the game. The Ulnalum Guardian isn't an endgame-quality foe (at least with the hammer in hand), but it does have some tricks up its... uh... well, it's got some tricks, okay?  Trick number one is what I like to call, "rocks fall, three people die." Okay, that's an exaggeration. It hits three people for about 50 damage. Our sturdiest heroes can take two hits without dying, but half of us can only take one. Here's Rydia taking a second to the face, which is why you pump Constitution for your back row. It also piles on a lot of wounds and some moderate stun. This is the first battle we've fought where wounds have been an impediment. (Thanks to Gaulen's awesome axe, we have been on the giving end for a little while now.) The Ulnalum Guardian has exactly two attacks. The other one is a single-target rock throw that's the same but bigger. Notably, the stun duration is much longer on the single-target attack. We want Edward or Rydia to remove the stun when that happens.  Alas, victory is not to be ours on this attempt. The final and best trick the Ulnalum Guardian has is near-perfect defenses. It resists anything that isn't pure physical damage. Our bag of tricks includes bleeding, wounding, stunning, poisoning, and igniting, and the Guardian doesn't bat an eye at any of these. (And that's not just because it has no eyes.) Mages can still contribute to this fight with their earth spells, which deal physical damage. Rydia's heralds are less helpful. The Herald of Valvet is happy to cast Sparks to no effect, and its regular attack is pretty unremarkable when it's not setting things on fire. The Herald of Nalaet is better, but its much-reduced defenses mean it crumples under the weight of the Guardian's attacks. Oh well! We'll come back to this. Let's get stronger first.  I contemplate an equipment sidegrade for Edge. Katanas are tied for the "heaviest" swords along with bastard swords, even though claymores have the highest raw damage. I didn't jump on this, but I regret that, since it's a 50% increase in bleed damage with minimal loss thanks to the Sharp enchantment. Swords are the most nuanced weapon class. The others are mostly tradeoffs between accuracy and efficacy, but swords don't follow that progression. Instead, the top-tier swords are the damage-heavy claymore, the bleed-heavy katana, and the one-handed bastard sword. If you must carry a shield, the bastard sword is the way to go -- there's no other remotely comparable one-handed weapon.  Next on our world tour, we visit the mausoleum in Cunavarn. I never did find the key to this mausoleum. I know I found it on my first playthrough, but on my first playthrough, I had maxed Gaulen's Exploration skill, which increases your vision radius and makes it much easier to find secrets. It's not the kind of skill you go out of your way for, but I had two skill books for it.  The antechamber of this mausoleum is full of these skulls. It's informative (if inaccurate) to call them bouncing skulls, but they're really... rotating? They move up and down in a sinusoidal pattern, making it difficult to tell where they actually are. Bump into one, and the entire party takes a good chunk of damage. That also removes the skull, so if you're feeling really reckless, you can charge through with a few trips back to the inn.  After disarming a trap and opening the gate, we find ice. (Ice, baby.) The game picks this opportunity to give us a tutorial. We can clear the ice by spending time and health. "There are also some spells that may help you get through," it adds, meaning there is exactly one spell that removes the ice.  The spell in question is a Mage/Arcane Soldier spell, but we have two of the relevant scroll, and we might as well use them. I want to say there's only one or two other areas where we'll find ice blocks. When cast in battle, the awesome-sounding Incinerate Air has the disappointing effect of removing freeze status from the party.  The guardian of this mausoleum is a lone Necromancer. "But it's not--" you protest. No. See, Necromancers have the endearing behavior of summoning low-level allies then hiding behind them. Whether this is a cakewalk or a royal pain depends entirely on your ability to dispatch the summoned ally in less than two rounds. That should be easy at this point, but in case you can't, the Necromancer will start casting spells from behind its skeletal comrades. Actually, it's kind of a pain either way, since you have to waste turns killing filler skeletons so that you can take a few swings at the Necromancer, but it's still a cakewalk. The mausoleum held absolutely no treasure of note. |
|
#103
09-03-2015, 04:47 PM
|
|||
|
|||
 At this point, I realize that the power to find the second prince was inside me all along, and I check the world map. There's a lot of very helpful information condensed into the world map, like how the SNES release of Final Fantasy III came bundled with a map of both the World of Balance and World of Ruin with every location labeled. Geez, spoilers! The first thing you might notice in the map as I have it positioned here is that Khornil's castle is west of Cunavarn. Particularly astute readers will notice that Cunavarn has two west exits. The southern one leads to the castle, and we probably should have gone there instead of chasing colossi, shouldn't we? Well, there'll be time for that. Less obviously, this map shows the locations of the mausoleums, dimensional portals, and witch houses. The witch locations are especially important, since it can be difficult to find them otherwise. There's one on the cape in Hadiros (the one we already defeated), but there's also a witch west of Khornil's castle. Disappointingly, the map doesn't show the locations of altars, although the temples are there.  I elect to head back to Odendro's Forest to kill a few more trees. In the process, we get a few levels up. I mentioned last time that the Herald of Nalaet didn't have Greater Heal yet, but I was wrong about that. Not pictured: Rydia will gain access to Heralds Destiny at level 16, increasing the duration of her summons.  Edward gets Song of Awakening at 16, which you might as well pick up, since it's another one-point wonder (...that costs three points. I didn't invent the terminology, okay?). Sleep tends to be a party-wide status, so this is very good to have.  And Cecil gets Divine Prayer at 16. It's a whopper of a level, I guess. (Gaulen is already 16, thanks to the arena.) Divine Prayer is less useful on the Paladin versus the Cleric. Partly, this is because it comes later for him, but it's also because Cecil wants to use that turn to attack, while attacking is a waste of a turn for Rosa. Paladins also have less use for the PP. We'll still grab it, because it's a free heal. At this point, I get a brilliant (read: stupid) idea: what if I, like, used Kersket's Hammer on the Ulnalum Guardian? Like, from the menu on the world map? Even though you can't actually do that?  So I killed the Ulnalum Guardian. Rydia died to let us win this battle, RIP. We can attribute this victory not to my terrible idea, but to the ten shuriken I expended on it. The Ulnalum Guardian may not bleed, but shuriken still do crazy damage. This is why you want a thief. I may or may not have hit up a priestess for a few blessings before attempting this battle. I don't think I did, but it would have been a good idea.  With the Guardian defeated, Kersket's Hammer turns into inventory filler, and we are free to go west.  The region of Velaskar is home to the town of the same name. Once again, finding a new merchant results in a global merchant upgrade.  JBear gets his cameo appearance in this Let's Play. The whole town is impressed that we destroyed the Ulnalum Guardian, which makes sense, since I'm also pretty impressed that we pulled it off.  New quests:
The second quest wants nine Cursed Hound Fangs, which is particularly cruel. Those fangs are one of a very few portable means of relieving Fatal Wounds, and they sell for a good amount. I don't remember the quest rewards being good enough to warrant giving them up. Sandworm Fangs (the fifth quest) are also quite nice, but they're also much less rare.  "Divine help"? If they really wanted to help, they could have done a lot better. Still, it's nice to meet someone who appreciates our divine mission. Say, what was the Ulnalum Guardian, anyway? "Divine help"? If they really wanted to help, they could have done a lot better. Still, it's nice to meet someone who appreciates our divine mission. Say, what was the Ulnalum Guardian, anyway? That's the second-most idiotic story I've ever heard. That's the second-most idiotic story I've ever heard.A little more chitchat with the townsfolk reveals that Kiriong was also working on a way to enter the Hall of Heroes when he died, yet another secret he took to his grave. Sharing is caring, Kiriong.  The game is not kidding about the "slow and tiring" bit. The desert is the most expensive terrain we've encountered so far. Our food supplies drain at an alarming rate in this area, which is our cue to start training Gaulen's Knowledge of Terrain skill.  Hugging the east wall will take you to the region's dimensional portal. It's guarded by a sand worm, which bears a striking resemblance to a xenomorph in its portrait. The "troublesome" rating is a portent of bad things to come.  Not necessarily for this particular battle (although a single attack dealing 84 damage plus six wounds is enough to give me pause), but the desert has sand worms traveling in pairs. It's a problem.  Sand worms hit like trucks, but they don't have the bulk to follow through on that threat. Here's our first Sandworm Fang. It's not the first time we've seen an item cure Sick (meaning any sickness -- it's a category of minor but persistent status effects), but it also restores a whopping 100 PP. Only Rydia even has that much at this point.  The desert is littered with treasure, which is more than ample compensation for the hassle of traversing it. Gold is common here, but we can also find other goodies. Check every skeleton you see here. Some have nothing, but most carry an item or two.  The northwest corner of the canyon holds the altar to Kersket, our destination in this trip. It's guarded by three stone golems, a fight that's "difficult." For those of you keeping track at home, that's worse than "troublesome." But we didn't come this far to go home empty-handed.  The stone golems are essentially miniature Ulnalum Guardians. They don't have the resistances of their forebear, and they collectively have a bit less health, but there are three of the murder triplets. Our saving grace in this battle is twofold: first, we can focus them down, reducing our incoming damage, and second, they're vulnerable to wounds.  That second point becomes very relevant as Gaulen finds himself alone against the last golem, who is unable to touch him after taking 20 wounds.  In exchange for the Amberian Diamond, Kersket grants us his eternal reward: +5 Constitution for the entire party. If you were struggling with inventory weight, this is a godsend (har har). Either way, this is a very nice +20 HP to everyone who had at least 10 Constitution -- which should be everyone by this point. NEXT TIME ON LET'S PLAY LORDS OF XULIMA: CASTLES ON RAILS OLOXPS COUNT: 12 (mushrooms, locks and traps, cereal plants, encounter clearing, herald of Golot, bard songs, Golot's blessing, mausoleum keys, the arena, minions before bosses, riddle imps, Odendro drops) No new OLOXPS, since I was feeling merciful today. UNSOLVED MYSTERIES:
Last edited by Mogri; 09-04-2015 at 10:57 AM. |
|
#104
09-04-2015, 12:24 AM
|
|||
|
|||
|
Uh... Didn't you just solve the first of those mysteries?
|
|
#106
09-10-2015, 05:51 PM
|
|||
|
|||
|
PREVIOUSLY ON LET'S PLAY LORDS OF XULIMA: KILLED STATUE
AND NOW  Still lagging behind, Rosa finally hits 15. Next level, she'll have the opportunity to ignore learning Dispel. At second level, Dispel removes only debuffs or only buffs, depending on whether you targeted an ally or enemy. I have never cast Dispel, and I don't intend to start now.  The southeast portion of the Velaskar map is this ex-river. We're approaching it from the south, and it runs all the way back up to the northeast corner. This area is important because it contains hints for getting into the Hall of Heroes.  The solution to the puzzle doesn't change, so I don't need to be here. I'm mostly interested in this area because the enemies are easier here than the desert's sand worms. The vulture in this picture is decorative.  Not decorative: birds. The Giant Raven is the third tier of blackbird. Like its predecessors, it's fast and evasive, and it attacks to deal moderate damage and bleed. In this case, "moderate" means about 40 damage, and the bleed is in the 15-20 range. Giant Raven bad.  Edward is once again key here, since the birds have little resistance to stuns. Killing the Giant Raven quickly is very much advised here. Birds drop shiny rings. They're unenchanted, so they're only good for selling, but the flavor is appreciated.  Another one of Kiriong's notes. If he had to die, at least he left good notes on the riddle he was working on. But not on, say, the giant unstoppable death statue. He had some strange priorities. Another one of Kiriong's notes. If he had to die, at least he left good notes on the riddle he was working on. But not on, say, the giant unstoppable death statue. He had some strange priorities. Aren't we supposed to use these to solve some sort of puzzle? These read like a history textbook. Maybe so... but there's some odd attention to some specific details. Aren't we supposed to use these to solve some sort of puzzle? These read like a history textbook. Maybe so... but there's some odd attention to some specific details.But you'll just have to puzzle over that yourselves, because we're not visiting the Hall of Heroes today.  AROO ARoh my We've graduated from Cursed Hound Young with the introduction of the green-eyed Cursed Hound. (Remember, the text suggests that the hounds are after your valuables. It makes sense.) The Cursed Hound is just a numerical upgrade. It has no new tricks, and it's not as powerful as the Cursed Hound Young were when we first encountered them, but the numbers are just bigger enough to command some respect. The Cursed Hound manages to curse Cecil (same curse as the Cursed Hound Young: -10 evasion). We get two fangs for our troubles.  Our intrepid band takes the southeast exit from Cunavarn, which deposits us right at the steps to Khornil's castle. There are... quite a few guards here. You can't really see them all. Trust me.  GAME OVER, BAD END |
|
#107
09-10-2015, 05:52 PM
|
|||
|
|||
|
That was stupid. Let's not go that way.
 The northern entrance to Karraga (that's where we are) leads to a vast tundra, but right at the entrance, we have the option of going into this snow-free forest. That's where we want to go.  Here's the upgraded ogre I mentioned earlier. It's not as tough as I had anticipated. In fact, all the encounters here are suspiciously easy. Like, goblins easy.  We get a picturesque view of the rear of Khornil's castle as the forest breaks back into the tundra briefly.  That brief break is long enough for this guy to sneak in. If I'd noticed who it was, I might not have even tried this battle. Yotum Adults (a perversion of Jotunn, in all likelihood) are fairly rare in this region, and Yotum Young are the more level-appropriate encounter. The adult form is, by all rights, a boss-level encounter for our team.  So I treat it like a boss encounter and manage to squeak out a win. We get our first Yotum Fang. Cunavarn wants something like nine of these. Good XP, though.  Meanwhile, the forest is throwing easy-five-levels-ago encounters at us. Oh, and here's the Karraga dimensional portal.  Oh, look! Another song Edward won't learn. Even if you're way into these crowd control songs, silence is pretty marginal. I would hope, at least, that enemy mages resist this less often than Song of Stunning, but I wouldn't put money on that.  I'm not kidding about this forest. We fought this exact formation at level 5.  A circuitous route through the southern forest (check the minimap) leads us to this crumbled wall and therefore to Khornil's castle. That's just shoddy guardsmanship, which will become sort of a theme really soon here.  See, if you haven't noticed yet, Khornil has a lot of guards, and a lot of them are pretty high-level.  But they're deployed throughout the castle in such a way that the game might as well have signs that say "NOT THIS WAY, DUMMY." As a result, this particular castle is a game of "follow the breadcrumb trail of guards that won't kill you before you get in a turn."  This looks a lot like foreshadowing, but I don't think this guy ever shows up again.  Hey, the note he left behind looks important and helpful! Hey, the note he left behind looks important and helpful!It's not.  Thank you, kind sir! I'm sure that advice will prove important and helpful. Thank you, kind sir! I'm sure that advice will prove important and helpful.It won't. |
|
#108
09-10-2015, 05:54 PM
|
|||
|
|||
 Here's what passes for a puzzle in Khornil's castle: flip the switches around until you find the combination that opens the secret door. Lords of Xulima has some well-designed dungeons, but this isn't one of them. The note we picked up earlier takes it from 31 possible combinations (2^5 minus the initial configuration) to 10, so it's not like it's entirely useless.  Yul, it's time to up your game. This isn't exactly paying the bills. The wages of sin are death. But we just got more HP. QED, sucka! Yul, it's time to up your game. This isn't exactly paying the bills. The wages of sin are death. But we just got more HP. QED, sucka! It's time for another round of Fiddle with Switches! Just beyond the passage that just opened up is a teleporter. We sure wouldn't have found that without the prisoner's tip!  Sure enough, it deposits us directly into Khornil's lavish hall.  Surgeon General's Warning: Khornil is a talker.  Surgeon General's Warning: Khornil is dreamy.  If we'd bothered talking to Cunavarn's NPCs, we'd have the explanation that Prince "The Enchanter" Khornil does some sort of mind-control thing. That's why Gaulen doesn't raise any objections when the prince offers to make him a king. This is only relevant in the cutscene. Khornil does not enchant anything when we fight him (oops, spoilers).  Golot intervenes by smiting Gaulen. Could've smote Khornil, but no....  If you ignore the out-of-depth guards, Khornil's castle is a real pushover. Khornil himself is another matter. Blizzard hits the entire party with a chance to freeze. (Freeze status is identical to stun.) It's damaging enough to take out the Herald of Nalaet in one hit, making healing harder than it ought to be. Khornil's regular attack hits the entire front row and stuns them. Finally, he can cast Ice Shards to damage and bleed a single target. Ice Shards isn't exactly a good time, but it's better than the alternatives.  This battle is about killing him before he kills you. Khornil doesn't have stellar defenses, fortunately. (He's also worth less experience than the Yotums wandering around outside.)  Did you ignore the pre-battle cutscene? Well, I've got good news!  For defeating Khornil, we get actual good loot. These shoes are the best.  And these gloves are so bad. And then I gave Rosa the wrong skill while leveling her up, and I had to redo the Khornil battle. NEXT TIME ON LET'S PLAY LORDS OF XULIMA: EXORCISM OLOXPS COUNT: 12 (mushrooms, locks and traps, cereal plants, encounter clearing, herald of Golot, bard songs, Golot's blessing, mausoleum keys, the arena, minions before bosses, riddle imps, Odendro drops) No new OLOXPS, since I was feeling merciful today. UNSOLVED MYSTERIES:
|
|
#109
10-07-2015, 06:38 PM
|
|||
|
|||
|
PREVIOUSLY ON LET'S PLAY LORDS OF XULIMA: KILLED KHORNIL
AND NOW  Fresh off a victory over impious prince #2, our party returns to Cunavarn to be washed in the adulations of a grateful populace. The innkeeper gives us a rather paltry 800 XP, the trainer gives his usual skill point (and Gaulen delivers some stone cold truth), the priestess gives her standard 1 HP and 1 PP, the merchant gives a Life Potion (removes Fatal Wound status), and the food vendor would top us out at three full days of food if I bothered to talk to her, but we already have nearly that much.  Speaking of the merchant, he's got a very nice upgrade for Edge. Both his current weapon and his new weapon have a bonus status effect. It usually doesn't trigger, because enemy defenses absorb a few status effect points. We're only likely to wound on a crit, and even then, only against a monster that has no wound resistance. Ideally, we'd want a bleed enchantment on our katana to increase the existing effect, but a single wound is better than a single second of stun. Along the same lines, this is also why it's hard to keep an enemy stunlocked. Rosa and Rydia technically do have stunning weapons, but they only ever stun extremely weak enemies, and even then, it's unreliable. You can increase your status effectiveness by increasing your Agility. I've been putting a lot more points into Agility this game than I did in my first run for this reason, trading some raw damage for extra wounds and bleeding. (Not stunning, though -- that's mostly useful when you've got multiple stunners.)  Khornil gave us the key to Alnaet's temple, so that's our next destination. Now, at this point, if I had -- oh, wait, hold on. HEY GAULEN Um... yeah?I JUST REMEMBERED WHERE THE OTHER FOUR KEYS ARE  Oh. That sounds dangerous. Oh. That sounds dangerous.YEAH So you're going to give us some sort of artifact that will help us defeat the titans?THAT DOES SOUND LIKE A PRETTY GOOD IDEA AND I WISH I HAD THOUGHT OF THAT  So you're saying he has one of the four remaining keys? That's what Golot told me. So you're saying he has one of the four remaining keys? That's what Golot told me. Wow, he's enormous. How did we not notice him earlier? Wow, he's enormous. How did we not notice him earlier?You may recognize the cold, dispassionate face of this titan from the promotional material. It's also the Steam icon. Anyway, as I was saying: at this point, if I had purchased the DLC for the game, Golot would have given us some sort of artifact that would have helped us defeat the titans. It adds some sort of collection quest, as far as I can tell, and the more doodads you find, the more bonuses you get. My understanding is that you can spend doodad points on various bonuses, notably including more skill points. I admit that it would be convenient, but the prospect of paying cash money to make the game easier really rubs me the wrong way. The DLC also comes with a guide that discusses the technical aspects of the game, which does appeal to me, although without knowing exactly how much detail it contains, I can't say with any certainty that it's worth the purchase. The DLC is one of the more obnoxious reasons that optimal Lords of Xulima play sucks. |
|
#110
10-07-2015, 06:45 PM
|
|||
|
|||
 Anyway, let's pretend that the DLC doesn't exist and proceed to the temple of Alnaet. Here, we find a vampire and an ice-flavored skeletal archer.  Vampires attack to deal moderate bleeding with a chance to inflict a really annoying disease. They also recover a small amount of health with each attack. The ice archer causes freezing, which is functionally identical to stunning.  The temple is laid out as two branches that have an enemy you must kill so that you can proceed down the central branch to the boss. At the extreme edges, there are optional, treasure-bearing passages such as this one. There are no random encounters here, but you do take very minor damage as you walk through here, which can be further mitigated by cold resistance.  Oh, hold on. I take it back: freezing is not entirely identical to stunning. It gives +30 defense, which is a large bonus that doesn't really make up for your total lack of evasion. Freezing can also be healed by taking fire damage -- caveat sorceror. Vampires are bleed-vulnerable, unlike nearly everything else in this dungeon, and they can cast some spells such as the one that put Gaulen in a block of ice. The palette-swapped soldier here is a Living Armor, which is as bulky as it sounds but is otherwise unremarkable. Frankly, if you've beaten Khornil (as you must before you can come here), then this temple is pretty easy.  "Yul wants you to die." "Never!" I play RPGs for the story.  There's a bit of foreshadowing here. The titans guard the keys to the temples because, as far as I know, the respective Lords gave them the keys. I'm not sure why Gaulen thinks this is a mystery. They should be loyal to the eight, but they've defected to Yul, and the herald drops a hint as to their motivation. He also discusses the princes' motivation, but I could have sworn Yul just made them immortal and that we've been over this. I suppose he did get the eight Lords off their backs, but I don't know why the princes would have cared.  But we have no time to dwell on that, because we have a boss to fight. The herald's attacks are mostly old news by now: the usual boss attacks that damage multiple heroes. The one pictured here is new, though, and it's really annoying -- it damages a single character's HP and PP. The HP damage is minor, but it takes out a large chunk of PP.  Still, Khornil was a harder fight.  "...and are so impatient that it is difficult to get more than a hint of information from them." Hold on. You're the impatient one. This is revisionist history. I write the journal. I get to decide. "...and are so impatient that it is difficult to get more than a hint of information from them." Hold on. You're the impatient one. This is revisionist history. I write the journal. I get to decide. Since the last temple, I came upon a horrible realization: you can throw things other than Nalaet's Tears into the well of souls. You get experience for tossing junk in there. You get experience for tossing your inventory into the well. Experience that is otherwise in limited supply. I've said it before, but this really takes it to a new level. Optimal Lords of Xulima play sucks. Now, as you can see, our donation of a cereal plant didn't exactly bear fruit. The bonuses are pretty small, all things considered. But we could get money by selling the cereal plants[needs confirmation], and we could use that money to buy items that do give experience. Limited XP is a core design element in this game, and this splits that wide open, one lousy cereal plant at a time.  Tossing Nalaet's Tears into the well prevents us from donating any more junk, but it also gives more XP than you'd get from hours of cereal plant farming.  Cleansing the temple prompts another round of generosity from the townsfolk (priestess, trainer, and innkeeper, the last of which gives gold this time around), although the exact identity of the random consumable we got from the merchant is lost to time.  And because I don't learn from my mistakes, I once again get the food vendor to restore me to three days of food twice. NEXT TIME ON LET'S PLAY LORDS OF XULIMA: TAKING CARE OF BUSINESS OLOXPS COUNT: 14 (mushrooms, locks and traps, cereal plants, encounter clearing, herald of Golot, bard songs, Golot's blessing, mausoleum keys, the arena, minions before bosses, riddle imps, Odendro drops, DLC, well of souls) UNSOLVED MYSTERIES:
|
|
#111
10-07-2015, 08:38 PM
|
|||
|
|||
|
Quote:
Quote:
|
|
#112
10-07-2015, 08:43 PM
|
||||
|
||||
|
Quote:
Quote:
Quote:
Quote:
|
|
#113
10-31-2015, 02:17 PM
|
||||||||||||||||||||||||||||||||||||
|
||||||||||||||||||||||||||||||||||||
|
So, I finally started playing this last week, after adding it to my Steam library when Mogri mentioned it being on sale back in... June? Not long before the LP began, I think. Anyway, I'm playing it now, and am absolutely f*cking obsessed with it. It's so good, you guys! I burned a vacation day to just sit home and play it all day. Anyway, I'm ahead of the LP now (and this LP is great, BTW), and just burned through that all at once too, and since I have no one else to talk to about this and am bursting to do just that, I'm going to reply to all the updates since it began as if I was reading along. I have quite a lot to comment on, and some of it is of the "well, actually" variety (and I don't want to look nit-picky), so I'm hiding the whole gigantic wall of text behind a spoiler-pop. Note that it doesn't contain any actual spoilers, though.
God, putting that together took like 2 hours. Where did my afternoon go? >_< |


|
#114
10-31-2015, 03:17 PM
|
|||||||
|
|||||||
|
Wow geez. Glad to see you're enjoying the game!
Quote:
|

|
#115
10-31-2015, 10:10 PM
|
|||
|
|||
|
Quote:
And I discovered something else during that time: I recall you making fun of Dispel at one point in the LP, and I haven't had it long, but level 2 Dispel was invaluable in a difficult fight that you have coming up, since my Cleric was able to use it to remove Craze status from my entire party. |
|
#116
10-31-2015, 11:13 PM
|
|||
|
|||
|
Cleric's gotta resist Craze for that to work. And, come to think of it, I'd be a little surprised if Craze couldn't be removed by the Help command.
I assume you're talking about one of the jumbo eyeballs? Dispel would probably be a good idea, but it's a lot more finesse than my usual approach (reload a lot of times). |
|
#117
11-01-2015, 07:50 AM
|
|||
|
|||
|
Is there a way to make the text bigger in this game? I just bought it and it seems cool, but I can barely read the conversations with NPCs in the first town. I'm going to have to get a Steam refund on this if I can't fix this.

|
|
#119
11-02-2015, 07:29 AM
|
|||
|
|||
|
Quote:
|
|
#120
11-02-2015, 06:35 PM
|
|||
|
|||
|
Check the settings file? Sometimes they stick the font options in those and you can meddle with things there.
|