
-
Welcome to Talking Time's third iteration! If you would like to register for an account, or have already registered but have not yet been confirmed, please read the following:
- The CAPTCHA key's answer is "Percy"
- Once you've completed the registration process please email us from the email you used for registration at percyreghelper@gmail.com and include the username you used for registration
Once you have completed these steps, Moderation Staff will be able to get your account approved.
Save Japan from Westernization! Let's Play Ganbare Goemon 2!
Back to Let's Play
< 1 2 3 4 5 >
< 1 2 3 4 5 >
|
#121
 09-26-2011, 07:45 PM
|
|||
|
|||
|
Sorry for the delay in the latest update, I was pretty busy last week IRL and with finishing up the Final Boss Thunderdome. Hopefully I'll have it ready by this weekend!
|

|
#122
09-30-2011, 07:52 PM
|
|||
|
|||
|
Hey I'm back! I got pretty preoccupied last week with finishing the Final Boss Thunderdome and having RL stuff to deal with, but I'm back on track now.
You may remember me leaving off the last update with mysterious comments about trying to do something neat. Alas, it was not to be, the technicalities were a bit too much to overcome. What I was going to do was use ZSNES 1.42's ability for online multiplay to do Area 5 in 2 player, but the emulator wasn't as agreeable as I would've liked. I ALMOST got it working, but then further tests proved too unstable for my purposes. (needing to record ZMVs for future screenshot taking with 2 players that DON'T desynch was a nigh impossibility) So here's Area 5, with just me playing.  Music: World Map So here we are in Area 5, the snowy northern regions of Japan, likely Hokkaido. Hey guys I wonder where McGuiness is hiding, all the terrain looks so inconspicuous! Anyway, Area 5 is really short. Like, super short. Even shorter than Area 1. So I'll be doing it all in one update, instead of splitting it up into two. So let's get started!  Music: Ski Resort The walkthrough calls this level 'Ski Resort', while the map says something like 'Ooyuki Mountain Lift'. I'm not sure if 'Ooyuki' is a proper name for anything, or if it's just supposed to literally mean 'a damn lot of snow' here. First thing of note in this stage, attacking the upper left corner of the building in the background reveals... someone's head. I'll admit, I have no idea who this is supposed to be an Easter Egg of, and I wouldn't even know about it if not for the TAS. But hey, revealing it DOES give us another Free Guy.  'A Damn Lot Of Snow' Mountain Lift is a fairly short and sweet level. For the most part you're climbing up the mountain, following the ski lifts. There's only four types of enemies in the stage, all of which you've seen before. In fact, I think this is the first update I'll have with no new silly enemy profile. Well, at least these Hoppers McGees are acting differently? I'm not sure why they would crawl in the snow like that, though.  Most of your trip up the mountain you will be accosted by Mr. P'tooies more than anything else. They're usually positioned juuuuuust right to make dodging their projectiles trickier than it needs to be. But we ARE in Area 5, I suppose.  Sasuke manages to score a Fortune Doll, bumping his attack back up to Lv2. Now that I think of it, this is one of the few stages in the game where Sasuke's Lv3 attack would be useful, since it also fires upwards at an angle, exactly where a lot of enemies would be as you scale up the mountain. Unfortunately for me, I don't get to snag another weapon upgrade.  And the last two enemies in the stage, the return of the orbiting Mini and Super Rolies. They only appear over large stretches of bottomless pits, and if you have to get up close and personal they would actually be quite hazardous, since a single hit is likely to knock you off the lifts and into the abyss. But Sasuke has his Lv2 weapon, so they're a simple matter to dispatch.  A few more try the same thing, and meet the same end.  Welp, I don't know if 'A severed head riding a Ski Lift' is something you expected to see today, but there it is! The lift-riding Mr. P'tooies are really tough to take out if you don't use a ranged attack. Trying to time the jump so you hit them with a melee weapon and land on their lift at the same time is really hard to do, especially with Sasuke. Ebisumaru or Goemon would have an easier time with their powered up weapons, but if you're using one of them then you can just hit them with your ranged attack.  Aaaaaand that's the end of the stage already! I told ya it was a short one.  Time for the next stage! World map simply calls it 'Ooyuki Mountain', the walkthrough called it... something else.  Music: Runaway Snowman Head! ...'Runaway Snowman Head'. Huh. Wonder why it called it that?  Well, what do you know. A runaway snowman head. The right-most snowman drops its smiling facade, and then drops its head on the ground to roll after us once we pass by. And no, you can't be clever and jump back to the left over the snowman's head and let it roll down ahead of you. The screen auto-scrolls, and you'll wind up crushed behind it after a few seconds. Time to run!  You don't have much time to react to the pits. Wait around too much and the head will crush you. But if you run ahead too fast you'll just run straight off the edge. The lack of screen real estate here, given the size of the player sprites, is one of the places in the game it's really noticeable.  Especially when a few enemies step in. The guy there is probably the single most deadly Hoppers McGee in the game, as he's capable of hitting you by surprise and knocking you back into the rolling snowman head. Remember, I said he's capable of it, doesn't necessarily mean it'll happen all that often. Still, quite an accomplishment for the lowest mook in the villain's roster. It's like if a Goomba were positioned just right in a Mario level to insta-kill you. Anyway, the chase down the mountain doesn't last long, and eventually the snowman head lands in the water.  Of course that's not the end of the stage, as the screen keeps going and you have to ride the head across the water. Actually, I've said this stage is auto-scrolling, and that's not QUITE right. The first section is, but when you hit this part you are capable of going beyond the screen, you can't go backward, but you can go forward and outpace the snowman head. The TAS abuses the way the game handles 2 players to speed through this section and leave the snowman head behind. One player dies, then when they reappear the other player dies. Whenever a player is brought back they're briefly invincible and capable of flying around the screen for a few moments. So by trading deaths between player 1 and player 2 the TAS essentially flies across this lake. Last edited by SpoonyBardOL; 11-27-2017 at 06:44 PM. |
|
#123
09-30-2011, 07:53 PM
|
|||
|
|||
 Not me, though. I'm stuck dealing with the "Top Bun" McGees who bedevil me the rest of the way. And-- ...did the head just shrink? Nah...  Anyway, Sasuke's Lv2 weapon is very well suited in this stage too, since you want to take the fliers out before they can get close enough to knock you off and... well... I guess it's NOT my imagination. The head IS shrinking.  Just to make matters worse, "Top Bun" McGees start coming in more frequently, and the game starts throwing Crunch Munchers at me.  The "Top Bun" McGees will also pelt you with rocks if you let them get too close, and you really don't need assaults coming from all sides as your ride is slowly shrinking.  Ok, just look at that. Sure, the end is in sight, but the level sure does throw one hell of a bad situation at you in the very end.  I just love the comical expression on the snowman's head there. You only have a split second to react from the moment its expression changes to it vanishing entirely, so don' get distracted. But that's the end of the stage!  So next up is a town, 'Nipopo Town'. We also get to see what very obviously looks like an Impact boss on the right side of the screen, though strangely enough there's no Fortress!  Music: Town Much like Area 5 itself, Nipopo Town is very short and straightforward. First building is an Inn, second is a Restaurant, I have no use for either really. Third is a shop.  This shop sells two new items, the Gold Armor and the Most Bestest Riceball. However Sasuke can't really get any mileage out of either of these, for reasons that will become apparent soon.  And then we have some Moonspeak Talking Time. This dude mentions one of the Bunny people on the outskirts of town! We haven't seen one of McGuiness's cronies in a peaceful community yet, we must be getting close to their HQ.  The next dude talks WAY too much, going on for something like seven dialogue boxes. I couldn't keep track of it all to try to decipher it.  There's also a Bath House in town, first one we've seen in awhile. If you'll remember it will grant you another bar of energy, but like the items in the shop I won't be splurging on it because of a reason.  This lady says something about Oedo Castle coming to the nearby mountain range. Huh, did anyone notice any conspicuous mountains in the region? I sure didn't!  And one other NPC says something or other about snow. I guess it's the hot topic up here.  Finally, there's a travel center in town. And like all the other ones before I just ignore it. Last edited by SpoonyBardOL; 11-27-2017 at 06:44 PM. |
|
#124
09-30-2011, 07:56 PM
|
|||
|
|||
 Suddenly, Sasuke comes across one of McGuiness's Bunny Man Generals, standing in front of an odd black gate! Random NPC from earlier was right! He suddenly starts talking loudly about the some brand new giant mecha just recently completed in their super secret underground base.  He then says as long as he has that mecha, he'll easily be able to crush Goemon and the others. Sasuke, of course, has none of it, and tells the grown man in the bunny costume they won't go down so easily!  And then the Bunny General seems to react in shock and hightails it through the gate. Did.. did he not see Sasuke standing in front of him the whole time?  Anyway, letting the crony get away to board his super new giant mecha wouldn't be the best idea. The gate is locked, but fortunately we have something of a univeral key: Giant Robot Fist.  Music: Goemon Impact! Yup.  The General can't believe he was surprised by the enemy so easily (s..seriously?) and says they'll just have to test the new mecha after all.  And so we have the last Impact Destruction Sequence in the game. The newest obstacle in this high-tech area are the walls which Impact can destroy with a swing of his pipe. Though if you don't they'll push you up against the edge of the screen and squish you flat. Y'know, it just occurred to me. The first area was in a green, forested area, the second out on the water, and the third in a high tech base. It just seems kinda familiar.  Of course, there are the usual pits and possible pratfalls that plague you at potentially every perilous... um... parlor? Ok that got away from me.  Basically, it's very easy to trip up in this Destruction Sequence, you'll frequently have obstacles thrown at you one after another, and the brief delay with the jump button is enough to trip you up easily enough.  Further ahead I score my first Bomb. Will I manage to pull off getting a second this time?  Yup. At last, I enter an Impact fight with two Bombs to use. And a good thing, too. This upcoming boss is certainly the one I'd want to use them on!  Music: Impact Boss The battle starts with the boss immediately rushing the screen, hitting Impact's cockpit and causing the screen to shake. There's no dodging it, nor counterattacking it, but it does no damage (this time) so there's no harm.  SUTOPPU! Yeah I really didn't get the rest of what he said there. Just the 'SUTOPPU' cracks me up.  Oh, and he says more things. But those things aren't hilarious accented English. The walkthrough calls this boss 'Grandfather Robot', though it looks like he's calling it 'Mikoshi Tengu' (portable shrine Tengu? Well, it's lower half does look like the base of a shrine I guess).  And the fight begins! Grandfather/Tengu's first attack is usually his most common one in this phase, it'll leap forward in a couple of small jumps before coming up against the cockpit and hitting Impact with a series of electrical attacks. You can punch it away right before it gets too close, though. Last edited by SpoonyBardOL; 11-27-2017 at 06:45 PM. |
|
#125
09-30-2011, 07:59 PM
|
|||
|
|||
 It will also fire its arm at you from a distance. You can either hit L or R to block it, or if your timing is good you can punch it to destroy it outright, though that won't stop it from firing more at you. It must have an ammo clip of them or something.  It will also launch its bamboo-decorated shoulderpads at you, which will fly around in front of the cockpit before pausing and firing three projectiles at Impact. They can either be blocked, shot down with some Nasal Medals, or punched to recover some Ryo. The shoulders will fire twice each.  After the shoulders finish their attack, the mecha will almost always follow them up with a quick charge attack, similar to what it used when the fight started, only this time it actually inflicts damage. A punch at the right moment will handle that.  Of course, Tengu Man also fires off his own multi-colored projectiles, what kind of Impact boss would he be if he didn't?  Finally, its last attack in this phase is to launch its head at you, which is also swat down by a quick punch. The screenshots don't get this across, but its mustache twirls like a propeller when it's launched forward. It's awesome.  Those are all the attacks it has up its sleeve, so let's put this sucker down!  Of course, it's not quite that easy. Once the Tengumech goes under 300 energy, the General speaks up. (And I only just now realize I doubled up on that first line of dialogue there. Oops)  The boss then starts firing these glowing walls of light at you.  Hitting one does quite a bit of damage, too. But you can either destroy them with a single strong punch...  Or with five Nasal Medals. I find it easier to just rapid-fire the Medals than to try and time the punches. Anyway, after you destroy half a dozen of those walls, the screen flashes white. 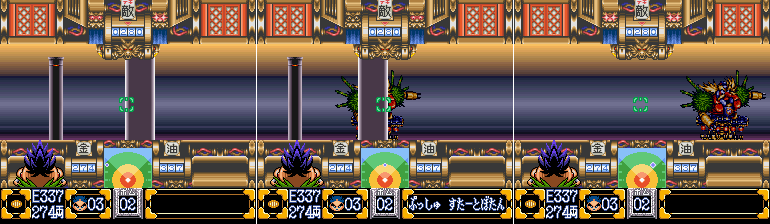 And suddenly your orientation is switched around, as the boss flies to the right in front of you.  Talky talky talky I'm invincible you'll never beat me Wa Ha Ha Ha, etc.  In the second phase of the fight, the Portable Shrine Tengu mecha will often fly up close to the cockpit without necessarily attacking. When it does this you have a very brief window of opportunity to score a free hit. Getting the timing down takes practice, though.  And then there are times when it'll charge right at the cockpit and either ram it, or hit it with a flurry of electrical attacks. Either way: punch that jank.  It'll also unleash a horizontal volley of projectiles, which you'll want to either blast out of the air with some Nasal Medals, or just guard against them if you're not feeling confident. Guarding, though, won't get all of them. Their range is wide, and guarding will only cover the majority of one side of the screen, and you can't swap to the other arm fast enough to block them all so a few will always sneak by. Last edited by SpoonyBardOL; 11-27-2017 at 06:46 PM. |
|
#126
09-30-2011, 08:02 PM
|
|||
|
|||
 Since I have two Bombs to use, I fire one out early to take a chunk out of its energy. In a hilarious bit of continuity, instead of being blasted into the air like the other two bosses were after being hit with a bomb, the Tengu mech comically bounces around the corridor, complete with 'boing' sound effect.  That's pretty much all this boss has to offer. It tries to ram me, I punch it back, it flies up close, I punch it back, it fires crap at me, I shoot them down. Though I don't really show it in the screenshots, however, this boss IS still pretty fierce. In fact, it's easily the hardest boss in the game.  But I defeat it anyway because I used savestates while taking screenshots I'm awesome. Once its energy is under 50, and its head is knocked off, I fire off my last bomb to finish the job.  McGuiness himself appears to grumble at us in frustration.  He's upset that we've even managed to defeat... um... 'Maburu-Black'. Actually, this is something that confused me earlier. Way back in the Area 1 cutscene, and also in Kabuki's boss battle, a 'Maburu-Blue' was mentioned. I wonder if that's actually the coding for McGuiness's generals? The Area 2 cutscene had them wearing colored armbands after all, and now that I go back and look at their sprites from Area 1, 3, and 5, they ARE wearing colored armbands there too (Area 1 was Red, Area 3 was Yellow, and Area 5 looked Black). 'Maburu-Blue' was mentioned for Area 2, and I guess since there was a green-armband guy in the Area 2 cutscene as well, he must've been the General in charge of Area 4 though he wasn't seen nor mentioned. Huh. Mystery solved! And I didn't even know it WAS a mystery!  'Maburu-Black' apologizes, but McGuiness tells him to shut it.  He also says that, at any rate, they'll be separating from this place, and says goodbye everyone, and his signal cuts off as he laughs and gives a thumbs up.  And the Tengumech explodes, ending Area 5.  Back outside, Oedo Castle on top of McGuiness's airship can be seen flying out of the exploded remains of his totally hidden mountain base.  Ebisumaru points it out, and Goemon wonders how they'll ever reach it that high up, but Sasuke says to leave it to him.  GOEMON IMPACT FULL POWER GREAT HI-JUMP!!!  Too great! Too great!  ...  ...well. Whatever.  They all exit the mecha and head off to storm McGuiness's domain directly. Sasuke says it was a great success, though I wonder if crashing through the ship really was his intention, or if he just decided to roll with it. And that's the end of Area 5! Tune in next time for the first part of Area 6 as Goemon and the others have finally reached McGuiness's ship and the stolen Oedo Castle, the end is in sight! Also, here's a video of the Area 5 Impact Boss, and cutscene. As I kept having problems with desyncs here too, I recorded it live and without save states, so this fight is a lot rougher and is cut a lot closer than the screenshots showed. It was actually my third take, the boss killed me easily twice without savestate assistance. Roughest fight in the game, like I said. (Also, if you were wondering why I didn't bother to buy upgrades for Sasuke, we're taking Goemon into Area 6, so any items bought with Sasuke's cash would've just been wasted) Last edited by SpoonyBardOL; 11-27-2017 at 06:46 PM. |
|
#127
10-02-2011, 01:45 PM
|
|||
|
|||
|
Quote:
Also the rolling snowman head stage looks godawful. |

|
#128
10-02-2011, 04:45 PM
|
|||
|
|||
|
It's probably the least-fun stage in the game, yeah. Auto scrolling plus several instant death traps, plus a lot of enemies that can take advantage of damage knockback, and no mid-way checkpoint.
Thankfully it's pretty short. |
|
#129
10-02-2011, 05:15 PM
|
|||
|
|||
|
I mean I could probably handle the autoscrolling/chase part, but the hop around on the shrinking head would be the breaking point.
|
|
#130
10-06-2011, 06:33 PM
|
|||
|
|||
 Music: World Map Welcome back! We're at the doorstep of the final area of the game, and the very first thing I do is turn right around and hightail it back to Nipopo town in Area 5.  Because now we're playing Goemon, and he could actually use the stuff here. I buy one of each!  Alright, and back to the Area 6 map. I love how Impact's legs are still dangling from underneath the sky castle. Speaking of the sky castle, that's what the walkthrough calls this stage, 'Sky Castle Gates'. Though a translation of the stage name is more like 'McGuiness Castle Plaza'.  Music: Sky Castle Gates But I've used the walkthrough titles for the music all this time, not about to stop now. The stage starts with Goemon hopping out of Impact's mouth. There's something... unsettling about Impact at the start of this stage. I guess it's because he's 'off', but the pasty-white eyes are just kind of creepy. We're pestered by a Severed Ed right at the start, but it's easy to duck under its flames and swat it from safety.  This stage is unique in that we cannot backtrack for some unexplained reason. The only other stages we couldn't backtrack in were auto-scrolling, but this stage doesn't do that. We just can't backtrack, because!  The other strange feature of this stage is that the terrain is totally flat. There are no obstacles, no structures, no variations in the ground's level, no pits, nothing. Just a flat expanse of a stage, with a gauntlet of enemies. Of course, we ARE in a Plaza, so I suppose a flat expanse with a bunch of minions trying to fight off invaders makes sense? Doesn't make for interesting platforming, though.  All 'n all it's a pretty weak start to Area 6, a flat stage with recycled enemies. There's virtually nothing interesting about it. Until...  Cannonball.... Cannonball.... ....what the?  Name: McGuiness McGear Mk I Profile: It's a walking battle tank, armed with a stealth nuke a Cannon. The weakpoint is, quite obviously, the face, which occasionally spits out flaming loogie.  Yeah, I don't know what to say about this thing. It's a boat with human-like legs. Seriously, it looks like something that walked off the set of Parodius.  Anyway, Goemon piping it in the face enough causes it to explod, and right behind it is a wooden gate. It serves no other purpose than to block your path until you hit it enough times to explod that too. Not shown: the Checkpoint right after the gate. I missed it.  More returning enemies appear to harass Goemon as he dashes across the Plaza. Though neither of the three types prove much of a threat. As long as you don't try and run straight through, if you take your time you should get through the stage without taking a hit. Of course, that advice goes for any platformer, when you think about it. Stop stating the obvious, Spoony!  First Fortune Doll in the stage drops, odd that it took this long, but I welcome the more better pipe. Last edited by SpoonyBardOL; 11-27-2017 at 06:47 PM. |
|
#131
10-06-2011, 06:36 PM
|
|||
|
|||
 Because now it's time to fight this jerk.  Name: McGuiness McGear Mk II Profile: The updated model of the McGear has human-like arms to hurl bombs at its foes, and fires Non-Prickly Darumas as well. McGuiness corrected the obvious design flaw of the Mk I model by moving the painfully obvious weakpoint out of range of any pipe, fan, or kunai.  Yeah you didn't think I'd call the first one Mk I if there wasn't another one coming up, did you? But as the profile said, there's really no way to hit the face with your weapons, it's just up too high. So what you do instead is hit the bombs it throws at you with your weapons and bounce them back to explode in its face.  The McGear backs up during the fight and eventually we see a second wooden gate. A few more bombs to its face, and...  It explods as nicely as the other one, its severed limbs flying off the screen.  And that's the end of the stage. It was dull, but at least it was short.  I bet 'McGuiness Town' is a swell place!  Music: Town It's not a swell place! There's a pretty high chance of running into an Obisumaru as soon as you enter town. Remember how I said they didn't seem to do any harm when I did their profile? Well I was mistaken, since I didn't have any weapon upgrades back in that segment. Turns out these fat bastards steal them from you! Fortunately some save-statery fixes that right up.  Inside the first house is McGuiness Town's 'WELCOME TO ******** TOWN' guy, though he says he's just kidding, and goes on about how dull it is everyday there. In a floating sky town filled with crooks. Okay.  I wasn't even kidding, either. McGuiness Town's big feature is that it's filled with every unsavory type of NPC imaginable. Now and then you might luck out and see some of the friendlier NPCs, but it's mostly thieves up the wazoo. Anyway, I don't bother with the Inn, so let's see who's staying in this house...  It's.... the Hannya Shogun! Wow, what a surprise. Remember him? Bad guy from the first game on the SNES?  'Dis guy?  Anyway, I think he talks about how after the events of the last game he was more or less left to help rebuild Oedo Castle, and of course McGuiness and his goons come along and pick the castle up while he's doing so. Y'know, I never caught it before. But those 'Disgruntled Carpenter' enemies from way back in Log Ridge Road (and the Mine cart ride) were probably Hannya Shogun's remaining followers. Not sure if they had signed up with McGuiness, or were just harassing Goemon because he thwarted them before. Last edited by SpoonyBardOL; 11-27-2017 at 06:48 PM. |
|
#132
10-06-2011, 06:38 PM
|
|||
|
|||
 Heading up into a new area, we pass by a travel center, and enter a shop. Which sells absolute junk. Man, this whole town is out to get you.  Seriously, the area in the middle screenshot is always loaded with thieves. They're not hard to avoid, but there's always a huge pack of them. Wander into the middle of that group by mistake and you'll quickly see your cash plummet to 0. Honestly, I've never figured out what the significance is of that building in the last screenshot. It certainly stands out, but I can't find a way inside. Maybe it's just supposed to be decoration, like this is just a base for McGuiness's troops, but it seems way too elaborate for it. It's just.. there.  Backtracking! We head back to the lower area of town.  In the first house we find.... Snatcher?!  He seems upset about something, but I can't quite parse what he's saying since I'm not familiar with his games.  There are a lot of 'Littlest Furaibous' in this part of town, but strangely they'll turn on you without provocation. Normally you'd have to hit them once to get them to chase you, but here they'll just do so randomly. Fortunately, the Ornery Yojimbos which also swarm around this part of town aren't quite as disagreeable. Inside another house is a woman holding a Konami icon. At least, I think it's a woman. She looks more like an alien, I gotta admit.  At the end of this section is a restaurant and a dice game.  Right now I have no need to Play Money Making Game, so back we go to the main path through town.  This dude mentions Princess Yuki being locked in a dungeon. I thought he also mentioned Goemon being locked in the same dungeon, but if he's talking about what happened in the first SNES game, then that happened at Ryukyu Castle, not Oedo. Then again, maybe the dialogue from the first game was spotty.  Anyway, back to the world map we hit up the next stage. McGuiness Castle Outer Wall.  Music: Sky Castle Wall Well Mr. Walkthrough Writer got it fairly close this time around. This is, more or less, the last proper stage in the game before the end. And it certainly makes up for the dullness of the previous stage. First thing we run into a rather overzealous Hoppers McGee. Honestly dude, we're at the endgame here. At least it's determined. We also nearly get pelted by a stage hazard and... well, why not?  Name: Shingles McGee Profile: The spirit and loyalty McGuiness infused into his army was so strong, it affected his very castle. Even the tiles on the wall will leap off their base to attack any intruders that pass by. Yeah ok it's a bit elaborate for falling debris, but the past few updates didn't have as many new enemies to profile! Plus I love the idea of sentient roofing material.  The stage has a lot of sharp slopes like this one, as it dips back and forth between stable footing and precarious jumps over bottomless pits. Ohh! Another new enemy! Last edited by SpoonyBardOL; 11-27-2017 at 06:50 PM. |
|
#133
10-06-2011, 06:39 PM
|
|||
|
|||
 Name: Turret Profile: Turret is the plainest enemy in McGuiness's army. It doesn't have a silly look, it doesn't fire silly projectiles, it doesn't even have a silly name! It's just a Turret. It's the guy that's just there. Yeah, McGuiness's Castle needs Turrets, but so what? No one will ever pay attention to them when he also employs drum-beating dragons, dive-bombing rabbits, and severed horseheads on sticks.  Turrets and Top Buns harass you in this early section. Since we're on the Outer Wall, falling means it's a looooong way down.  Goemon finally scores his Chain Pipe, and begins wrecking stuff. Also, these lower parts of the stage have little grates which periodically expel... erm... waste? It'll do damage and send you plummeting if you hit it while jumping, so be careful.  Yes Goemon actually hit those two enemies with his Chain Pipe, but with how I took the screenshots, I prefer to imagine he destroyed them with his mind.  We finally start climbing back up, though that mysterious platform on the right is mysterious!  Once you reach the top you can jump down through by holding down and pressing the jump button, as many gamers should instinctively know to try.  There is. however, a big fat nothing down there. Nothing I was able to find, anyway.  Geez, he's even adorned his rooftops with golden statues. Ok, we get it, McGuiness likes bunnies. He has an unhealthy obsession with bunnies.  Crossing this latest bottomless pit lands us on another sloping platform. This one behaves differently, though, it starts shaking when you land on it.  It's only barely noticeable, but you can see in the last two screenshots how much lower the foreground is to the background. This little part of the castle is sinking, and quickly!  You really can't afford to waste any time there. If you dawdle for too long you won't be able to make the necessary jump.  Fortunately that was the last obstacle the stage had to throw at you. That's the end of this stage! And that's the end of this update. It was another fairly short one, but I had to cut it here due to how long the next update is likely to be. So be sure and tune in next time for the shocking endgame! Last edited by SpoonyBardOL; 11-27-2017 at 06:51 PM. |
|
#134
10-14-2011, 08:17 PM
|
|||
|
|||
 Music: World Map Aaaaand we're back, and it's time for the REAL FINAL UPDATE as we break into McGuiness's Domain and save Japan! I forgot to take screenshots of it, but before entering the final stage I went back to McGuiness Town, gambled up some Ryo, then returned to Nipopo Town and got decked out in Gold Armor. If there's ever a time you'll want it, it's now.  Music: McGuiness's Domain Walkthrough calls it 'McGuiness's Domain' (or 'Magginesu's Domain'), but 'McGuiness Castle Dungeon' might be more appropriate. (Or maybe a Keep, or a Tower, 'Tenshukaku' can go a few ways I think) Anyway, though it's the final stage, it has surprisingly upbeat music, and it's laid out like a town with its perspective. The stage starts you off in the center of a hallway, and already we see two new enemies.  Name: Socrates and Rusty Profile: They're three sad souls, oh me oh my, no Brain, no Heart, he's... well, they don't have a third member to complete the reference. Socrates does nothing but whirl around carrying a blade, ricocheting off the walls, and Rusty will chase after you and will relentlessly smack you if given half a chance. Both of these guys go down in one hit. These two foes will harass you throughout the the stage. They keep appearing, too, since they act like town NPCs and don't have pre-set spawning locations.  To the right of the stage entrance is a shop! I still had to go back to Nipopo Town, though, since this one neglects to sell a Helmet.  Further to the right is a staircase to a new area, but I ignore it for now to go back to the left, past the stage entrance again, and into a new door. This one's an Inn, which is handy if you take a lot of stupid damage early in the stage I suppose.  Further to the left is another staircase up, which I do take this time. First door I come across from there is a bathhouse. While the extra life bars WOULD be nice, I still pass. Because of a reason.  At the leftmost end of this new hall are two doors. The bottom one is a trap, which locks you in a room with a horde of Rusties. You have to beat them all to get out.  Leaving the trap room, I head upward to a new corridor. Inside here is.........  Princess Yuki and her unfortunately unnamed father! Boy this is the second game in a row we've come across him tied up in the game's final dungeon. Lord frets some more about the situation, but Princess Yuki stresses to Goemon to hurry and save Omitsu, as she's being held somewhere else in the castle.  Further to the right is a shower of blue Whirly Dhirlies from the ceiling, which explode when they hit the floor. There's also a door with an Ichi (1) character above it. Mysterious! Ignoring it for now though, moving on to the next door...  Oh goddammit it's Kensuke. What's he even doing here? Forget him, moving on!  Moving down into another hallway, there's another door, and inside is Yae! I guess the master ninja must've slipped up somewhere and let McGuiness's cronies get the better of her.  Anyway, I think she says something about having to choose between four different paths through the castle, or something like that. And we DID see a door marked '1' earlier...  At the far right end of that hallway is another trap room full of Socrateses. It's a bit trickier to escape this one without taking a hit.  And finally, up and to the left is a door marked '2'. That's as much as we can explore in the first area, so we'll have to pick a door now to advance. Last edited by SpoonyBardOL; 11-27-2017 at 06:52 PM. |
|
#135
10-14-2011, 08:18 PM
|
|||
|
|||
 So for now I return to the first door and go inside!  Music: Fortress The music changes to the standard Fortress theme as we're sent to a proper side-scrolling section based off of the game's first castle stage. How I've missed those endlessly posturing Sumo wrestlers. Off we go across the abacus! 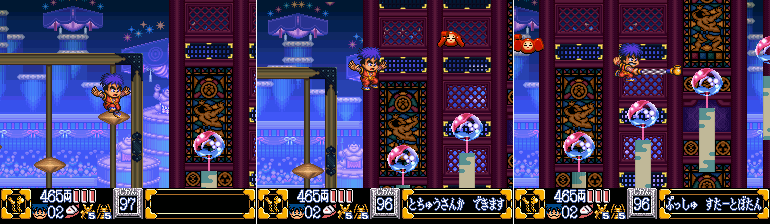 A few Bowl Bats patrol the area, and we see a brand new type of platform. These chimes will dip a bit once you land on them, but quickly rise back to their normal position, and... that's all, really.  After the chimes, there's a section with more abacus platforms and a spiked ceiling and floor.  Another new enemy makes its appearance as well!  Name: Dragon Head Profile: If ever there was a poser in McGuiness's army, it's the Dragon Head. He fancies himself as lethal a foe as the dreaded Medusa Head, spending all his time mastering the art of flying in a sine wave. But it's all just a pipe dream, as he's not nearly as deadly as his idol, and is more of a pest than anything.  The last segment of the stage has these Dragon Heads flying at you. Problem is, while they can knock you off your platform, if you're unlucky, you'll just land on a spiked platform below. This part doesn't have bottomless pits.  And the first fortress segment comes to an end.  It drops us off in a new section of McGuiness's Castle Tower, but I'm gonna employ some save state trickery to go back to the #2 door. Might as well show you the entire final stage.  If you were expecting the #2 door to take us to the second fortress in the game, you'd be mistaken. This isn't the Kabuki fortress, it's the Japanese Cuisine fortress. I'm not really sure why they were swapped around like this, honestly.  The Tofu Slicer platforms are as deadly as ever. If I didn't stress it enough back in the update with the third fortress, I'll do it again: it's VERY easy to slip up and die on them. If you so much as graze the upper part of a Tofu Slicer then your character will literally be sucked into it and sliced up. You have to time your jumps so that you can get on and off the pieces of tofu before they disappear into the slicers. Because of these, this is probably one of the most lethal areas of the final stage. Oh and samurai dude goes down in a few hits.  Fortunately the stage splits up here and allows you to take a lower path, bypassing the Tofu Slicers entirely. I'll take fried shrimp platforms any day of the week.  The lower path has a few Sizzles Shrimpers that try to pester you, but it's still vastly preferable to the 'slip up slightly and INSTANT DEATH' platforms above.  A Bowl Bat manages to sneak a hit on Goemon, but otherwise the low road pays off as the rest of the section goes smoothly.  These mini-fortress sections are kind of brief. You're not meant to go through all four (and you can't!) but two of them, along with the rest of the stage, does make for kind of a long level. Last edited by SpoonyBardOL; 11-27-2017 at 06:53 PM. |
|
#136
10-14-2011, 08:20 PM
|
|||
|
|||
 Music: McGuiness's Domain We're dropped off in the same area as before, though the other end of it. This section section of McGuiness's Castle Tower is essentially symmetrical, with the two fortress sections dropping you off at either end, and the path forward being in the center.  At first the route zig-zags a bit, but we're soon met with the main stage hazard of this section.  McGuiness statues firing chest lazors. Because, honestly, what kind of video game villain would he be if his evil lair didn't have statues in his likeness that doubled as stage hazards? A pretty poor one, that's what.  Finally we enter a section where some more Whirly Dhirlies drop form the ceiling, and with a staircase heading downward in the middle of the hallway. This is the way forward. If I were to keep going left I would just wrap around a mirrored version of the path I just took and wind up in the room the first fortress section dropped me. So I'll spare you that. Moving on!  As you might have guessed, there's a #3 and #4 door down here. Let's do #3 first.  Music: Fortress It seems they really did just swap the places of the Kabuki and Japanese Cuisine fortresses. Weird.  The infuriating trampolines are back. In case you forgot, the timing on them is surprisingly hard to get right, and it's so easy to move off of one expecting to have bounced higher when you don't and fall to your doom.  I'm really not sure how you're supposed to get the Money Boxes on either end of the first section. Not without using 2-player piggyback hopping anyway. To get by that Kabuki hair of doom without taking damage, you pretty much need start moving as soon as you can, and crawl at the end so that it passes over your head.  The stage zig-zags a bit here, unfortunately unlike the original Kabuki fortress there's no shortcut you can take in the bottom corner of the room.  But like in the original Kabuki fortress, you'll need to dispatch a Shown'off and ride their wooden wheel drum across a bamboo spike pit.  Oh good, the falling lamps. I missed those.  You can easily reach them in this section, though, unlike their original appearance where they were almost entirely out of range of melee weapons. If you want to take your time and destroy them all before moving on, you can. Though doing that is slow and boring.  Sometimes it's the best idea, though.  The section drops us off in front of an ominous door. But, we're not going in just yet! Time to backtrack and enter door #4!  Which is, of course, the section based off of the Toy Fortress. Incidentally, the term 'Toy Fortress' just gave me a mental image of a Team Fortress parody with the Toy Story characters. Someone should get on that. Last edited by SpoonyBardOL; 11-27-2017 at 06:54 PM. |
|
#137
10-14-2011, 08:21 PM
|
|||
|
|||
 There's lots of moving walls in this section, much like the similar section in the original fortress. Between being crushed, or being pushed off an edge into a bottomless pit, lots of instant death potential here. It's about as lethal as the Tofu Slicers in the food section. So, clearly, going through the #1 and #3 doors in the final stage would give you the least trouble, if that's what you were going for.  Never before have rainbow colored blocks been so deadly!  This section is surprisingly sparse on enemies. I mean, the final stage went ahead and introduced a new enemy that flies around in a sine wave, and yet they don't use it here where you're actually making tricky jumps.  The Kokeshi in those shots move up and down, which does you no favors when you're trying to land on a yo-yo which lingers in the ideal position for only a moment.  We finally see some enemies, but they're probably placed in the most non-lethal location possible. Oh McGuiness, you're quickly losing the 'video game bad guy' points I gave you for your lazor-firing statues.  I'm not sure why the spikes were necessary on that ceiling since if the floor rose high enough that you were going to be hit by them you would have been crushed on the ceiling anyway. 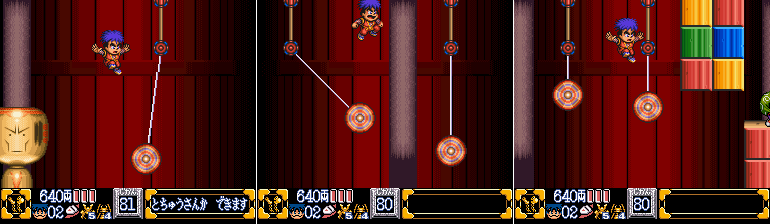 Don't worry, this jump isn't impossible. It's just that the rainbow-block wall moves up and down, and it's currently as low as it goes.  Once it moves out of the way, I decided to wail on a Ban Ditz for a few moments before it takes off. I dispatch the Hanafuda Soldiers and move on.  And now we get to the trickiest part of the section. It's hard to notice it in screenshots, but once I land on the top and get it moving the surroundings start glowing faintly red, much like they did at the end of that one hallway back in the original Toy Fortress. See that rainbow block wall Goemon just barely crawled under in the third screenshot? It moves at least twice as fast as all the other moving obstacles before this.  And speaking of moving fast, this one kokeshi has probably killed more players than any other obstacle in the entire game.  The speed it moves at is pretty unforgiving. This was the best way I could show. Just look at the three images in sequence, knowing I made the jump in the first image, landed in the second, and jumped again before the third, only barely avoiding being crushed.  Music: McGuiness's Domain And we're back here again. You see now why I decided not to bother springing for two Bathhouse trips, the game just awards us two Golden Fortune Dolls in a row just outside McGuiness's chamber. And yes, that's where we are. The final stage is behind us, now it's time for the FINAL BATTLE. Time to confront this wannabe Western Shogun and kick him out of Japan.  Music: Confronting McGuiness UERUKAMU! No I will never stop chuckling over the accented English. But basically, McGuiness welcomes Goemon to his Castle Tower. He then asks if he had fun at the Ryukyu Resort. (Hey, it looks like McGuiness visited Dr. Wily's yard sale.)  He then says he has to invite them again on yet another trip. And this time the destination is... HELL-DESU Yeah, I'll just go ahead and not be threatened by the guy who looks like a cross between Hulk Hogan and Principal Kuno. Bring it on, McGuiness!  Music: Battle with McGuiness The music kicks in, and McGuiness flies to the top of the screen. This fight is why I insisted on going back and getting golden armor. And, honestly, if the game didn't throw two Golden Fortune Dolls at me right outside his door, I would've used the Bathhouse too. It's pretty easy to take a lot of stupid hits in this fight, especially if you're not using Goemon (or don't have his Lv3 weapon). McGuiness begins the fight by flying to one of the upper corners of the room and throwing his arms out again (which is pretty much his only frame of animation in this fight, it comes before all of his attacks). Last edited by SpoonyBardOL; 11-27-2017 at 06:55 PM. |
|
#138
10-14-2011, 08:23 PM
|
|||
|
|||
 His first attack is a swooping one. He'll just dive down from one corner, and fly back up to the other. If you're under him when he starts you can probably score a hit on him from behind as he swoops back up. But I wasn't fast enough.  His second attack is to throw a bunch of umbrellas down at you. The light purple ones fall down to the ground, exploding. The red ones unfold and fly back and forth across the screen.  This sets up his third attack, a laser shining out of the bottom of his capsule. The red umbrellas serve two purposes. One, they can be used as platforms to jump up and reach McGuiness. In case it wasn't obvious, his only weak point is his exposed upper body. Hitting the capsule does nothing.  The other purpose of the umbrellas platforms is to block his laser attack. If you stay under them you can pass safely by, and you'll need to make use of them as McGuiness makes several passes around the room with his laser before he shuts it off.  I just want to say I love his 'taking damage' pose. How many times have you ever seen a villain react to taking damage with a bewildered shrug?  Finally his fourth attack is set up much like his first swooping attack. But instead of that, he bounces wildly over the walls of the room. You can use this opportunity to get a hit on him, but it's pretty likely you'll just take one back since he bounces around rather fast.  It's also easy to take a hit while using the umbrellas, since the upper umbrella moves much faster than the lower one, and that's the one you need to stand on to hit him. Your timing has to be pretty good to get an attack off on McGuiness before the umbrella carries you into his hitbox and you take some damage.  And that's all there is to this fight. He'll throw umbrellas out every second attack, and then alternate between a swoop or a bounce for the other. I had some luck this run and didn't take too many stupid hits. I still got some armor left when I finally knock off McGuiness's last bit of his life bar.  And I promptly decapitate him. Huh, this lighthearted game took a grim turn all of a sudden.  Oh of course it was a robot clone. As if he wasn't channeling Dr. Wily enough. At least he was kind enough to leave a health-refilling Golden Fortune Doll. I mean, I don't need it now, but I'm sure it's helped a lot of other players. Alright McGuiness, where you hiding?  Music: McGuiness's Master Plan Oh, he has a monitor back there. He's too chicken to come out here and face Goemon himself, it seems!  He introduces himself as McGuiness (as if we didn't know that, I guess he wanted to make sure we knew the robot double was, in fact, a robot double), and says that, unfortunately, we just defeated a fake.  He then says he is currently headed to the mecha Goemon and the others arrived in, and says to Omitsu that they should get going. Omitsu then calls out for Goemon to save her. (interestingly, she'll call out for Goemon regardless of which player you're using) Hah! What does McGuiness hope to accomplish by going to Impact? I mean, sure Goemon and the others left him shut off... ....at the entrance of McGuiness's own fortress... ...completely... unguarded...  ....................................oh  FUUUUUUUUUUUUUUUUUUUUUUUUUUUUUUUUUUU- Last edited by SpoonyBardOL; 11-27-2017 at 06:56 PM. |
|
#139
10-14-2011, 08:25 PM
|
|||
|
|||
 Music: Final Battle Bastard stole my robot! (Instead of the Japanese 'Yo!' sound, Impact yodels here. Also, I love the pathetic expression on Omitsu's face in this scene. How else would a grown woman stuffed into a full-body bunny costume forced to tag along with an insane foreign warlord boarding a ridiculous giant robot look?)  And so begins the real final battle, on the top of McGuiness's Castle Tower.  Impact climbs up, King Kong style. There's one thing I have to make note of, and that's the perspective. The two towers Impact is climbing up there are actually far in the background, they're not adjacent to the roof Goemon is standing on, though they kind of look it. This means there's a pit on either side of Goemon's platform, not a wall.  So for the final battle goes like this: McGuiness's Bunny Generals (the previously mentioned color-coded 'Maburu' guys, Blue, Black, Red, Yellow, and Green) run out on either tower and toss bombs down at Goemon that correspond with their color. Each color of bomb behaves differently. You basically want to strike these bombs with your weapon to swat them back into Impact's mouth. All while avoiding the other bombs and all of Impact's attacks. Black bombs, seen above, are tossed out three at a time by Maburu-Black (I guess he survived exploding with the Tengu Robot). They're the most basic bomb, if one of them touches the ground they'll just create a small explosion. Since there's always three of them they're the easiest to attack Impact with, as sometimes you can even get two flying back at him at once. Goemon is very fortunate McGuiness is pretty incompetent. Not only does he provide the means to his own defeat, he doesn't even use Impact to his fullest potential. For most of the fight Impact's Nasal Medal reticule follows the player. If the player stands still long enough for it to rest on him, Impact will fire a volley of Nasal Medals at that location. Once fired they don't follow the player, so it's easy to move out of. The real danger is the brief explosion they leave behind which can also do damage. If you don't stay still for too long in this fight you'll be able to avoid that attack.  Here's the Blue Bomb. These are only ever thrown one at a time, if they hit the ground they'll send a shock-wave out towards one of the platform's edges (shaped... like a bunny-man's head? Ok). Since Maburu-Blue only throws one bomb, it can be pretty easy to miss, but they always tend to go for the center of the screen.  Oh right, and that goofy grin of Impact's in the second picture? Every now and then he just closes his mouth. It appears random, sometimes he'll do it when you haven't even flung a bomb at him. But he's capable of blocking the bombs whenever he does it.  Welp, since we're fighting Impact I guess this attack had to come up eventually. Even an incompetent doof like McGuiness had to notice the big red 'PIPE BOMB' button. When Impact brings his pipe out, you have a brief window of opportunity to stop him from using the Pipe Bomb, since Maburu-Black will always run out at the same time and toss three black bombs. If you can hit Impact in the mouth before he fires, you'll stop him.  If you don't, he blasts the roof and it explodes, sending Goemon into the air.  The blast sends you high in the sky. You can move left and right freely during this segment, and you had better do it because Impact tracks the entire time, and he'll fire Nasal Medals at you while you're in free fall. Strangely, the actual explosion itself does no damage. It just sends you into the air, it's only the projectiles that can hurt you.  Be careful not to be on the uttermost left or right side of the screen as you fall, you don't want to land right in the bottomless pit.  Maburu-Red shows up and throws two red bombs. These are probably the most annoying ones. They'll usually each land on either side of the platform if you don't hit them, and hitting them both can be difficult. Once they hit the ground they leave behind a flaming pillar that lingers for far too long. Having a persistent obstacle while you're trying to avoid Impact's projectiles and position yourself to hit oncoming bombs does you no favors, so be careful with the red bombs.  This is Impact's only other means of directly attacking, besides Nasal Medals and Pipe Bombs. He'll occasionally wind his fist up and strike the roof three times. You'll pretty much be safe if you run to one of the edges and duck. At least, I've never ever seen Impact strike anywhere outside of the general middle of the platform.  Maburu-Yellow throws a yellow bomb out, which instead of exploding when striking the roof simply bounces along it. It moves quickly, but is otherwise fairly harmless, and is pretty easy to send soaring at Impact since it doesn't detonate when it hits the ground like the others.  Finally, Maburu-Green throws his bombs which... aren't really bombs at all, actually. He throws the most of any other, something like four or five at a time, but when you hit them they just turn into Ryo, you can't send the green ones back at Impact at all.  Impact prepares another Pipe Bomb, but a quick shot to his mouth stops it this time. Last edited by SpoonyBardOL; 11-27-2017 at 07:00 PM. |
|
#140
10-14-2011, 08:27 PM
|
|||
|
|||
 That's all there is to this fight, so Goemon finally dispatches the last bit of Impact's energy. The giant robot starts exploding, as McGuiness's bunny soldiers drop out of the sky like flies.  Impact also... vomits? I think? Ew?  Music: Ending Part 1 Defeated, McGuiness is thrown out of Impact's cockpit. He pulls another Dr. Wily and starts pleading with Goemon, saying he surrenders.  I can't quite decipher all this moonspeak, but I think he's basically saying he'll return Oedo Castle to Japan. And, also, that he actually thinks Japanese Culture is wonderful! I guess he's had a change of heart about Westernizing it?  McGuiness seems to have some sort of misunderstanding about Japanese Culture, but Goemon says that Japanese Culture is something that's rooted in their hearts or some wishy washy stuff like that.  McGuiness goes 'OK' and says he understands. He apologizes and asks for forgiveness. I'm really not entirely sure what he says in the last two images, but...  Music: Ending Part 2 Whatever it was got Omitsu to fire at him from inside Impact. McGuiness... dude.. don't..... don't leave a ticked off woman you stuffed in an embarrassing bunny costume at the controls of a giant robot. Anyway, she wants to hurry and get out. Whether she's talking about getting out of Impact, or the costume, I'm not sure.  Goemon admits he completely forgot about her. Buuuuut then a clicking sound is heard, Impact glowers downward, and the screen starts shaking. Omitsu shrieks, as apparently Impact started moving.  She wants someone to stop it. McGuiness goes 'OH NO', and tells Omitsu to press the red button in the middle of the driver's seat controls.  She scrambles to find it, and presses it. But that only causes Impact to start charging up. Goemon says that wasn't good, because that button was.... Impact: KI - SE - RU - BO - MU!!! (I hit the screen capture too soon, but there was a 'MU' at the end of that) Which stands for Pipe Bomb.  You guys can make your own Team Rocket joke.  Music: Credits And so the game comes to a close with a cheerful tune as Impact goes on a rampage throughout whatever the closest city was. 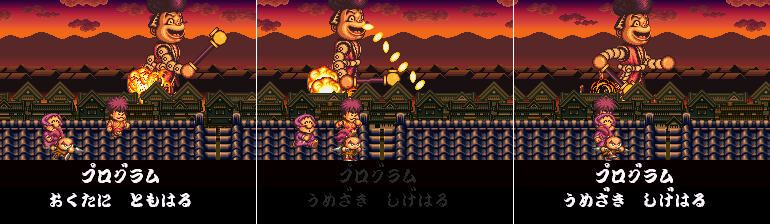 Goemon, Sasuke, and Ebisumaru give chase over the lengthy credits scene. I love how the music has this feeling of 'Welp, that's how it goes!' to it. All it needs is a sad trombone.  Eventually, the credits come to an end, the three heroes fall back offscreen, and finally, Impact's energy apparently runs out as his head pops off and his body explodes. Y-yay? And that's The End! The heroes all strike a pose (Omitsu is all innocent and 'eheh!' there) while fireworks of Lord and Princess Yuki go off in the distance. I guess they're just so happy that McGuiness is taken care of that they really don't mind the giant robot rampage! So that, friends, was Ganbare Goemon 2. Overall, it's seems obvious Konami decided to go in a different direction after the first SNES game. In a lot of ways some of the gameplay elements are similar (upgradeable, degradable weapons, armor, 2-player simultaneous play) but there was a lot of changes too. It's much more cartoony than the last game, it cranks the silliness up quite a bit, and it's much, MUCH easier. Legend of the Mystical Ninja was a HARD game, you guys, it was pretty classic Konami hard. Ganbare Goemon 2, though? They dialed the challenge way back, save for one or two spots, like the battle with the Tengu robot in Area 5. The game is considerably more playable and fun, but it has it's forgettable moments. A number of levels are lacking memorable gimmicks or set pieces. Then again, one of the things I love about the SNES Goemon games is the 2 player simultaneous play, and you gotta admit, the first game on the SNES has a pretty huge barrier against 2 players with its difficulty. Ganbare Goemon 2 is much friendlier to two people trying to play at once. In the end, this game was a bit of an experiment. The first game on the SNES still had a few holdovers from the NES days of Goemon, but this one departs from most of them entirely. And the few it did hold onto (like the degradable weapons) are gone in the next entry. There's a lot of new stuff introduced in this game (a more cartoony aesthetic for the graphics and music, gameplay elements like vehicles and Impact) and the things they tried here they try again in Ganbare Goemon 3, and they do a lot better. In fact, Ganbare Goemon 3 is pretty great, and is my personal favorite of the SNES Goemon games. So folks, what do you think? Should I try and LP Ganbare Goemon 3 sometime down the road? It is, by far, a much more interesting game, but it is also much wordier. It'll be even harder to give the story reasons for everything, and untranslated moonspeak will be everywhere. But if you're all OK with that, I'd be more than happy to take you through it sometime later. For now, though, this is The End........ ....ooooorr not. I'm not quite done! There's still one more update to come, as I go over a few things I neglected, and show off the terrifying BONUS STAGE. Stay Tuned! (And here's a video of the final boss and ending. Much like the third Impact battle I had to record it live, and had to restart from the SRM and replay the final stage to match, so Goemon's in worse shape at the start here, and I make a few dumb mistakes due to the emulator's timing being off thanks to the recording) Last edited by SpoonyBardOL; 11-27-2017 at 07:02 PM. |

|
#141
10-14-2011, 10:06 PM
|
|||
|
|||
|
Quote:
Quote:
|

|
#142
10-15-2011, 04:22 PM
|
|||
|
|||
|
Quote:
|
|
#143
10-16-2011, 08:54 AM
|
|||
|
|||
|
I think I'd do that, yeah. I wasn't really sure how to handle it here, since it was my first real screenshot LP, and an untranslated game besides.
I'm also looking out for any other feedback, like I just said, first LP. Anything I should focus more on/not focus as much on, stuff like that? |
|
#144
10-24-2011, 10:24 AM
|
|||
|
|||
|
FYI, I'll probably have the real final update sometime next weekend. I was pretty busy last week, and it's kind of appropriate to save this update to pretty close to Halloween.
Because. |
|
#145
10-24-2011, 06:45 PM
|
|||
|
|||
|
Quote:
|
|
#146
10-24-2011, 07:04 PM
|
|||
|
|||
|
Really? That wasn't my intent. I was pretty much trying to be self-deprecating more than anything else since when I ripped the SPC set way back when I went entirely by the walkthrough instead of trying suss it out myself. Doing this LP was the first time I actually did try to decipher the actual level names and I was so surprised at how off some of the titles were I felt pretty bad about tagging an SPC set incorrectly.
Though that's my own OCD coming into effect, and I suppose I did throw the walkthrough writer under the bus at the same time. Fortunately neither 3 or 4 have anything like this in their walkthroughs, so this wouldn't happen again regardless. |
|
#147
10-31-2011, 06:40 PM
|
|||
|
|||
|
Welcome back boys and ghouls (ho ho ho) to the final installment of the Ganbare Goemon 2 LP! It's not a terribly long update, but I felt it was best to wait until Halloween.
Because for the final installment, we are diving into Virtual HELL!  And the first thing we do upon loading our clear save is to walk all the way back to Karakuri World in Area 2.  Music: Karakuri World Ya'll remember this castle that was in the center of the park? Inside there was a lady announcing their newest attraction, but for some reason or another McGuiness's presence kept it from opening. Well, now that that's done we can go ahead and enter! Yay! Except we still can't, and need to collect four demon masks first. Boo! We get the four masks from beating harder versions of the four mini-games around Karakuri World. The hard modes are available automatically when you return after beating the game (and, honestly, I don't even know if it's possible to access the non-hard versions of the game after this, unless you go another town where a game happens to be set up). Welp, might as well get the hardest one out of the way first.  Music: Devil Bazooka Make no mistake, Devil Bazooka is the hardest mini-game, if only because the trick to faking out the AI isn't immediately obvious. This here was my first attempt at the hard mode, that's my score at the top FYI.  Balls. Two more attempts end in slightly less embarrassing but no less utter failure.  Finally I get the idea on try #4. The trick is, I gathered, not to try shooting at your opponent directly, but aim for his own projectiles. If you hit one of his balls with one of yours, his will be bounced back, and not only can he be hit by them but the AI seems to intentionally wander into the path of them, where it avoids your own projectiles with ninja-like agility. Maybe I just got super lucky, but it seemed to happen way too frequently to be a fluke. Hooray, I finally got my ogre-demon-hulahoop-dude to do a happy dance. It is the happiest dance.  The old dude who runs the game presents us with one of the four masks, complete with a 'Jya-Jya-Jyaaan!', which I guess is Japanland's version of 'Tah-dah!'.  Music: Memory Game Next is the easiest mini-game, the Memory Game. Even on its hard mode it's still a piece of cake. It kind of has to be. I mean, yeah, the AI moves a little faster, but it still has to intentionally act a bit dumb and pretend it can't remember what every space it examined was in order to give the player a fighting chance here. But it's still far too hard to lose, so hey, free mask!  Music: Xexex Stage I didn't really give Xexex the best introduction last time because, admittedly, I wasn't even fully aware of its roots. Never was the biggest shooter-player, certainly not arcade shooters. It was released here as Orius, and was an arcade-only game (until its home port in 2007 within the Salamander Portable compilation, and even that was Japan-only). Turns out the ship you pilot is called the 'Flintlocke', but all I can imagine now is an ornery dwarf that shoots woodchucks out of a gun... In the end, though, while I never recognized Xexex before now, I did finally recognize it from a parody of it, that one stage in Jikkyou Oshaberi Parodius.  Yeah, that stage. Turns out, that stage was a parody of Xexex all along. I just thought it was a random food-related stage, (as the normally molecular enemies were, instead, candies and sweets).  Anyway, the Xexex game in hard mode is essentially the same layout, just packed with a few more enemies. You have to be a bit more careful (and, if you're bad at shooters, I could easily see this as being a big stumbling block to reach the bonus stage), but otherwise the boss goes down, and I get thanked again by Princess Xexex 80s hair whatever Irene from the planet E-Square.  Jya-jya-jyaaan! Three masks, one more to go! What was the last game again?  Music: Floor Sweeper Uheeheeheehee! Oh right. I'll be totally honest, I'm still not entirely sure what the exact 'winning conditions' are for Floor Sweeper. The stage layout doesn't seem to be any different, so I can only guess the 'hard mode' involves getting a higher score, but I've never been able to figure out what it is exactly (or, for that matter, what it was back on the normal mode).  Jya-jya-jyaan! Yeah even the shifty shopkeep (who I am still convinced just wanted me to clean his floors) says that, it doesn't seem as charming here. But anyway, four masks! Let's go to Hell! Or, rather,  RETSU GO TSU HERU! Last edited by SpoonyBardOL; 11-27-2017 at 07:06 PM. |
|
#148
10-31-2011, 06:43 PM
|
|||
|
|||
 Music: Virtual Hell Virtual Hell, as a bonus stage, is not too bad. It's probably a bit tougher than McGuiness's Domain, though is still pretty tame compared to anything from the first SNES game. Anyway, it's new enemy time.  Name: Restful Spirit Profile: You would think Hell would be full of restless spirits, but these guys are oddly content. So content they're actually sleepwalking! And sleep-attacking and sleep-axe-throwing. But that's just how content they are. Some people can sleep anywhere!  The stage feels kind of similar to the Hell stage in the first Wai Wai World game, I guess it's not surprising they'd share a similar aesthetic. But it's not like we're going to run into Fuuma here, I mean, what are the odds of having a cameo in an action stage?! There's also a persistent glowing on the bottom of the screen throughout the stage, which you can barely see in the screenshots. It's just a faint, pulsating red glow.  Aristotle vs... MASHY SPIKE PLATES! Yes, being crushed by one of these is insta-kill, and to make matters worse you can't jump over them without taking damage either, since it's impossible to clear them without landing on them. Mmmmaybe Sasuke could do it, I never gave it a proper test, but it'd be damn close.  I'm not sure if my pipe or the spike plate got the Restful Spirit in that middle image, but it's sure as dead one way or another. New enemy sighted!  Name: Ghost of Crunch Muncher Profile: Every single Crunch Muncher that Goemon and the others destroyed in their quest is now here in Hell waiting to get revenge. And have been turned into flaming skulls for some reason. And despite the fact they were soulless robots to begin with. The afterlife is weird like that. Nevertheless, Ghost of Crunch Muncher behaves just like Crunch Munchers did in life, jumping up out of pits. It's just that now they do it on fire.  They die to a basic pipe-thwack like most other enemies. Along the way a Restful Spirit is kind enough to drop a Fortune Doll for some upgrading times. By now it should be obvious I never bothered to stock back up on golden armor after the final battle. Well basically I forgot I'm too awesome to need it.  Ghost of Crunch Munchers can be pretty easily dispatched from below if you jump at the right moment and swing upward. One was so impressed by Goemon's aerial acrobatics that it dropped a Fortune Doll for him. The Chain Pipe is the best pipe.  I love it when stage hazards are hazards to enemies too. I hate it when enemies in other games just casually walk on spikes, or survive being crushed.  If Ganbare Goemon 2 had the less-friendly jumping physics of the first SNES game then jumping these pillars might actually be challenging.  The spinning tops return. This makes their, what, third appearance? Pretty good longevity for a set piece in this game.  This time the tops throw us a curve ball by having more than one on a single stretch of rope. If you're not quick enough you'll miss your chance to jump to the next top. Once they hit each other they turn back around immediately.  It gets even more fun when you have to contend with enemies at the same time. Well folks, there it is, the very last new enemy in the game. I think it deserves a profile of particular eloquence and enormity to celebrate the very last of the game.  Name: Flaming Bat Profile: It's a flaming bat. Beautiful.  The final stretch of this section of the stage seems to take a page from the Runaway Snowman's Head book, in that you're giving the task of contending with a lot of enemies at the same time as needing to make a precise jump. At least the top isn't shrinking. Goemon's chain pipe can clear several enemies at once, though, so dealing with this many enemies that can be one-shotted isn't as bad as it was when we just had Sasuke. Last edited by SpoonyBardOL; 11-27-2017 at 07:08 PM. |
|
#149
10-31-2011, 06:44 PM
|
|||
|
|||
 Goemon couldn't get off that top any faster. It's hard to see in the screenshots, but as we progress through the stage the glowing effect coming from the bottom of the screen got more and more intense. In this section it even causes glitches in sprites when the glow is at its most intense. Though I have no way of knowing if this is something that happened on the legit cart, or if it's an emulation bug.  More graphical glitches. And we see yet another new stage hazard, periodic flame pillars. At least the bonus stage isn't being skimpy with variety.  The flame pillars are just fast enough to give you a very short window of opportunity to make your jumps in this section.  One final Flaming Bat decides to pester Goemon. That's the last we'll see of them. Farewell, o final enemy mook!  Well no, the stage isn't quite done yet. The purpose behind the gradual increase in the intensity of the glow is revealed, the final part of the stage has you climbing to escape the rising flames! But first I grab a Golden Fortune Doll, no need to be at a scant 3 bars of life if I can help it!  The flames don't wait around and start rising immediately, and quickly. As long as nothing holds you up, you should be fine.  And as long as you don't do something stupid like go for that Money Box, which might as well have Admiral Ackbar's face painted on it.  Some Mr. P'Tooie's try to get in our way, but they're not even worth slowing down for. And here we see an eternal plague on 2D stage design, the zig-zag corridor. Especially annoying in auto-scrolling/moving hazard stages. Zig-zagging stage design is pretty basic, and used everywhere. But what kind of monster would force the player to run zig-zags through a stage when you're trying to make good time for one reason or another?  ...Oh. Yeah this is one of my stages from Super Talking Time Bros, but I swear it's not as bad as it looks in screenshot form!  There's no taking a breather from the rising flames, even when it seems like you get ahead of it for a moment, it catches up immediately after.  The stage gives us a choice of paths near the end, taking the left-most path here is a time-saver.  As it is here too.  Ignore the fact that the last screenshot of the previous image and the first one here are identical. It's nothing.  And here we are, the final section of the bonus stage. Y'know, there's something about exiting a castle-like area to an outer balcony where we climb diagonally up to the left under a moon-lit sky that seems kind of... familiar. Hmmm...  Hey look, a series of power-ups inside the hallway. Hmmmmmmmmmmmm.... Last edited by SpoonyBardOL; 11-27-2017 at 07:10 PM. |
|
#150
10-31-2011, 06:48 PM
|
|||
|
|||
 Oh look, a coffin and a bat. ...wait.  Music: Dracula Oooookay. Y'know, I remember hearing this for the very first time and initially being psyched. I mean, the music starts off with the opening BGM of the first Castlevania game. Aaaaaand then it goes right back into the game's standard boss BGM, ruining any possible menace the fight could have had. It's so absurd, it's kind of hilarious.  Anyway, Drac fights pretty much identically to how he does in the first Castlevania game. He disappears, reappears, opens his cape and fires three projectiles at the player, disappears again, and his painfully-obvious weakpoint is his ugly blue mug.  Unlike the battle in the first Castlevania game, though, we're playing as an agile hero that can run circles around this basic attack pattern. Goemon can duck and crawl for chrissakes.  If you're paying even the slightest bit of attention then the most likely damage you'll receive in this fight would be from Dracula appearing right on top of you, rather than from his actual attacks.  And this right here is the fight in a nutshell, really. Something appropriate about Goemon having his whip-like chain pipe for the battle, though.  I get a bit impatient near the end and take a stupid hit, but no matter. Dracula is smited!  He erupts into a swarm of green bats and fly off. Hmm, I wonder, if we're in hell now and we just killed Dracula, did we only just send him back to the real world? Maybe this is how Drac keeps bypassing his own 'resurrect once a century' rule in all those Castlevania games. Way to go, Goemon.  Wait, there's more! Perhaps Dracula has a second form after all?  Nnnnnnnope, it's just Kabuki. He exclaims that he's back, and starts attacking. I guess it's appropriate, since he did say back in Area 2 that he'd see us in hell, or something like that.  Unfortunately there is absolutely nothing new to show you in the Kabuki fight, it plays out identically to the fight in Area 2. He just gets a rematch because someone on the game's staff must've thought it would be funny.  He says it was nice to have a chance to recieve this dream (???), and says 'Later', and then explods. Kabuki is a confusing individual, but I'm sure Goemon and the others will never see him again.  With Kabuki's defeat the trip through Virtual Hell properly ends, and the girl outside congratulates Goemon. She also expresses surprise that Kabuki returned, but shrugs it off just as quick. And that, folks, is that. There's no special reward for beating Virtual Hell, it's just a fun little post-game diversion. I guess they wanted to give the player something extra to do, since the game pulls a bit of a dick move:  Goemon's standing on the 'final battle' stage, but cannot enter it. Much like the fortresses throughout the game. No combination of buttons, that I've tried, will work. You can re-enter McGuiness's Domain, but upon reaching the end of the stage you're just punted back to the world map instead of entering the final battle. This means the final boss and ending can only be done once on a save file. Ganbare Goemon 3 and 4, I'm pretty sure, do the same thing. So yeah, it's kind of a dick move to cut off the final boss and ending once you've beaten the game. Since I covered my thoughts about the game in the last update, I suppose I have to leave it at that! So, hopefully in a couple of months (early next year most like) I'll start an LP for what I think is the best game in the series on the SNES, and one we really missed out on by not getting back in the day, Ganbare Goemon 3 - Shishijurokube no Karakuri Manji Gatame. What on earth does that title translate to? Find out, whenever I actually start! See ya'll then! Last edited by SpoonyBardOL; 11-27-2017 at 07:11 PM. |